🕓 Timeframe: 4H | ⚠️ Bias: Bearish From Supply Zone
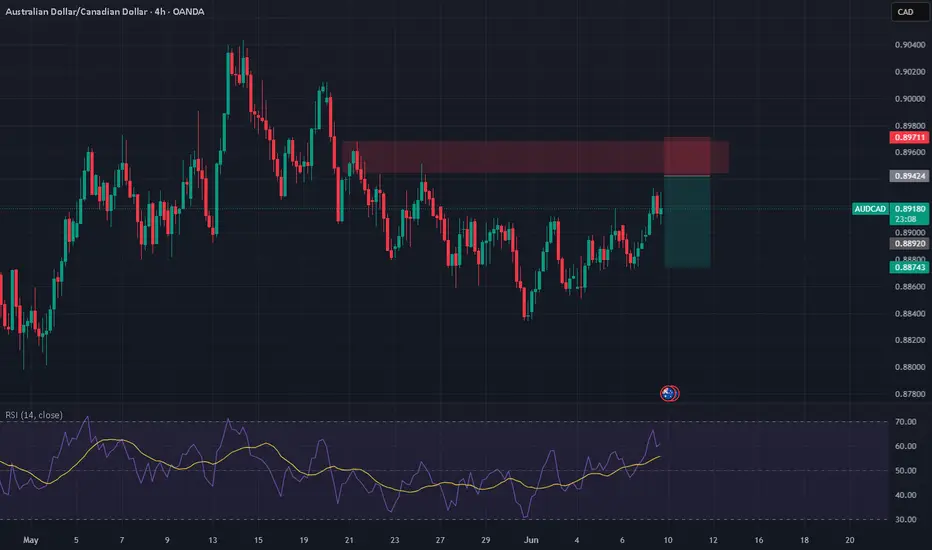
AUDCAD is rejecting the 0.8940–0.8960 supply zone, a key resistance that's been respected multiple times. With RSI turning over near overbought and CAD fundamentals improving, this looks like a clean short opportunity.
📊 Technical Confluence
🔴 Resistance Zone: 0.8940–0.8960 (historical supply zone)
📉 Bearish Structure Intact: Still in a broader HTF downtrend (lower highs)
⚠️ RSI Divergence: Slowing near 62, suggesting momentum exhaustion
🕯️ Price Action: Current candle showing indecision – early signs of rejection
🌍 Fundamental Confluence
🇦🇺 AUD Weakness:
RBA paused rates, inflation easing → Dovish
AUD overextended after sentiment shift (conditional score ↑ too fast)
AUD vulnerable if sentiment shifts risk-off
🇨🇦 CAD Strength:
BoC holding firm on rates, hawkish tone
Oil production recovering → CAD-positive
COT net long position + seasonal strength
🎯 Trade Plan
📍 Entry: 0.8940–0.8955 (on bearish confirmation: engulfing/pin bar)
🛑 Stop Loss: 0.8975 (above resistance zone)
🎯 Take Profit 1: 0.8870 (mid-range)
🎯 Take Profit 2: 0.8830 (into demand zone)
⏱️ Optional: Partial entry now, scale in at 0.8960 if tapped
🧠 “Don’t chase the move. Sell the retest when momentum fades and fundamentals align.”
Trade closed: target reached
🎯 Trade Recap – Target Reached on AUDCADExecuted a short position from the well-defined supply zone (0.8940–0.8960) after spotting clean rejection candles on the 4H.
🔻 Confluences for Entry:
Technical: Strong resistance + bearish engulfing
RSI: Rolling off near 60, confirming loss of bullish momentum
Fundamentals:
• AUD overstretched on weak macro backdrop
• CAD supported by oil and BoC’s hawkish tone
• Risk sentiment neutral, favoring CAD stability
📉 Result: Price followed through perfectly, respecting both structure and momentum. Target was hit with clean precision and no drawdown.
✅ Lesson: Patience at key levels pays. When technicals and fundamentals align, the trade often takes care of itself.
Disclaimer
The information and publications are not meant to be, and do not constitute, financial, investment, trading, or other types of advice or recommendations supplied or endorsed by TradingView. Read more in the Terms of Use.
Disclaimer
The information and publications are not meant to be, and do not constitute, financial, investment, trading, or other types of advice or recommendations supplied or endorsed by TradingView. Read more in the Terms of Use.