Trend Reversal Confirmed – AUD/NZD Eyes 1.0835 and 1.0795...
📉 AUD/NZD – Trend Breakdown & Bearish Continuation Setup
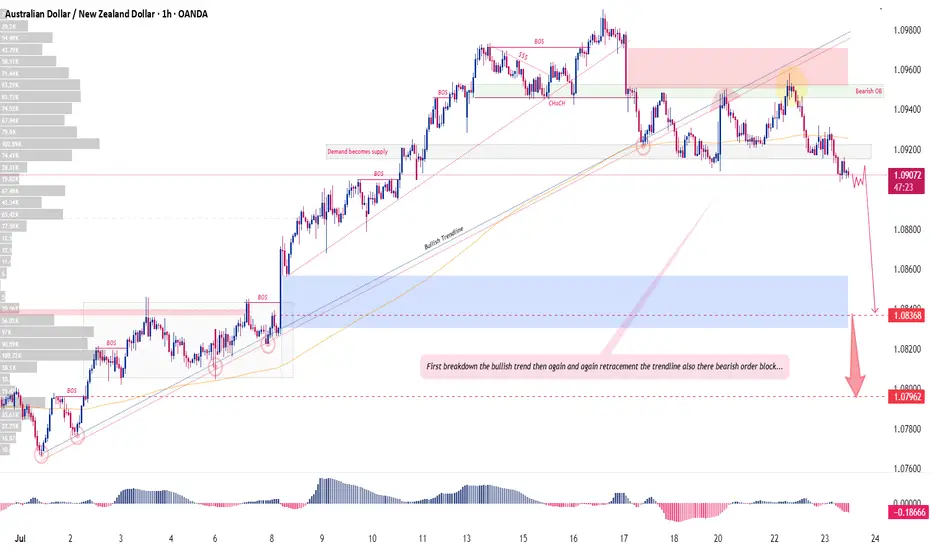
AUD/NZD has formed a clear top structure, with the first signs of weakness appearing on the lower timeframes, where price initially broke trend and formed a series of bearish candles.
That weakness evolved into a full breakdown of the bullish trend with multiple strong bearish candles, followed by a decisive break below the 200 EMA — confirming a shift in market structure.
After the breakdown, price retraced back to the broken trendline, which now acts as resistance. This area also aligns with a bearish order block, and the previous demand zone has flipped into supply, forming a powerful confluence zone.
📊 Volume is increasing on the sell side, signaling strong bearish pressure. This move is backed by Smart Money behavior and trend structure alignment.
🎯 Technical Target Levels / Support Zones:
First Target: 1.0835
Second Target: 1.0795
As long as price stays below the EMA and order block zone, the bearish momentum remains strong.
🚨 This is not financial advice. Always use proper risk management and trade with discipline.
💬 Like, comment & follow for more Smart Money and price action-based setups. Congrats to those already in the trade!
💲𝗙𝗢𝗥𝗘𝗫 < 𝗚𝗢𝗟𝗗 > ₿ 𝗕𝗧𝗖 || Real Trades, Real Results 🧿 || 🚨 VIP Signals {My Personal Entries} 🔗Join Telegram – Trade smarter. t.me/DollarsMagnet1
Premium Channel For Gold Trading.
t.me/iTradeDollar
Premium Channel For Gold Trading.
t.me/iTradeDollar
Related publications
Disclaimer
The information and publications are not meant to be, and do not constitute, financial, investment, trading, or other types of advice or recommendations supplied or endorsed by TradingView. Read more in the Terms of Use.