CHFJPY recently bounced from what seemed like a perfect support level. Many likely saw this as a buy signal. But when the price failed to make a new high, it sent a clear warning: the correction isn't over yet.
This analysis dives into why that first bounce was a trap and where the next institutional levels are waiting below—the ones with the real fuel for the next major move up.
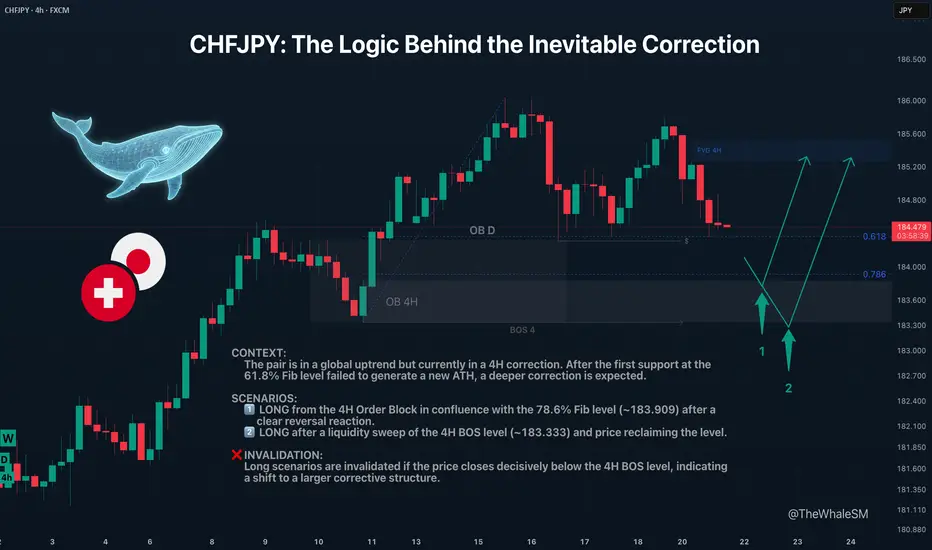
The CHFJPY pair continues its long and strong global uptrend. However, the market cannot move in one direction indefinitely without pullbacks; sooner or later, corrections occur. Large capital, or "Whales," who are the most important market participants, need to refuel with liquidity to continue their advance and to shake off piggybacking competitors. Right now, CHFJPY is in a 4H structure correction.
The first target for this correction was the 61.8% Fib level and a daily order block. The price did show a reversal reaction from them, but it lacked enough liquidity to create a new ATH, and the price continued its corrective movement. The next target for the correction will be the 78.6% Fibonacci retracement level at ~183.909, in conjunction with a 4H order block. This move will also sweep liquidity from the low of July 16th.
Two Potential Long Scenarios
~~~~~~~~~~~~~~~~~~~~~~~~~~~~~~~~~~~~~~~~~~~~~~~~~~~~~~~~~~~~~~~~~
The principles and conditions for forming the manipulation zones I show in this trade idea are detailed in my educational publication, which was chosen by TradingView for the "Editor's Picks" category and received a huge amount of positive feedback from this wonderful, advanced TV community. To better understand the logic I've used here and the general principles of price movement in most markets from the perspective of institutional capital, I highly recommend checking out this guide if you haven't already. 👇

P.S. This is not a prediction of the exact price direction. It is a description of high-probability setups that become valid only if specific conditions are met when the price reaches the marked POI. If the conditions are not met, the setups are invalid. No setup has a 100% success rate, so if you decide to use this trade idea, always use a stop-loss and proper risk management. Trade smart.
~~~~~~~~~~~~~~~~~~~~~~~~~~~~~~~~~~~~~~~~~~~~~~~~~~~~~~~~~~~~~~~~~
If you found this analysis helpful, support it with a Boost! 🚀
Have a question or your own view on this idea? Share it in the comments. 💬
► Follow me on TradingView to get real-time updates on THIS idea (entry, targets & live trade management) and not to miss my next detailed breakdown.
~~~~~~~~~~~~~~~~~~~~~~~~~~~~~~~~~~~~~~~~~~~~~~~~~~~~~~~~~~~~~~~~~
This analysis dives into why that first bounce was a trap and where the next institutional levels are waiting below—the ones with the real fuel for the next major move up.
The CHFJPY pair continues its long and strong global uptrend. However, the market cannot move in one direction indefinitely without pullbacks; sooner or later, corrections occur. Large capital, or "Whales," who are the most important market participants, need to refuel with liquidity to continue their advance and to shake off piggybacking competitors. Right now, CHFJPY is in a 4H structure correction.
The first target for this correction was the 61.8% Fib level and a daily order block. The price did show a reversal reaction from them, but it lacked enough liquidity to create a new ATH, and the price continued its corrective movement. The next target for the correction will be the 78.6% Fibonacci retracement level at ~183.909, in conjunction with a 4H order block. This move will also sweep liquidity from the low of July 16th.
Two Potential Long Scenarios
- SCENARIO 1: Entry from the 78.6% Fib Level & 4H Order Block
The first long entry scenario will be triggered by a clear reversal reaction from this support confluence.
► Setup Condition: Price must reach this zone, mitigate the order block, and close decisively above the 78.6% level, showing strength. An entry will require LTF confirmation (a BOS or the beginning of LTF order flow).
► Invalidation: If the 78.6% level is broken and the price closes below it, this scenario is invalid. In this case, the 4H order block itself will act as liquidity, and an attack on the 4H structure's break level (BOS 4) will likely occur. - SCENARIO 2: Entry After a Deeper Liquidity Sweep
This path becomes active if the first scenario fails.
► Setup Condition: A liquidity sweep with a candle wick below the 4H BOS level (183.333), with the price then closing back above this level. The final confirmation would be the start of a new order flow on a lower timeframe.
► Invalidation: A decisive close below the 4H BOS level will invalidate all long scenarios and will signal that the correction is shifting to a higher timeframe structure.
~~~~~~~~~~~~~~~~~~~~~~~~~~~~~~~~~~~~~~~~~~~~~~~~~~~~~~~~~~~~~~~~~
The principles and conditions for forming the manipulation zones I show in this trade idea are detailed in my educational publication, which was chosen by TradingView for the "Editor's Picks" category and received a huge amount of positive feedback from this wonderful, advanced TV community. To better understand the logic I've used here and the general principles of price movement in most markets from the perspective of institutional capital, I highly recommend checking out this guide if you haven't already. 👇
P.S. This is not a prediction of the exact price direction. It is a description of high-probability setups that become valid only if specific conditions are met when the price reaches the marked POI. If the conditions are not met, the setups are invalid. No setup has a 100% success rate, so if you decide to use this trade idea, always use a stop-loss and proper risk management. Trade smart.
~~~~~~~~~~~~~~~~~~~~~~~~~~~~~~~~~~~~~~~~~~~~~~~~~~~~~~~~~~~~~~~~~
If you found this analysis helpful, support it with a Boost! 🚀
Have a question or your own view on this idea? Share it in the comments. 💬
► Follow me on TradingView to get real-time updates on THIS idea (entry, targets & live trade management) and not to miss my next detailed breakdown.
~~~~~~~~~~~~~~~~~~~~~~~~~~~~~~~~~~~~~~~~~~~~~~~~~~~~~~~~~~~~~~~~~
Note
UPDATE: CHFJPYThe 78.6% Fibonacci retracement level was reached, but the price fell just short of the order block, so it was not mitigated. Thus, the condition for the setup to form was not met. The reaction came from the FVG located just above this order block.
Now let's look at the additional context that has appeared thanks to the price movements over the last couple of days. We now have a hint of the beginning of a bearish order flow. This is manifested in the price's consecutive reactions from two order flow-generating elements: the OB #1 order block and the 4H FVG above. The price has now mitigated the new OB #2. If there is a bearish reversal reaction from it, this will confirm the continuation of the correction.
It's important to understand that I've highlighted the order blocks above only to better gauge the potential for a continued correction towards our expected POI levels. As I mentioned in the How "Whales" Manipulate Markets guide, all manipulations against the primary trend are invalid and will, in most cases, serve as liquidity. Therefore, one should certainly not consider any shorts from them in this case. The bearish OB #2 can easily be broken by the force of the main uptrend. If this happens, the price will likely create a new ATH, and these long scenarios will become invalid. For the next opportunity to enter in continuation of the trend, we would need to wait for the next correction.
For now, I am waiting to see how events unfold on this pair based on the price reaction to OB #2.
Note
UPDATE: CHFJPYThe price on CHFJPY has broken through the OB #2 order block, but it did not fully shift the local structure to bullish. This turned out to be a fake BOS, and the order block itself acted as liquidity in this case, which, as I mentioned earlier, happens constantly with manipulation zones that form against the primary trend. The 1-hour timeframe provides a more detailed picture. After sweeping the liquidity above this order block, the price also swept the Asian session high, which increases the probability of it now sweeping the session's low and continuing a deeper correction towards our expected zones.
Both long scenarios remain valid, but I now consider the first scenario to be weaker. This is because the price has already mitigated the FVG above the 4H order block, and the 78.6% Fib level has already produced a reaction. But as usual, I will act based on the actual price interaction with the POIs.
Note
UPDATE: CHFJPYFor the setup in the first long scenario to form, the price fell just short of reaching the 4H order block; the reversal occurred from the FVG above it in conjunction with the 78.6% level. However, there was no proper entry there, as the price sharply bounced from that level and got stuck in a range, which it then broke out of to the upside quite quickly, again offering no entry point.
Since the price came very close to the OB (by mitigating the FVG) and subsequently formed a new swing structural element, I now consider that order block to be invalid. (Large capital has likely already closed its losing positions there, and there is no reason for them to return the price for that purpose). Consequently, I am no longer considering Scenario 1, even if the price returns to that area next week without creating a new ATH.
As long as the ATH is not decisively broken, Scenario 2 remains valid. However, in place of the invalidated Scenario 1, a new potential long setup has emerged, which I've labeled Scenario 0. This would be an entry on a return to mitigate a new 1-hour order block located within the recent range.
Related publications
Disclaimer
The information and publications are not meant to be, and do not constitute, financial, investment, trading, or other types of advice or recommendations supplied or endorsed by TradingView. Read more in the Terms of Use.
Related publications
Disclaimer
The information and publications are not meant to be, and do not constitute, financial, investment, trading, or other types of advice or recommendations supplied or endorsed by TradingView. Read more in the Terms of Use.