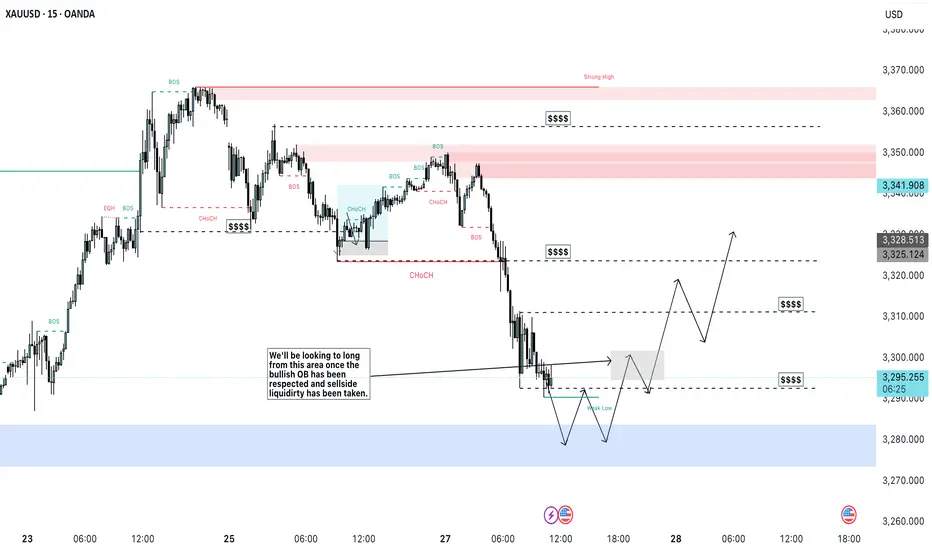
The market structure shows clear bullish and bearish Breaks of Structure (BOS) and Change of Character (CHoCH) zones.
• I am applying a liquidity sweep and order block entry model.
Market Structure Overview
• The chart starts with a bullish rally, followed by multiple BOSs to the downside, indicating a bearish market structure.
• Then, there’s a shift as CHoCH occurs — a Change of Character, often marking the beginning of a potential bullish shift.
• A recent CHoCH is marked near the bottom, signaling a potential reversal point.
Liquidity Concepts
• Sell-side liquidity was taken at the recent low (indicated by liquidity grabs marked with “$$$$”).
• The blue zone at the bottom represents a bullish demand zone / Order Block (OB) where liquidity has been swept and the price is expected to react bullishly.
Order Blocks & Zones
• The large red and pink areas at the top are Bearish Supply Zones / Bearish Order Blocks.
• The blue zone at the bottom is the Bullish Order Block the trader is focusing on for a potential long entry.
• A note on the chart says:
“We’ll be looking to long from this area once the bullish OB has been respected and sellside liquidity has been taken.”
Anticipated Price Action
• A projected path is drawn showing price forming a higher low, then breaking structure to the upside.
• The trade idea is to go long after the demand zone is respected and a new BOS to the upside confirms bullish intent.
• The path includes retracements and BOSs, indicating a bullish structure shift.
• Target zones are marked above, with areas of interest around $3,310, $3,325, and higher into the $3,340–$3,350 zones.
Key SMC Concepts Used
• Break of Structure (BOS): To confirm trend direction shifts.
• Change of Character (CHoCH): To signal potential reversals.
• Liquidity Sweeps: To trap retail and create institutional entries.
• Order Blocks (OB): Institutional demand and supply zones.
• Market Structure Shift: After liquidity is taken, the market shifts in the opposite direction.
Summary of the Setup
• Bias: Bullish, contingent on the bullish order block holding.
• Trigger: CHoCH and BOS to the upside from the OB zone.
• Entry Area: Around $3,280–$3,293 (blue zone).
• Targets: $3,310, $3,325, and potentially higher into supply at $3,341–$3,350.
• Invalidation: Break and close below the blue OB zone would invalidate the bullish setup.
Disclaimer
The information and publications are not meant to be, and do not constitute, financial, investment, trading, or other types of advice or recommendations supplied or endorsed by TradingView. Read more in the Terms of Use.
Disclaimer
The information and publications are not meant to be, and do not constitute, financial, investment, trading, or other types of advice or recommendations supplied or endorsed by TradingView. Read more in the Terms of Use.