Audjpydaily
Audjpy short opprotunity Cypher pattern are complete on 86.55 level and ,, 86.56 level are also important previous support and resistant level ,, , when cypher pattern complete at 86.57 and see price action ,, then sell from that level and tp 1 is 85.25 tp 2 is 84.85 tp3 84.45
good luck

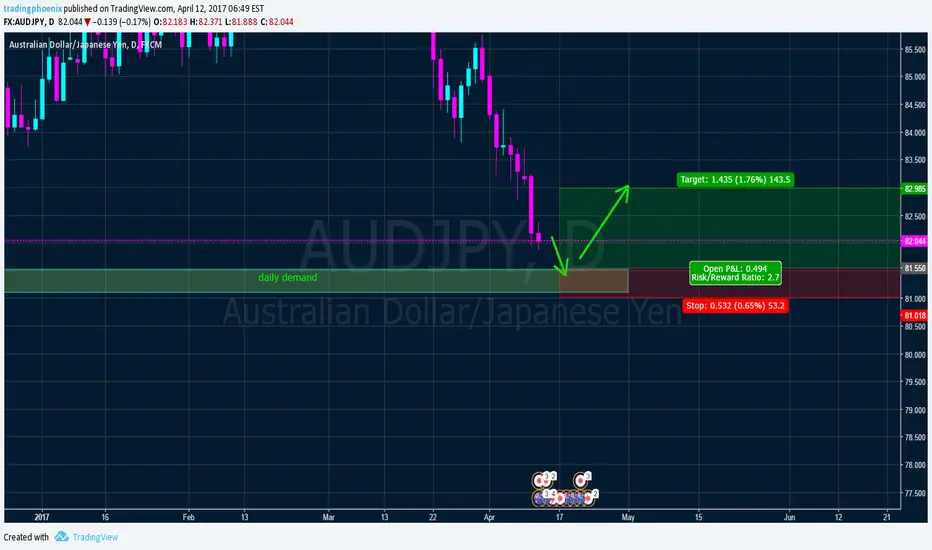
Long AUDJPYHi guys,
I am looking for a potential setup on AUDJPY. Looks like we have reached a strong support level, so maybe time to reconsider the longs. Waiting for price action confirmation

AUD/JPY dropped perfectly towards profit target, remain bearishSell below 85.75. Stop loss at 86.51. Take profit at 83.87.
Reason for the trading strategy (technically):
AUDJPY dropped absolutely perfectly once it reached our selling area and is close to our profit target. We remain bearish below 85.75 resistance (Fibonacci retracement, horizontal pullback resistance, Fibonacci extension) to play the continued drop to at least 83.87 support (Fibonacci extension, horizontal support).
Stochastic (55,5,3) has turned down from our 96% resistance level perfectly and has good downside potential

AUDJPY False Break of 85.35 Triggers Selling OpportunityWe looked at the AUDJPY on Thursday of last week. At the time the pair was trading just below the 85.35 handle, a level that’s served as a pivot since the new year began.
The idea was to watch for a sell signal from new resistance. However, Thursday closed at 85.51, which canceled out any notion of shorting the cross. I wasn’t interested in buying the pair on the break given the velocity of the 300 pip decline the week before.
By the close of Friday’s session, the AUDJPY had fallen back below 85.35. The drop was so severe that sellers nearly carved out a bearish engulfing candle. But Thursday’s apparent false break of 85.35 serves as a bearish signal just the same.
From here any retest of the 85.35 area is likely to encounter an influx of selling pressure. The next key support comes in at recent lows at 83.80. A daily close below that would expose the 82.50 handle.
Keep in mind that the AUDJPY will also be at the mercy of Tuesday’s RBA decision.

AUDJPY Takes on 85.35 as New ResistanceWe discussed the AUDJPY exactly one week ago. At the time the pair had just broken support at 85.35 and looked determined to test the next key support at 83.73. With this in mind, we were watching for a selling opportunity on a rotation back to new resistance.
Unfortunately, that retest never came. But the pair did reach a low of 83.81 this past Tuesday, just 8 pips above the December 2016 low of 83.73.
Although we didn’t get an immediate retest, the past few sessions have produced something even more appealing. Since bottoming earlier in the week, the AUDJPY has carved out a rounded retest – something that is often more effective than an immediate retest of a broken level.
Now, because Tuesday’s low triggered a bullish engulfing candle, I’m inclined to wait for a sell signal from 85.35. More specifically, I need to see a long upper wick on the daily time frame. This would indicate that sellers are willing to make a stand at 85.35, which is now resistance.
Otherwise, a daily close back above the level would negate the somewhat bearish outlook. And I certainly don’t want to step in front of this market if buyers intend to reclaim the 85.35 handle.
Should we get a favorable sell signal from the 85.35 region, the next key support comes in at 83.80. A daily close below that would expose the mid-November highs from last year at 82.50.
For now, the jury is still out on whether the AUDJPY is likely to turn lower after Tuesday’s bounce or continue higher.

AUDJPY Breaks Key Support, Targets 83.73The AUDJPY appears to have broken a key support level. The 85.35 handle has been a critical factor for the pair since the start of 2017 and yesterday’s close at 85.32 should continue to attract selling pressure.
But as you may well know, what we sometimes think are precise levels are instead areas of support or resistance. So yesterday’s close being just 3 pips below 85.35 leaves me too skeptical to do anything at the moment.
Also, the yen cross is now 140 pips below the mean as measured by the 10 and 20 EMAs. With this in mind, I’d rather wait for a more convincing close below 85.35 followed by a retest of the area as new resistance.
The next key support level comes in at the December 29th low of 83.73. This area also attracted a bid in late November and early December of last year. A close below 83.73 would expose the mid-November highs at 82.50.
Right now the technical landscape for the AUDJPY is favorable, to say the least. The pair has been respecting the key levels mentioned above, and the recent breakdown presents a potential selling opportunity.
But perhaps even more favorable than the levels is the fact that other risk-sensitive pairs are showing signs of weakness. Some of the best trades can occur when the yen pairs begin to move in tandem.
Look no further than the rally that ensued from the November 9th U.S. elections.

AUDJPY Sell at 86.8Hi traders!I hold a point:Good charts does not need more words to explain! Good luck!

AUDJPY remain bullish above strong supportBuy above 86.17. Stop loss at 85.80. Take profit at 87.17.
Reason for the trading strategy (technically):
We remain bullish above 86.17 support (Fibonacci retracement, horizontal swing low support) where we expect a bounce from to at least 87.17 resistance (Fibonacci retracement, horizontal pullback resistance).
Stochastic (55,5,3) is seeing strong support above the 10% level where we hope to see a further bounce from.

AUDJPY testing major resistance, prepare to sellSell below 87.40. Stop loss at 87.71. Take profit at 86.67.
Reason for the trading strategy (technically):
Price is testing major resistance at 87.40 (Fibonacci retracement, horizontal resistance, Fibonacci extension) and we expect a reaction from this level for a drop towards 86.67 support (Fibonacci retracement, horizontal overlap support).
Stochastic (21,5,3) is seeing major resistance at the 96% level.

AUDJPY profit target reached, time to turn bearishSell below 86.68. Stop loss at 87.10. Take profit at 85.90.
Reason for the trading strategy (technically):
Price made a bounce and reached our profit target perfectly yesterday. We now prepare to turn bearish below 86.68 resistance (Fibonacci retracement, Fibonacci extension, horizontal pullback resistance) for a further drop to 85.90 support (Fibonacci retracement, horizontal overlap support).
RSI (34) is seeing descending resistance hold price down.

AUDJPY right on strong support, time to buyBuy above 85.88. Stop loss at 85.34. Take profit at 86.72.
Reason for the trading strategy (technically):
Price is now above major support at 85.88 (Fibonacci retracement, horizontal pullback support) and we expect to see a bounce from here to at least 86.72 resistance (Fibonacci retracement, horizontal pullback resistance).
RSI (34) is seeing strong support above the 32% level where we expect a bounce from.


AUDJPY profit target reached perfectly, prepare to turn bearishSell below 87.48. Stop loss at 87.80. Take profit at 86.39.
Reason for the trading strategy (technically):
Price bounced up perfectly and reached our profit target as expected. We now prepare to turn bearish below 87.48 resistance (Fibonacci retracement, horizontal overlap resistance, Fibonacci extension) for a push down to 86.39 support (Fibonacci extension, horizontal swing low support, Fibonacci retracement)>
Stochastic (21,5,3) is seeing strong resistance below the 97% level.

AUDJPY prepare to buy above major supportBuy above 86.34. Stop loss at 85.92. Take profit at 87.48.
Reason for the trading strategy (technically):
We prepare to turn bullish above major support at 86.34 (Fibonacci retracement, Fibonacci extension) for a push up to 87.48 resistance (Fibonacci retracement, horizontal overlap resistance).
Stochastic (21,5,3) is seeing strong support above our 6% level signalling a bounce is impending.

AUDJPY below strong resistance, turn bearishSell below 87.05. Stop loss at 87.56. Take profit at 86.076.
Reason for the trading strategy (technically):
We are bearish below 87.05 resistance (Fibonacci retracement, horizontal pullback resistance) for a push down to 86.07 support (Fibonacci retracement).
Stochastic (21,5,3) is seeing a nice reaction from the 95% level.

AUDJPY profit target reached perfectly, prepare to turn bearishSell below 86.72. Stop loss at 85.98. Take profit at 87.10.
Reason for the trading strategy (technically):
Price has reached our profit target perfectly from yesterday. We prepare to turn bearish below 86.72 resistance (Fibonacci extension, horizontal swing high resistance) for a push down to 85.89 support (Fibonacci retracement, horizontal overlap support).
Stochastic (21,5,3) is seeing strong resistance below the 95% level.

AUDJPY right above support, remain bullishBuy above 85.34. Stop loss at 84.97. Take profit at 86.08.
Reason for the trading strategy (technically):
We remain bullish above 85.34 support (Fibonacci projection, horizontal support) for a push up to at least 86.08 (Fibonacci retracement, horizontal pullback resistance).
Stochastic (21,5,3) is bouncing nicely above strong support at 5.5%.

AUDJPY profit target reached, time to go bullishBuy above 85.34. Stop loss at 84.97. Take profit at 86.08.
Reason for the trading strategy (technically):
Price reached our profit target for the 4th time in a row. We turn bullish above 85.34 support (Fibonacci projection, horizontal support) for a push up to at least 86.08 (Fibonacci retracement, horizontal pullback resistance).
Stochastic (21,5,3) is approaching strong support at 5.5%.

AUDJPY 2TAPIt might look like a 3TAP, but the last two taps happened within a week, so they are falls as individual taps. Volume on the last two taps did not break new highs, so support for breaking out long over 86.917 is weak. It's on my radar this week thinking it might go short soon.

AUD / JPY uptrend.There is an uptrend in AUD / JPY. Buy now at any price. Set TP as 86.980, SL - 85.290. This is a long trade. Just wait. It may take 1 day. You can give trailing stop after 86.200 as 50 points.

Audjpy Short On BreakoutAnalysis And Research
We Expect that if Aud/jpy crosses lower trend line then we will be happy to go short from that point unless right now it is in consolidation zone and lots of noise we can see onto this zone .
We will let it pass through all noise then we are gonna short it straight towards take profits @ Flag.

long AUDJPY @ 1h @ trading capability for this 52nd week `16This is only a trading capability - no recommendation !!!
Next week i`ll confirm or change my opinion about this SetUp :)
Buying/Selling or even only watching is always your own responsibility ...
Best regards
Aaron
