AUDJPY SELLWatching this pair for a healthily sell. Trend line resets plus ema rejection as well as rejection of the 50% fib. Multiple confluences to take a short here. Just waiting for price to come up top the purple box region and form some bearish candle sticks to take a short position here to ride it all the way down.
Tale partial profits.
430 PIP gain 7.5/1 RR
Audjpysetup

AUD/JPY Potential Short Idea | Trading Institutional Order FlowIf we see a pullback, back into the yellow box when the new week opens, I will be most likely looking to short AUD/USD to take out the equal lows created that are marked up. This looks like a pretty solid setup, with it being on the daily chart .
**Education Purposed Only**
- Will

Over 300 pips on this pairOn the daily, we've hit a strong resistance just like the highlighted areas and we see a potential short. I'll be taking this pair as soon as the market opens. Good luck this week!
If you like my analysis, please hit the like button to support.


AUDJPY Analysis: Price bounced from channel resistanceThe pair is following a falling channel in daily timeframe.
It bounced off from the channel resistance and is very likely to continue downwards.

[AUDJPY] 10th December 2019OANDA:AUDJPY
Short-term breakout and retest of the downward trendline + clear support level. :)
Looking for at least a little push up to the upper resistance level.
Keeping the stop loss just below the trendline.
Keep those losses at 1%!
Good luck

AUDJPY 15MHello Traders,
on this sell trade we have an initial target
of 8.8 pips and 2nd target set at 20 pips,
all with immediate momentum.
The stop loss is at the red line up high.
Best,
Jay

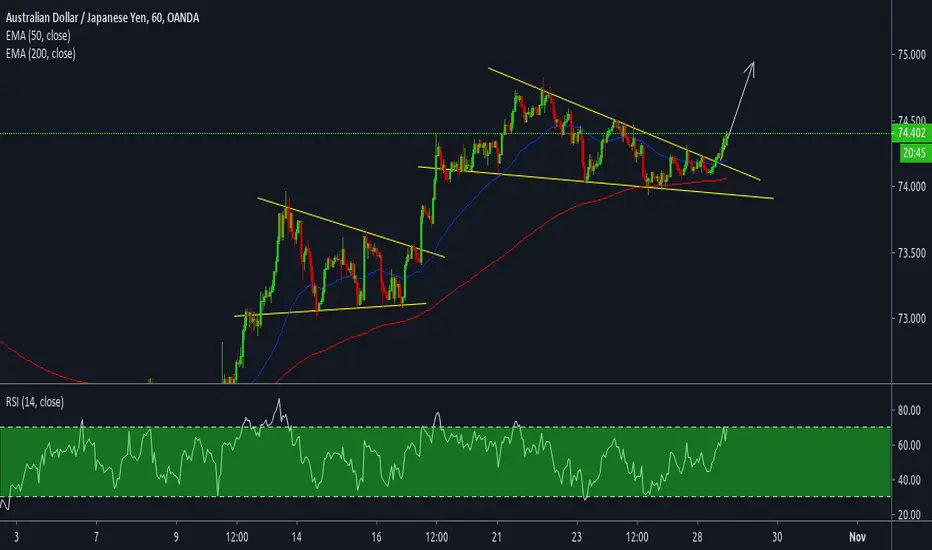
AUDJPY analysis: Next Big Move!AUDYEN has been in a downtrend channel since 2018. Price is currently in a bearish wedge, making a corrective movement. Here is what to watch out for next!!!

AUDJPY 15MHello traders!
This is a Tag&Go setup short, a sell stop order,
set and forget style is right on the red line at
73.662
The red circle is the stop and 1st and 2nd
targets are in green below.
Best,
Jay

AUDJPY 15MHello traders!
This is a Tag&Go setup short, a sell stop order,
set and forget style is right on the red line at
73.982
This is an update from yesterday, entry is higher now.
The red circle is the stop and 1st and 2nd
targets are in green below.
Best,
Jay

AUDJPY 15MHello traders!
This is a Tag&Go setup short, a sell stop order,
set and forget style is right on the red line at
63.885
The red circle is the stop and 1st and 2nd
targets are in green below.
Best,
Jay

AUDJPY 15MHello traders!
This short is a touch and go from the top of the Bollinger heading down.
Best,
Jay

AUDJPY 15MHello traders!
This is a sell at the red line, 1st target at the immediate
green circle and stop at the red circle above. Targets range
from 12 to 27 pips.
Best,
Jay

AUDJPY 15MHello traders!
This is the same kind of entry short as yesterday,
with the immediate trend.
The red circle is the stop and the 1st target is
anywhere near the green circle below.
Best,
Jay


AUDJPY 60MHello traders!
There is a sell opportunity between lines B and C for 20 pips.
This trade can be taken with a sell stop order as a set&forget setup.
It`s recommended to position stop no further away than 1:1 RR away from entry, although this
may vary with markets and volatility.
Best,
Jay

AUDJPY 240MHello traders!
In this trade we are looking for a momentum completion from line B to line D for 50 pips.
We also have a 25 pip target between lines B and C if price goes that way.
These trades can be taken with a buy stop order as a set&forget setup or we can wait for PA
to close above line B as with the T1 and T2 levels. In the case of the T3 level,
price blasted through too quickly to wait for a close above the line.
It`s recommended to position stop no further away than 1:1 RR away from entry, although this
may vary with markets and volatility.
Best,
Jay

AUDJPY Analysis: Price at a good entry levelPrice has been on the rise and following an ascending channel.
It just reversed from a strong resistance level and currently at the support line of the channel.
It is also currently at a horizontal support level.
I am not sure of the next move but I see two possibilities:
Scenario 1:
Price may continue to follow the channel and bounce off upwards to test the resistance again.
In this case we need to wait and confirm reversal to go long.
Scenario 2:
Price may break the support and continue downwards.
In this case we to wait and confirm a breakout in order to go short.
I would appreciate much to get your opinions on the pair in the comment section. If you agree with the analysis kindly hit the like button to show agreement.
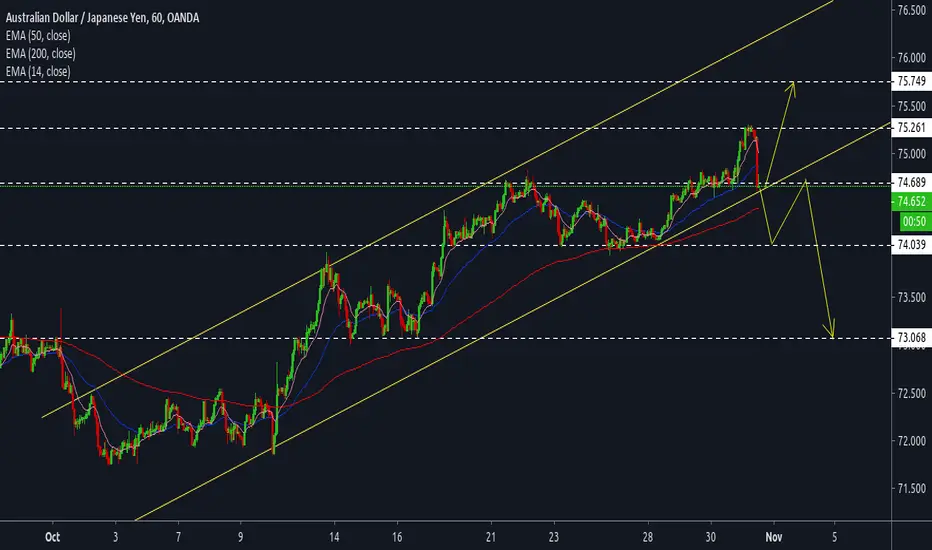
AUDJPY to climb from upside confirmation, potential bounce!
AUDJPY to climb from its upside confirmation at 74.550 where it could potentially bounce further to 76.200.
Trading CFDs on margin carries high risk.
Losses can exceed the initial investment so please ensure you fully
understand the risks.


AUDJPY: WEAK BUY SIGNALSIGNAL: LONG issued on 09/18/18.
TARGETS: Dashed gold lines with 1st @84.630 for an approximate 295 pips.
STOP: 78.675
Fib Extensions: 1 - 2.618 (Solid Blue lines)
Signal Strength: Weak. Watch for correction.
