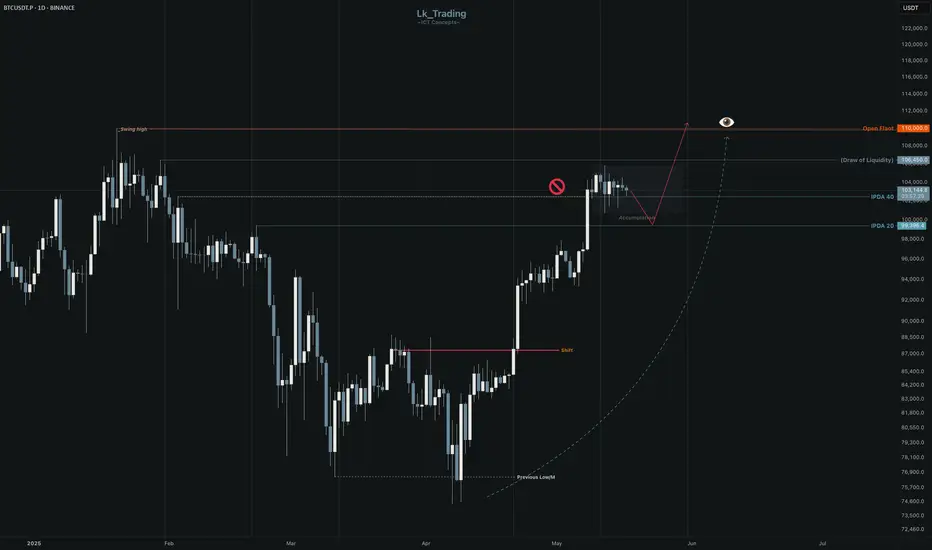
BTCUSDT.P
We are In Order Flow Bullish, But Now Is Re-Accumulation to continuo higher To Open Float Id DOL OF MMBM
Maybe Next week is Bearish Candle To Retracement (SSL/4D) if we are Rejected Is Good Entry Point Buy (100,624)
Ictconcepts

GBPJPY( British pound my banker!)Good day traders, I’m back with another idea on GbPJPY but this one is based on the strength and weakness of the pound itself. Before you ask what I mean…on this respective TF we had a break of structure higher(strength) but we saw price immediately move lower showing some weakness in price.
For the rest of the London session we can expect price to move higher on that volume imbalance to start the New York session. The rectangle is a balanced price range.
How to Master Premium & Discount For Better EntriesA lot of traders talk about premium and discount, but very few actually know how to use it properly. Most just draw Fibonacci tools on random legs and try to catch reactions at the 61.8% level. That kind of trading lacks structure and context. If you're serious about using Smart Money Concepts the right way, then you need to understand where value exists in the market and how to position yourself accordingly.
This guide is all about mastering the premium vs discount model using a 4H bias, entries on the 1H or 15M, and refinements based solely on Fair Value Gaps. No order blocks. No guessing. Just clean structure, displacement, and a focus on institutional logic.
Establishing a Valid 4H Dealing Range
Your entire analysis starts with the 4H chart. That’s where you define the dealing range, the leg of price that caused a significant shift in market structure, usually confirmed by displacement and a break of a previous swing.
To do this correctly:
Identify a 4H swing high to swing low (or low to high) that broke structure and created an imbalance.
Anchor your range from that swing point to the extreme, this becomes your dealing range.
Mark the 50% of this range — this is your equilibrium line.
Everything above this midpoint is premium, everything below is discount.
You’re not drawing fibs for retracement levels. You’re using them to separate cheap price from expensive price.
Premium vs Discount: Why It Matters
The logic is simple: institutions buy at discount and sell at premium. They don’t place large positions in the middle of the range, they accumulate when price is cheap and distribute when price is expensive.
Once you’ve marked out your 4H range, you now have a framework:
Price in discount (below the 50%) = potential buy setups.
Price in premium (above the 50%) = potential sell setups.
The key is to only look for trades in the right part of the range. If price is in premium and you're trying to long, you're working against smart money. If it's in discount and you're trying to short, you're fading accumulation.
Refining the Setup on 1H or 15M
Once price enters the zone you’re interested in, premium or discount. Drop to the 1H or 15M charts to look for entries.
But we’re not trading any structure or supply/demand zone. We’re only interested in Fair Value Gaps. Why? Because FVGs are the cleanest way to spot imbalance — they show where price moved too aggressively and left inefficiency behind.
Here's what to do:
Watch for displacement on 1H or 15M once price taps into the 4H premium or discount zone.
The move should break short-term structure and leave a clear FVG.
Wait for price to retrace into that FVG.
Entry is placed inside the gap, preferably in the upper or lower third depending on direction.
Your invalidation is the low or high of the displacement move.
The FVG gives you a clean risk-to-reward setup that is backed by structure, context, and smart money intent.
Example: Long from Discount
Let’s say price is trading inside the discount zone of a 4H bullish dealing range. You now drop to 15M and see a sharp move higher that breaks structure and creates a clean 15M FVG.
Now you wait.
If price retraces into that gap and shows some form of reaction (volume, reaction wick, or small lower timeframe shift), you have a valid long. The trade is high probability because:
It’s inside 4H discount
The 15M displacement confirms smart money is stepping in
The FVG is your refined entry zone
Target is always the next liquidity pool inside premium.
Example: Short from Premium
Opposite logic applies.
If price trades into the premium zone of a 4H bearish range, you drop to 1H or 15M and wait for displacement to the downside. When you get a strong bearish move that leaves behind a Fair Value Gap and breaks intraday structure, you mark the FVG.
When price retraces into it, you execute your short. Stop is above the displacement high. Target is the first liquidity level inside discount, such as an old low or a clean equal low.
Rules for FVG Entries (1H/15M)
To keep your execution sharp, stick to these:
Only enter FVGs that form from displacement moves.
The FVG must break intraday structure.
It must form inside the 4H premium or discount zone, no exceptions.
Avoid FVGs that form in the middle of the range or during chop.
Make sure higher timeframe context supports the direction.
This filters out 90% of weak setups and forces you to trade in sync with value.
Targets and Exits
Where you enter is based on imbalance and structure, but where you exit is based on liquidity and the premium/discount model in reverse.
If you long from discount, you should be targeting premium levels.
If you short from premium, you should be targeting discount levels.
More specifically:
Look for old highs/lows
Clean equal highs/lows
Unfilled FVGs in the opposite zone
This way, you’re always exiting into areas where the market is likely to reverse or stall, and not overstaying your trade.
Conclusion
Trading from premium or discount zones isn’t just a concept, it’s a framework that puts you in line with institutional activity. When you combine it with FVGs, you have a clean, mechanical way to structure your trades.
Keep your bias on the 4H. Mark your ranges clearly. Drop to 1H or 15M only when price is in a valid zone, and only take entries on FVGs that form from strong displacement. If you stay disciplined with this model, you’ll avoid chasing price and start trading from areas of true value.
___________________________________
Thanks for your support!
If you found this guide helpful or learned something new, drop a like 👍 and leave a comment, I’d love to hear your thoughts! 🚀
Make sure to follow me for more price action insights, free indicators, and trading strategies. Let’s grow and trade smarter together! 📈

CADCHF watch the drop!!Good day traders, I recently share an Idea on CADCHF and if you go back and see what was outlined and how I ended the description. I highlighted that price might manipulate higher but as long as the overall bias remains we still on!!
How I look at the markets is I like to cross reference different pairs and GBPCAD confirmed my bearish outlook and so did AUDCAD. Study this setup till Sellside liquidity 🙏🏽

EurGbp….‘CE of a balanced FVG’Good day traders, EurGbp has been on my watchlist for sometime now and I was hesitant because of the strength shown on DXY and that made me think we’d have a quiet day here yesterday.
With that been said the balanced price range is the grey rectangle shown on the chart and we can see that price showed a rejection by failing to close below the midpoint(CE). On the daily TF we are very much still bullish and till we shift structure lower on the daily TF, my overall sentiment remains. On the 4H TF we have a very bearish leg and from what we know price moves in a trend not a line so that also makes part of our thought process as well.

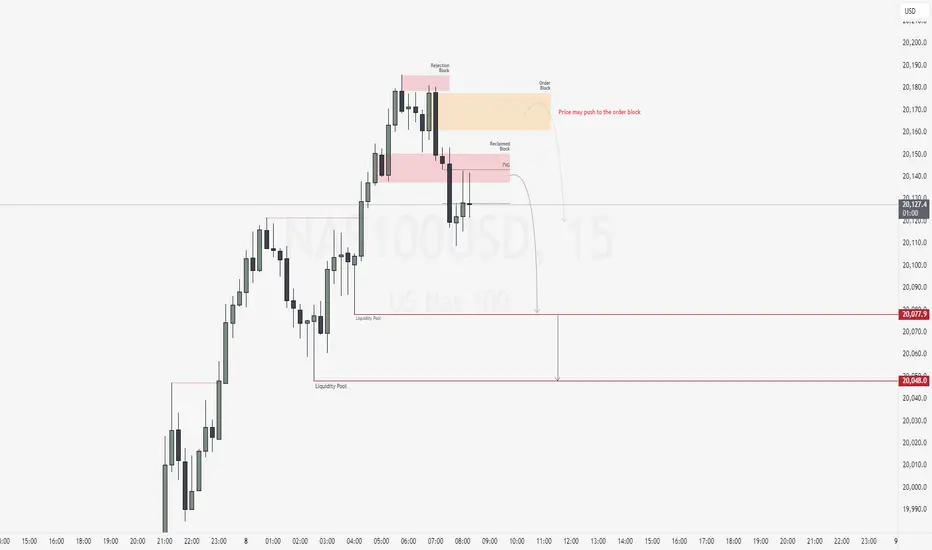
NAS100USD: Is this a False Break?Greetings Traders,
In today’s analysis on NAS100USD, we observe sustained bullish volatility, indicating that the institutional order flow remains decisively bullish. As such, our objective is to align with that momentum and seek opportunities to position ourselves accordingly.
Current Market Context:
Now entering the New York session, we can anticipate continued upward movement. A key technical development is the recent liquidity sweep—price action took out a set of sell stops, creating the appearance of a potential bearish break of structure. However, this movement aligns with a classic “Turtle Soup” scenario, where a false break is engineered to trap liquidity before the market resumes in its dominant direction.
Institutional Insight:
This sweep suggests that institutions have likely order paired against willing sellers, using their stops as entry liquidity. With that liquidity now absorbed and price rejecting lower levels, we look for bullish confirmations to join the smart money narrative.
Trading Focus:
We are now monitoring for lower-timeframe confirmation entries to validate bullish setups, ideally supported by institutional arrays or bullish order blocks that hold as support.
Let the market reveal the footprints of smart money—our role is to read and respond with discipline.
Regards,
The Architect

EurUsd…Daily FVG fill.Good day traders, I’m back with another setup but this setup is based on the GBPUSD setup I posted yesterday…go and look at it, to get the ideological.
To be honest I don’t think the drop in price to start the week was unexpected because of the strength shown last week on the DXY and on the idea I posted on GBpUSD I highlighted that last week XXX/USD pairs did not perform as the USD/XXX pairs. Which explains why we open with a bearish move lower and now I believe price is gonna do as I expected it on GBPUSD before taking liquidity but strength was too strong.
EurUsd on this respective TF we can see that it has been on a downward movement, and if we take a look at that healthy bearish leg. Price has left imbalances but the most visible one is the volume imbalance that I have shown you on the chart. For the rest of the day should price closer above the VI than I believe we can expect it to move higher till Thursday before DXY continues moving higher.

DXY MMBM confirmed - Bullish ThesisDXY exited the first stage distribution confirming we are bullish and in a marked maker buy model.
I expect CPI to retrace price and resume the bullish weekly trend afterwards.

GBPUSD…inverse FVGGood day traders I have a lot of great setups but I believe this one can be a big mover going into the new week.
1D- Before going into more details I hope the inverse FVG is visible because that’s the area of interest, for the most part of last week was bearish indicating that US dollar for the upcoming week might continue with the strength shown last week. Price has broken structure lower but the way it broke price is not in a convincing way so keep an open mind to manipulation but overall the inverse is our area of interest. Monday and Tuesday we can expect price to move higher first than make a run lower since last week the move did not match the USD/XXX moves.
4H- Here we saw market shift lower to be in sync with the daily solidifying our weekly price movement bias. Here I’m not gonna say much cause the idea is based of the daily TF.

USDJPY Smart Money Short Setup | 30m OB + FVG Reaction🧠 USDJPY 30m SMC Setup | May 9, 2025
We’ve got a high-probability short brewing as price taps the premium zone and aligns with multiple Smart Money Concepts. A clear Fair Value Gap (FVG) is sitting inside a bearish Order Block, with price aggressively wicking into it — right where institutions unload.
🔍 KEY CONFLUENCES:
🧱 Bearish Order Block rejection in premium
⚡ Fair Value Gap filled at 145.910
💰 Risk-to-Reward ~1:4+, targeting discounted zone
🧲 Liquidity sweep + FVG fill = SM distribution trigger
⏳ Entry timing aligned with NY session reaction
📊 Setup Specs:
Pair: USDJPY
Timeframe: 30 min
Entry: 145.910 (after FVG fill)
SL: ~146.246
TP: ~144.440
RR: Approx. 1:4.5
💡 Smart Money Logic:
Price filled a clean imbalance zone, ran liquidity from earlier highs, and instantly showed distribution behavior. If momentum confirms with a bearish break, this becomes a high-conviction short.
📈 Chart Ninja Note:
“FVG + OB is where the banks sell while the crowd buys… don’t be the crowd.”

NAS100USD: Discount Reversal & Bullish Continuation NarrativeGreetings Traders,
In today’s analysis on NAS100USD, we observe the market operating within a bullish institutional order flow—a clear signal for us to align with the prevailing momentum and look for high-probability buying opportunities.
Market Context:
The market has established a well-defined bullish swing, followed by a retracement that delivered price action deep into discount territory. Within this zone, a prior low was taken out, serving as a liquidity grab where institutions could execute order pairing—buying against the willing sellers (sell stops) positioned at discounted prices.
Key Observations:
Optimal Entry Zone: Price retraced into the 62%–79% Fibonacci levels, historically considered the optimal reversal zone. Following this, we observed a rejection—an early indication of bullish re-engagement.
Breaker Block Alignment: The rejection coincides with a breaker block array, a zone where previous selling orders are mitigated and fresh institutional buying begins. This strengthens the validity of the expected reversal.
Bullish Continuation Signs: Post-rejection, price action confirmed a shift in market structure, and prior order blocks have now begun to act as bullish support arrays.
Trading Strategy:
With institutional footprints aligning at key technical zones, I am anticipating further upside. Upon receiving confirmation on the lower timeframes, I will look to enter buy positions, aiming to target the liquidity pools resting in premium prices—the next logical draw for institutional interest.
Stay focused, follow the smart money, and let the structure guide your entries.
Kind Regards,
The Architect

Dxy bullish idea for next week - MMBMThis is a bullish possibility for DXY price action for next week.
Monthly:
- Price took a swing low confluent with a bearish breaker in discount and closed above the level;
Weekly:
- Price Took a swing below monthly swing with a bullish reaction. If this week closes with above previous weeks high, it confirms a bullish weekly swing;
Daily:
- Monday printed the likelly low of the week
- A daily fair value gap is open allow with a volume imballance around monday open signalling bullish price action - a retrace to these levels would be a good buying opportunity.
4h:
- there is a market maker buy model in play.
- as of now, price already printed an intermidiate term low signalling that low risk buy myght have happened.
News forecast:
- I expect NFP to either retrace price to daily fvg or daily volume imbalance and leave a bullish reaction.
- FOMC next week might bring the volatility to complete the mmbm
Thank you for reading

NAS100USD: Bearish Confluence Builds as Market WeakensGreetings Traders,
Despite the broader bullish context on NAS100USD, current confluences suggest a potential short-term move to the downside. As we enter the New York session—with a key news release on the horizon—we anticipate heightened volatility. The critical question now becomes: where is price most likely to draw?
Key Observations:
1. Shift in Market Structure:
Price failed to break above the previous high and instead formed a lower high, signaling weakness and suggesting a possible reversal. This lower high, marked by multiple rejection wicks, forms what we identify as a rejection block—a zone often used by institutions to initiate sell orders.
2. Displacement and Bearish Arrays:
Following this rejection, the market displayed strong displacement to the downside, confirming a market structure shift. This supports the likelihood of bearish continuation and increases the validity of bearish institutional arrays holding as resistance.
3. Current Zone of Interest:
Price is now trading within a fair value gap (FVG) aligned with a reclaimed order block—a strong confluence area for potential bearish continuation. Just above this zone lies a bearish order block and another FVG, which may act as a secondary resistance should price wick higher before moving down.
Trading Plan:
Wait for confirmation at the current resistance zones before considering entries. If validated, look to target the liquidity pools resting at lower, discount price levels.
Stay patient, trade with precision, and let the market confirm your idea.
Kind Regards,
The Architect
CadChf daily bias confirmedGood day traders, I’m back with CadChf but this one is special cause it provides us a clean setup where I will get an opportunity to explain some of ICT concepts that I look for and have made me the trader I am today but I’m not here to talk about Michael!! Just his thoughts behind this type of setup.
Well my excitement is that this setup is happening on the daily timeframe so hopefully it’ll be much more understandable. First let’s start with some tape reading on the left hand side we can see that price has been bearish and have reason to believe that price has bottomed as we can see that price left a low only to later take out creating a new one than made a run higher shifting structure on the lower TF’s but here on the daily what price did was leave the first presented FVG which you can see on the chart I have marked it. Back to the tape, if you take a closer look at that F.PFVG you’ll see that price only touch the upper quarter of the level and price made a move higher. Here why I said this one was special👂 ICT teaches how to look at price from a naked eye just by dividing gaps, FVG and OB’s and more.. by 4 quarters and FIB retrace works wonders here 0,25,50,75,100. 50 being the midpoint. Price from experience since paying attention to details always comes for the F.PFVG midpoint ATLEAST!🔊
If you look at the chart again you’ll see a red arrow pointing to that wick’cosidered a gap’, now if we consider that wick a gap than we gonna treat it as one. If you take you FIB and get the levels you’ll see price was a few pips shy of the midpoint of that gap!!👂
Our narrative than becomes…we wanna see price reach the midpoint of that wick considered a gap. Than we gonna shoot down if we can just get to that midpoint 🤞🏾
Because we cannot I repeat we cannot trust price, we can expect it to disrespect that buyside but not close higher 🛑✋, our draw on liquidity is the one below.
Please study this setup carefully 🙏🏽🙏🏽

GBPCAD: 700+ pips swing move in making; what you think? FX:GBPCAD
After looking at the daily timeframe, we have identified the price pattern with this particular pair, we pointed out the upcoming big move based on similar move that this pair has made. Currently price has been rebounding from the strong buying zone where we expect a large volume to kick in the market. First our main aim will be to see how price react at the downtrend trendline and if price successfully breakthrough the region. We can then enter more entries with this pairs targeting long term 700+ pips. Good luck and trade safe.

Ultimate Guide to Master CISDCISD stands for Consolidation, Inducement, Stop Hunt, Displacement. It’s a simple, repeatable structure that shows how smart money sets up traps in the market to grab liquidity and then make a clean move in the opposite direction.
If you’re serious about trading the ICT style, this is one of the most useful frameworks to learn. It helps you avoid chasing bad breakouts and teaches you to wait for real setups that come after stop hunts and proper market structure shifts.
But there’s one rule that’s non-negotiable — a CISD setup is only valid after a liquidity sweep. If the market hasn’t taken out a clear high or low where stops are sitting, then the rest of the model doesn’t mean anything. No sweep, no trade.
1. Start With the Liquidity Sweep
Everything begins with the liquidity grab. If price hasn’t taken out a high or low where stops are stacked, you should walk away from the setup. Don’t try to front-run a move before smart money has done its job.
The liquidity sweep is what gives the rest of the move power. That’s when price runs through obvious levels, swing highs, swing lows, the Asian range, New York session highs or lows and hits stop losses. Those stops give smart money fuel to enter in the opposite direction.
When you’re watching the market, ask yourself this:
"Who just got stopped out?"
If you can’t answer that, then it’s not a sweep. And if it’s not a sweep, it’s not a CISD.
2. Consolidation — Where Liquidity Builds
This is the first part of the structure. Price starts to move sideways in a tight range, usually during Asian session or during parts of London where volume is low. It can last for hours or even across sessions.
The key here is to understand what’s happening. Traders are placing buys above the highs and sells below the lows. Liquidity is building on both sides. It’s a trap being set. Retail traders are expecting a breakout, but smart money is waiting to use that breakout to their advantage.
Your job in this phase is to identify the range and mark out the highs and lows. That’s where stops will be sitting. You’re not looking to trade during this phase. You’re watching and planning
3. Inducement (sweep)— Fake Break to Trap Traders
After the range is set, price gives a small push out of the range just enough to get people to commit. This is the inducement. It’s the bait.
Let’s say the range high is being tested. Price breaks just above it, traders think it’s a breakout, and they go long. Maybe it holds for a couple of minutes, even gives a small push in their favor. But then it rolls over. That’s the trap. Now those traders are caught, and their stops are sitting below.
Sometimes the inducement comes before the real sweep. Other times, the inducement is the sweep. What matters is that traders have been lured into bad positions and their stops are exposed.
As a trader, your job is not to take the bait. Watch how price reacts to these fake moves. Often, they come with weak volume or are followed by an immediate sharp reversal.
4. Stop Hunt — The Sweep That Validates the Setup
This is where the real move starts to form. Price aggressively runs through the level that holds liquidity, usually below the low or above the high you marked earlier.
This is when smart money takes out the traders who were induced during the fake move. Their stops get hit, and that gives institutions the volume they need to get into the opposite side.
You should be actively watching for a reaction here. Do you see rejection? Does the candle close with a strong wick? Are there signs of absorption or order flow flipping?
This is your validation point. Once price sweeps liquidity and starts to reject the level, that’s your cue to get ready for the next part, the actual shift.
5. Displacement — The Real Move Begins
Once the sweep happens, price doesn’t just drift, it snaps back hard. This is called displacement.
Displacement is a sharp, clean move in the opposite direction of the stop hunt. This is when market structure breaks, momentum shifts, and a fair value gap usually forms.
This is your confirmation that the setup is live. The sweep happened, smart money entered, and now the market is moving with intent.
You don’t want to chase the displacement candle itself. Instead, wait for the retrace. Look for price to come back into the fair value gap or an order block left behind by the impulse. That’s your entry point.
Make sure:
Structure is broken in your direction
The move away is impulsive, not choppy
You’re not forcing an entry on a weak pullback
This is the only part of CISD where you actually take the trade. Everything else is just setup.
How to Manage Risk and Entries
Once you’ve got a valid setup, here’s how to manage it:
Entry: Enter on the CISD or wait for the pullback into the fair value gap or order block. Enter on the reaction or confirmation.
Stop Loss: Place it just past the low or high that got swept. If you’re long, your stop goes below the stop hunt candle. If you’re short, it goes above.
Take Profit: Target the next liquidity level. That could be the other side of the range, a swing high or low, or an inefficiency in price.
You can scale out if price approaches a session high or low, or hold for a full range expansion depending on the session.
Final Thoughts
The CISD model works because it’s built on how the market actually moves, not indicators, not random patterns, but liquidity.
Don’t jump in early. Don’t guess. Wait for the sweep. Wait for the displacement. That’s where the edge is.
Once you get used to watching this play out in real time, you’ll start to see it everywhere. It’s in Forex, crypto, indices, any market that runs on liquidity.
Stick to the rules. Let the model do its job. And remember: no sweep, no setup!
___________________________________
Thanks for your support!
If you found this guide helpful or learned something new, drop a like 👍 and leave a comment, I’d love to hear your thoughts! 🚀
Make sure to follow me for more price action insights, free indicators, and trading strategies. Let’s grow and trade smarter together! 📈

DXY Bullish scenario (Daily)Dxy is still respecting the market maker buy model idea.
Monday traded inside friday range.
Today (Tuesday) price already traded above monday previous high signaling bullish momentum and a higher probability to trade also above friday high.
Right now price is consolidating between a daily bullish fair value gap and a bearish daily volume imbalance.
With the information we have, price is likelly to shop arround with no clear direction before FOMC.
For the current week price is still in the manipulation phase.
Traders will find higher probability trades after FOMC.

Bullish till March 26 High but open for retrace.We are at a daily -BPR at the moment. All daily candles have been bullish so far since April 22. The whole sentiment behind this has been the 90 day tariff pause.
There definitely is a mix of fundamental and technical reasons for both bullish and bearish bias once we achieve this target.
For this week, I would look for a long entry only if NQ retraces lower first. Otherwise would have to just watch it do its thing. Once we hit the March 26 High, I am very open for NQ to go to All time high again because that is what it historically does but I am also completely open for it to start dumping to monthly lows because it seems that the sell-side was not hit and the higher lows made on the 4H chart seem to be very low resistance targets.
Not a good time to marry a bias.

Bitcoin to create new All Time High?Fundamental Analysis
Uncertainty with the Dollar.
Institutional adoption of Bitcoin undergoing unprecedented acceleration.
COT report(Bitcoin Micro Futures) as of: April 29, 2025 shows Non-commercial traders still net short(-3,958) however, a larger percentage of investors who were short the previous week have closed their short positions(-17,401) as opposed to those long(-758).
Technical analysis(Daily TF)
Possible low of the year formed in April(on the 7th)
Displacement of sellers with buy stops above previous highs(2nd & 24th March)
-2 scenarios possible;
1. Correction to fill the liquidity void created on 20th-24th of April then continuation of the bull run or
2. If the daily FVG formed on the 1st of May holds, it could support price higher.

?BTC Intraday LongsTechnical analysis using ICT concepts.
A rally below the 12 am NY opening price to raid sell stops below previous day's Asian & London session.
CISD from a Bullish orderblock formed on Thursday NY am session.
Looking for Buy stops resting above Friday's highs.
* Note A 4hour BISI is below the reference range that could still be revisited.

US100 – Bullish Continuation Setting Up Inside the ChannelUS100 remains firmly bullish, showing consistent strength after breaking out from the prior consolidation range in mid-April. Price action has been moving cleanly within a well-defined ascending channel, supported by strong impulsive moves followed by shallow retracements. Each pullback so far has been relatively controlled, and buyers have been stepping in aggressively from clearly defined zones, which aligns with the current risk-on sentiment across tech-heavy indices.
Consolidation Structure
We’ve now had two solid retests of prior fair value gaps (FVGs), both of which acted as demand zones and helped fuel continuation. The first pullback dropped into a previously formed imbalance, consolidated briefly, and then launched a strong bullish leg. The second did the same, creating a layered structure of bullish continuation through efficient retracements. Each of these reactions confirms that price is respecting areas where institutional orders may have been left behind, which adds confluence to the trend’s strength.
Currently, price is working on forming a third FVG within the upper half of the channel. This is developing just below recent highs and has not yet been retested, which makes it a key area of interest. If the market pulls back into that imbalance with proper structure, it could offer the next high-probability opportunity to join the trend.
Bullish Scenario
If price retraces into this newly forming FVG and holds, especially with a wick or lower timeframe rejection candle inside the zone, it could mark the start of the next impulse. The overall trend remains intact as long as we stay within the channel and each FVG continues to serve as valid support. Given the strength of the previous bounces and the orderly nature of this structure, any retest into this new FVG would likely lead to another push into fresh highs and a move toward the upper boundary of the channel.
Bearish Scenario
On the flip side, if price fails to respect this new FVG and breaks below with momentum, especially if the channel support fails at the same time, it would be a sign that buyers are losing control. In that case, we’d want to see how price interacts with the last confirmed FVG below before making any bearish assumptions. A deeper pullback into that area could still provide another long opportunity if structure holds, but any sharp momentum break through both imbalances would put the bullish trend on pause and shift focus to downside levels.
Price Target and Expectations
Assuming the bullish structure continues to play out, the next projected move would be a clean rally toward the top of the channel. There’s enough space left between current levels and the upper trendline to justify an entry on the next pullback, provided it lands inside the newly created FVG. The setup is fairly straightforward, let price come back into the imbalance, confirm with lower timeframe strength, and ride the continuation leg.
Current Stance
There’s no need to chase price here. The best scenario is waiting for a patient retest of the fresh FVG forming now. If it pulls back cleanly, holds the zone, and gives confirmation, that would be the entry. Momentum, structure, and market context are all aligned for continuation, but the trade needs to be built off a level that shows actual commitment from buyers.
Conclusion
US100 is holding its bullish structure well, forming clean legs within an ascending channel, and repeatedly respecting fair value gaps as demand zones. With a new imbalance forming beneath the most recent high, the setup is shaping up for another continuation play if price rotates back and holds. It’s a wait-and-see moment for now, but if the FVG gets tagged and buyers show up, this could be the next leg higher in an already strong trend.
___________________________________
Thanks for your support!
If you found this idea helpful or learned something new, drop a like 👍 and leave a comment, I’d love to hear your thoughts! 🚀
Make sure to follow me for more price action insights, free indicators, and trading strategies. Let’s grow and trade smarter together! 📈

Bearish forecast for DXYWith regards my previous forecast, we have a strong reaction from Weekly and daily premium arrays.
On the weekly TF, we have IOFED of the SIBI and BSL above previous 2 weeks' highs was taken.
Tf: time frame
IOFED: Institutional Order Flow Express Entry Drill
SIBI: Sellside Imbalance, Buyside Inefficiency.
BSL: Buy side liquidity
