DXY Printing a Bullish Triangle??The DXY on the 1 Hr Chart is forming a potential continuation pattern, the Bullish Triangle!
Currently Price is testing the 99.6 - 99.8 Resistance Area and battling with the 200 EMA and 34 EMA Band. The reaction to this conjunction could be pivotal in who overcomes: Buyers or Sellers.
Now during the formation of the potential pattern, Price on the RSI has stayed relatively Above the 50 mark being Bullish Territory suggesting Buyers could win the Bull-Bear battle.
Until Price breaks either the Resistance Area or the Rising Support, we will not have a definitive direction in which USD will strengthen or weaken.
*Wait For The Break*
-If Price breaks the Resistance Area, USD will strength possibly heading to the 100.8 - 101 Area
-If Price breaks the Rising Support, USD will weaken possibly heading to the 98.5 - 98.3 Area
Fundamentally, it is said China and USA are possibly getting closer to potentially ending the Reciprocal Tariff War going on with both sides willing to negotiate.
With the USA being the #1 Consumer of Goods globally, other economies can not afford us to not buy their things so I continue to see the Tariff War more as a Strong-Arm for the USA to be able to negotiate better terms!
USD News:
JOLTS - Tuesday, Apr. 29th
GDP - Wednesday, Apr. 30th
Unemployment Claims / ISM Manu. PMI - Thursday, May 1st
Non-Farm Employment Change / Avg Hourly Earnings / Unemployment Rate - Friday, May 2nd
For all things Currency,
Keep it Current,
With Novi_Fibonacci
Oscillators

Weekly Moonshot Setup for $BLEGChecked all the boxes for this upcoming seasonal wave in the OTC. First one to set off my scanner(87% WR) since early 2021 - $BLEG. This is a low floater with under 900mm shares outstanding, transfer agent verified - pink current status (big green check on these two things).. quick snippet from the Dec 2024 report:
A. Summarize the issuer’s business operations (If the issuer does not have current operations, state “no operations”) Branded Legacy, Inc. is a diversified holdings company with a primary focus on biotechnology and wellness product development. Over the past year, the company has made significant strides in expanding its operations, acquiring new businesses, and enhancing its product offerings. Business Operations: Branded Legacy, Inc. specializes in the extraction, refinement, and synthesis of alkaloids, providing white/private label services, formulation, and co-packing solutions. The company’s main business activities revolve around the commercial development of alkaloid-infused products such as vapes, tinctures, topicals, and gummies. Additionally, Branded Legacy engages in brand development, marketing, and promoting sustainability practices. The company has expanded its portfolio through strategic acquisitions, including Sycamore BioPharma Inc. and MariJ Pharmaceuticals Inc. These acquisitions have significantly bolstered Branded Legacy's capabilities in botanical extractions and drug delivery systems, enhancing their product offerings and market reach. Product Development and Services: Branded Legacy, Inc. operates through its subsidiaries, Royal Biotek and The Alcannabist, which focus on advancing biotechnical research and development. Royal Biotek, in particular, conducts in-house pre-clinical trials to ensure product efficacy and safety, thereby building consumer trust. The company’s state-of-the-art facilities in Melbourne, FL, support the production and distribution of high-quality wellness products. Sycamore BioPharma, recently acquired by Branded Legacy, is renowned for developing plant-based pharmaceuticals and wellness solutions, including gummies, tinctures, compression sleeves, and pain-relieving topical creams. The acquisition of Sycamore BioPharma has brought over $500,000 in inventory of products and raw materials as well as key personnel for advancing clinical trials. Sycamore supports Branded Legacy's mission to deliver high-quality, innovative products. MariJ Pharmaceuticals, another significant acquisition, specializes in the development and distribution of cannabinoid-based products. This acquisition has added substantial value to Branded Legacy’s portfolio, with MariJ Pharmaceuticals valued at close to $2,000,000. The integration of MariJ Pharmaceuticals has enabled Branded Legacy to expand its product lines and leverage MariJ's expertise in cannabinoid extraction and formulation, further strengthening the company’s position in the biotech and wellness markets. Branded Legacy has also secured exclusive extraction partnerships and developed proprietary delivery systems for various health supplements, further solidifying its position in the wellness industry. The company's innovative approach is evident in its diverse product lines, which include not only traditional botanical extracts but also novel formulations aimed at improving bioavailability and therapeutic effectiveness. Growth and Market Strategy: Branded Legacy is committed to sustainable growth through continuous innovation and strategic partnerships. The company's recent moves include acquiring new facilities, enhancing production capabilities, and expanding its market reach. By integrating advanced biotechnology with robust branding and marketing strategies, Branded Legacy aims to set new benchmarks in the wellness and biotech sectors. The company's forward-thinking approach and strategic acquisitions have positioned it as a leader in the industry, with a focus on delivering high-quality, sustainable products that meet the evolving needs of consumers (Sources: Branded Legacy website, Business Insider). For further details and updates on Branded Legacy's operations, please visit their profile on OTC Markets or their official website. B. List any subsidiaries, parent company, or affiliated companies Total Refinement Solutions, LLC (DBA Royal Biotek) The Alcannabist, LLC MaryJ Pharmaceuticals, Inc. Sycamore Biopharma, Inc. (SBP) All Companies are included in this disclosure statement.

$BTC Bull Trap Clear As DayI’m probably the biggest 3-Year perma-bull on this app, and even I can tell this is most likely a bull trap.
This is either the beginning of the long awaited parabola, or else we’ll correct back down to at least the 200DMA in the next week, or the 50DMA within the next month.
Lack of volume on the move and RSI becoming overheated gives me feels for the latter
Remember, never trust a weekend pump 💯
Bookmark this.

Technical Analysis Indicators Cheat SheetHello, traders! 🦾
This cheat sheet provides a comprehensive overview of the most widely used technical analysis indicators. It is designed to support traders in analyzing trends, momentum, volatility, and volume.
Below, you’ll find a handy screenshot of this Cheat Sheet that you can save and peek at whenever you need a quick, friendly refresher on your trading indicators. ;)
1. Trend Indicators
These tools identify the direction and strength of price movements, critical for trend-following strategies.
Moving Averages (MA)
Simple Moving Average (SMA) and Exponential Moving Average (EMA) smooth price data to highlight trends. Crossovers (e.g., 50-day vs. 200-day MA) signal potential trend shifts.
MACD (Moving Average Convergence Divergence) – Tracks the difference between two EMAs, paired with a signal line to generate trade signals. A bullish crossover occurs when MACD rises above the signal line.
Parabolic SAR. Places dots above or below the price to indicate trend direction. Dots below the price suggest an uptrend; above, a downtrend.
ADX (Average Directional Index)
Measures trend strength (0–100). Values above 25 confirm a robust trend; below 20 indicate consolidation.
2. Momentum Indicators (Oscillators)
These indicators assess price movement speed and highlight overbought or oversold conditions.
RSI (Relative Strength Index)
Ranges from 0 to 100, with values above 70 indicating overbought conditions and below 30 indicating oversold. The divergence between the RSI and price can signal impending reversals.
Stochastic Oscillator –Compares closing price to the price range over a period (0–100). Above 80 is overbought; below 20, oversold. %K and %D line crossovers provide precise trade signals.
CCI (Commodity Channel Index) – Measures price deviation from its average. Readings above +100 indicate overbought; below -100, oversold.
Williams %R – Similar to Stochastic, it measures distance from the period’s high (0 to 100). Above -20 is overbought; below -80, oversold.
3. Volatility Indicators
These tools quantify price fluctuation ranges to optimize trade timing.
Bollinger Bands – Comprises a 20-day SMA and two bands (±2 standard deviations). Narrow bands reflect low volatility; wide bands indicate high volatility. A price touching the outer bands may signal a reversal or trend continuation, depending on the context.
ATR (Average True Range) – Calculates the average price range over a period to gauge volatility. Higher ATR values denote greater market movement.
4. Volume Indicators
Volume-based indicators validate price movements and highlight market participation.
OBV (On-Balance Volume) – Cumulates volume to confirm price trends. The rising OBV, alongside rising prices, supports an uptrend. OBV divergence from price may foreshadow reversals.
Volume Oscillator – Compares two volume moving averages to evaluate buying or selling pressure. Positive values suggest stronger buying. It typically confirms breakouts or assesses the sustainability of a trend.
Chaikin Money Flow (CMF) – It analyzes money flow based on price and volume. Positive CMF indicates buying pressure; negative, selling pressure.
5. Other Key Indicators. Advanced Tools for Deeper Market Analysis.
Ichimoku Cloud – Combines five lines and a “cloud” to assess trend, momentum, and support/resistance. Price above the cloud signals an uptrend; below, a downtrend. Cloud thickness reflects the strength of support or resistance levels.
Fibonacci Retracement – Maps potential support and resistance using Fibonacci ratios (23.6%, 38.2%, 50%, 61.8%).
Pivot Points – Derives support (S1, S2) and resistance (R1, R2) levels from the prior period’s high, low, and close.
Skills to Sharpen for Smarter Trading
Successful traders often find that combining indicators from different categories yields better results. For instance, pairing a trend-based EMA with a momentum indicator like RSI can help confirm signals more reliably — much like crafting the perfect coffee blend, where balance is everything.
Many also realize that stacking similar tools, such as using both RSI and Stochastic, tends to clutter the picture rather than clarify it. A focused set of indicators usually proves more effective.
Another common practice is backtesting setups on historical data to understand how strategies perform in specific markets and timeframes. It’s a way to rehearse before stepping onto the stage.
Ultimately, those who see consistent results tend to integrate indicators into a coherent strategy rather than reacting to every signal. That clarity often makes all the difference
Many of these indicators, from MACD to Bollinger Bands, are readily available on platforms like TradingView, making it easy to apply them to your charts.
Subscribe and let us know which of these indicators intrigues you the most so we can explore it further in our next post!
Good luck! 👏

Monday.com May Start MovingMonday.com has drifted for the last year, but some traders may think the business-software company is ready to start moving.
The first pattern on today’s chart is the bullish price gap on February 10 after earnings, revenue and guidance beat estimates. The shares touched their highest level since late 2021, only to decline with the broader market.
However, the slide wasn’t significant and MNDY stabilized at lows from January. The shallowness of the pullback may reflect a lack of selling pressure.
Second, the 50-, 100- and 200-day simple moving averages are virtually on top of each other. Does that long-term neutrality create potential for price expansion?
Next, MNDY has pushed above a falling trendline.
Finally, MACD is rising.
TradeStation has, for decades, advanced the trading industry, providing access to stocks, options and futures. If you're born to trade, we could be for you. See our Overview for more.
Past performance, whether actual or indicated by historical tests of strategies, is no guarantee of future performance or success. There is a possibility that you may sustain a loss equal to or greater than your entire investment regardless of which asset class you trade (equities, options or futures); therefore, you should not invest or risk money that you cannot afford to lose. Online trading is not suitable for all investors. View the document titled Characteristics and Risks of Standardized Options at www.TradeStation.com . Before trading any asset class, customers must read the relevant risk disclosure statements on www.TradeStation.com . System access and trade placement and execution may be delayed or fail due to market volatility and volume, quote delays, system and software errors, Internet traffic, outages and other factors.
Securities and futures trading is offered to self-directed customers by TradeStation Securities, Inc., a broker-dealer registered with the Securities and Exchange Commission and a futures commission merchant licensed with the Commodity Futures Trading Commission). TradeStation Securities is a member of the Financial Industry Regulatory Authority, the National Futures Association, and a number of exchanges.
TradeStation Securities, Inc. and TradeStation Technologies, Inc. are each wholly owned subsidiaries of TradeStation Group, Inc., both operating, and providing products and services, under the TradeStation brand and trademark. When applying for, or purchasing, accounts, subscriptions, products and services, it is important that you know which company you will be dealing with. Visit www.TradeStation.com for further important information explaining what this means.

Golden times!Gold is not done yet, imo. 5k is in play. Hard assets like Gold and Bitcoin are becoming a safe haven.

Bitcoin Bulls Eye $95K as Upside Momentum BuildsAfter a bullish wedge break and having cleared the key 50-day moving average earlier this week, bitcoin bulls will now be eyeing a break above $95,000, especially with indicators such as RSI (14) and MACD signalling strengthening topside momentum.
A break and close above $95,000 would generate a bullish setup, allowing for longs to be established above with a stop beneath for protection. While some resistance may be encountered around $100,000, a move beyond that psychologically important level may encourage bulls to look for a run towards the record high above $108,000.
In the interim, bids have been noted at $91,750 with sellers emerging on pushes above $94,000.
Good luck!
DS

Short NFLXBearish divergences on momentum oscillators signaling impeding correction. Anticipating move down to the $672 level within a few weeks. Shorting here with stop loss at $1100.

$USDC | Altseason Incoming.....FinallyCRYPTOCAP:USDC Dominance looks to be Double Topped on the RSI side and per historic movements, this looks promising for the market.
I say, BRING ON THE ALTCOINS.
Technical Analysis Idea for BTC/USD (1W Chart - Coinbase) CurrenSuggested Strategy (just an idea):
• Speculative long entry: $93,000
• TP1: $98,000
• TP2: $103,000
• SL: $85,000

Potential Breakout in PalantirPalantir Technologies has been consolidating as the broader market struggled, and some traders may look for its uptrend to continue.
The first pattern on today’s chart is the February 24 high of $99.01. PLTR peaked near that level in late March and again last week. However the stock cleared the resistance yesterday, which may signal a breakout.
Second, prices consolidated at the 50-day simple moving average but have now escaped from it. Is the intermediate-term trend getting more bullish?
Third, the 8-day exponential moving average (EMA) is above the 21-day EMA. MACD is also rising. Those patterns may reflect bullish short-term momentum.
Finally, the software company is a highly active underlier in the options market, averaging more than 700,000 contracts per session in the last month. (It ranks in the top five of the S&P 500, according to TradeStation data.) That could help traders take positions with calls and puts.
TradeStation has, for decades, advanced the trading industry, providing access to stocks, options and futures. If you're born to trade, we could be for you. See our Overview for more.
Past performance, whether actual or indicated by historical tests of strategies, is no guarantee of future performance or success. There is a possibility that you may sustain a loss equal to or greater than your entire investment regardless of which asset class you trade (equities, options or futures); therefore, you should not invest or risk money that you cannot afford to lose. Online trading is not suitable for all investors. View the document titled Characteristics and Risks of Standardized Options at www.TradeStation.com . Before trading any asset class, customers must read the relevant risk disclosure statements on www.TradeStation.com . System access and trade placement and execution may be delayed or fail due to market volatility and volume, quote delays, system and software errors, Internet traffic, outages and other factors.
Securities and futures trading is offered to self-directed customers by TradeStation Securities, Inc., a broker-dealer registered with the Securities and Exchange Commission and a futures commission merchant licensed with the Commodity Futures Trading Commission). TradeStation Securities is a member of the Financial Industry Regulatory Authority, the National Futures Association, and a number of exchanges.
Options trading is not suitable for all investors. Your TradeStation Securities’ account application to trade options will be considered and approved or disapproved based on all relevant factors, including your trading experience. See www.TradeStation.com . Visit www.TradeStation.com for full details on the costs and fees associated with options.
Margin trading involves risks, and it is important that you fully understand those risks before trading on margin. The Margin Disclosure Statement outlines many of those risks, including that you can lose more funds than you deposit in your margin account; your brokerage firm can force the sale of securities in your account; your brokerage firm can sell your securities without contacting you; and you are not entitled to an extension of time on a margin call. Review the Margin Disclosure Statement at www.TradeStation.com .
TradeStation Securities, Inc. and TradeStation Technologies, Inc. are each wholly owned subsidiaries of TradeStation Group, Inc., both operating, and providing products and services, under the TradeStation brand and trademark. When applying for, or purchasing, accounts, subscriptions, products and services, it is important that you know which company you will be dealing with. Visit www.TradeStation.com for further important information explaining what this means.

EUR/CHF: At the Crossroads with 200DMA Looming LargeWith the key 200-day moving average overhead and having failed to sustain pushes above .9400 earlier this month, EUR/CHF finds itself at an interesting level on the charts, generating multiple potential setups depending on how near-term price action evolves.
If the price is unable to hold above .9400, shorts could be initiated with a stop above the 200-day moving average for protection. Minor support sits at .9339, with a break of that level opening the door for a run toward the recent swing low around .9220. For this setup to play out, an escalation in trade tensions between the United States and major trade partners would be helpful.
Alternatively, a break and close above the 200-day moving average would allow for longs to be established, targeting the 50-day moving average initially and resistance at .9491 thereafter. A stop beneath the 200DMA would provide protection. Further concrete progress in trade negotiations would assist an extension of the recent rebound.
While momentum indicators are less bearish than when the price last visited these levels, on balance, they still screen neutral to slightly bearish.
Good luck!
DS

Berachain Hidden Bullish DivergenceHidden RSI bullish divergence, thinkin about $6 as TP that was the last important POC.

Crypto Bulls Awaken – Is This Just the Beginning?In the past 48 hours, the crypto market has brought joy to traders and investors who managed to buy near the bottom.
(Sorry to the cryptobros still holding floating losses—your time will come too! 😊)
Some of you might be thinking it's too late to ride this bull run. But if you zoom out and look at the bigger picture, there's still plenty of room for the bull to run.
Just switch to a higher timeframe like the weekly or monthly chart, and you'll see the potential upside.
One coin that looks particularly interesting is BINANCE:SUIUSDT .
There's been a pullback from 2.1829 - 1.7997, and it's supported by bullish divergence, suggesting a continuation of the impulsive move with 7.6108 as the first major target.
This bullish scenario remains valid as long as the price holds above 1.7174.
You might be wondering,
" So can I just buy/long BINANCE:SUIUSDT now? "
Not yet.
For a better entry and a more favorable risk-reward ratio, I suggest using the daily chart.
Wait for a pullback, then look for confirmation using candlestick patterns.
(I'll cover those patterns in my next post—stay tuned!)

EWTSU 6E1! H1 micro wave ((5)) down developping
EWTSU 6E1! H1
micro wave ((5)) of subminuette wave a down developping - target 1.1308
micro wave ((5)) should develope in five waves
invalidation: price break over 1.1490 area steadly

$GOLD Continues to Move in Lockstep With Global M2It's amazing how accurate TVC:GOLD follows Global M2 with NO LEAD.
Near instant liquidity injection into the asset as the money supply rises 🪙
I do not see the price of Gold falling until Global M2 does.

ASX 200 Bulls Take the Reins as Trade Hopes BuildThe signal from last week’s bullish engulfing candle on ASX 200 SPI futures has proven reliable so far, with the price rocketing above 7900 on Monday, providing a platform to establish long positions around.
With optimism building over trade deals between the United States and major partners, including China, bulls may look to enter above 7900 with a stop beneath for protection. The 50-week moving average screens as a potential target, with futures bouncing strongly from it the last three times it’s been tested.
If the price reverses and closes below 7900, the bullish bias would need to be reassessed.
Momentum indicators remain net-bearish, though RSI (14) is lifting toward neutral. Given the headline-driven nature of the market, these signals may be less reliable than usual.
Good luck.
DS

#ETH Update – April 22, 2025
Current Price: $1,700.02 (+7.8%)
📊 Technical Snapshot
• Trend: Downtrend (last 4 months)
• Support: $1,500 & $1,350
• Resistance: $1,750 & $2,150
• Range: $1,557 – $1,630 → Moderate volatility
• ETH has dropped ~65% from its all-time high of $4,107
🔗 On-Chain Metrics
• Exchange Inflows: Large positive netflow to derivatives in March → Selling pressure
• Wallet Profitability: Only 20.94% of wallets in profit → Weak sentiment
• Active Addresses: Down to 400K from 650K → Lower usage
• Staked ETH: Over 25.6M ETH → Long-term confidence remains strong
🧭 Fundamentals
• SEC Approved ETH ETFs (no staking allowed) → Institutional inflow potential
• Galaxy Digital moved $100M from ETH to SOL → Institutional rotation
📈 Forecasts
• Short-Term (by Apr 27): ~$1,635.87 (−0.51%)
• Mid-Term (by May 22): ~$1,725.30 (+4.93%)
✅ Summary:
ETH is still in a downtrend, but fundamentals like staking and ETF approval show long-term strength. Short-term movement may be choppy. Watch $1,500 support and $1,750 resistance.

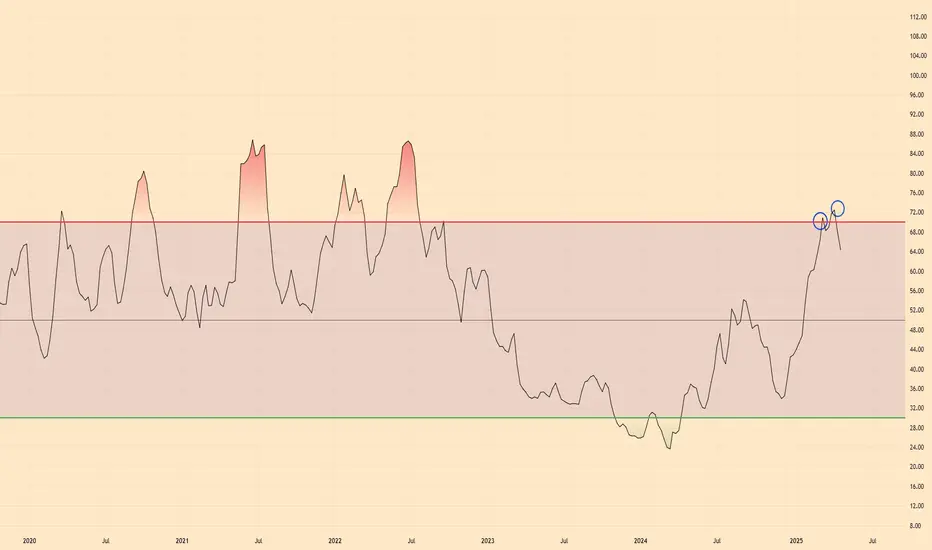
#BTC Market Update – April 22, 2025Current Price: $90,700 (+4%)
📊 Technical Overview
• 200-Day MA: $88,356 – BTC is trading above it → Bullish sign
• RSI: 78 – Overbought zone → Possible pullback
• Resistance: $90,000 – Key psychological level
• Support: $85,000 – Watch this level on retracement
🔗 On-Chain Insight
• Long-Term Holders: Some distribution happening → Profit-taking
• Network Activity: Steady → Healthy usage
• Sentiment: Bullish → Weak USD + institutional inflows
🧭 Macro & Fundamentals
• U.S.–China tensions + Fed uncertainty → BTC seen as safe haven
• Institutions are increasing their exposure → Positive market signal
✅ Summary:
BTC shows strong bullish momentum, but RSI is overheated. Stay alert for potential short-term correction. Key levels: $85K support / $90K breakout.

Kaspa Vs Eth have finally broken out. Heading to ATH?After a period of DCAing, especially within the green zone (golden pocket), Kaspa had finally set a higher high, and now have broken out above the long-term yellow resistance line.
Orange measured-move line indicates that Kaspa will be heading up to retest the ATH (vs ETH) again.
Here's a zoomed-out view of the long-term support/resistance lines drawn.

StoneCo May Have Turned HigherStoneCo has been stuck in a range since crashing in 2021, but some traders may think it’s turning back to the upside.
The first pattern on today’s chart is the series of lower highs since early last year. Prices have apparently broken that falling trendline.
Second, the Brazilian fintech jumped on a strong quarterly report last month and continued higher after a pullback. That could reflect improved fundamentals.
Third, the 8-day exponential moving average (EMA) is above the 21-day EMA. MACD is also rising. Those signals may be consistent with a short-term uptrend.
Fourth, the 50-day simple moving average (SMA) is nearing a potential “golden cross” above the 200-day SMA.
Finally, Latin American stocks have outperformed in recent weeks. Brazil, in particular, has seen economic growth forecasts increase.
TradeStation has, for decades, advanced the trading industry, providing access to stocks, options and futures. If you're born to trade, we could be for you. See our Overview for more.
Past performance, whether actual or indicated by historical tests of strategies, is no guarantee of future performance or success. There is a possibility that you may sustain a loss equal to or greater than your entire investment regardless of which asset class you trade (equities, options or futures); therefore, you should not invest or risk money that you cannot afford to lose. Online trading is not suitable for all investors. View the document titled Characteristics and Risks of Standardized Options at www.TradeStation.com . Before trading any asset class, customers must read the relevant risk disclosure statements on www.TradeStation.com . System access and trade placement and execution may be delayed or fail due to market volatility and volume, quote delays, system and software errors, Internet traffic, outages and other factors.
Securities and futures trading is offered to self-directed customers by TradeStation Securities, Inc., a broker-dealer registered with the Securities and Exchange Commission and a futures commission merchant licensed with the Commodity Futures Trading Commission). TradeStation Securities is a member of the Financial Industry Regulatory Authority, the National Futures Association, and a number of exchanges.
TradeStation Securities, Inc. and TradeStation Technologies, Inc. are each wholly owned subsidiaries of TradeStation Group, Inc., both operating, and providing products and services, under the TradeStation brand and trademark. When applying for, or purchasing, accounts, subscriptions, products and services, it is important that you know which company you will be dealing with. Visit www.TradeStation.com for further important information explaining what this means.

Why I Think GBPJPY May Continue to Sell...Technical AnalysisHey Rich Friends,
I think GBPJPY will continue to sell today and maybe this week. This is only a technical analysis so check the news and cross-reference your charts/indicators. Here is what I am looking at:
- The market has already rejected the daily high of 188.852, which is a strong sign that it can continue to move down.
- The 4-hour low was broken, and sellers are picking up momentum on lower time frames.
- The stochastic is facing down, the slow line (orange) is above the fast line (blue), and both lines have crossed below 50
Sell stops are recommended. I will use previous lows as TPs and previous highs as stop losses. Good luck if you decide to take this trade. Let me know how it goes in the comments.
Peace and Profits,
Cha

EWTSU XAUUSD H4 update - minute ((3)) developping
Elliott wave trade setup H4 update the previous wave count
minute ((3)) developping -
fib target 1.618 area 3490
macd momentum slow down
minute wave ((4)) should follow corrective
fib target 0.382/0.50 - 3294/3230
macd to zero line
ichimoku first support 3410/3350
