tornado cash money 3User Manual for the “Tornado Cash Money ” Indicator
Summary
This indicator is designed to help you identify and trade only in the dominant trend, as defined by the 200-period exponential moving average (EMA 200). It integrates different moving averages and volatility bands to provide clear visual signals, provided you use it in the direction of the trend.
Indicator Components
Bicolor EMA 200
Role: Indicates the major market trend.
Interpretation:
Green: Bullish trend (only take buy trades).
Red: Bearish trend (only take sell trades).
Imperative Instruction:
ONLY TRADE IN THE DIRECTION OF THE EMA 200 COLOR.
If it is green, you only open long positions (buys).
If it is red, you only open short positions (sells).
Bicolor SMA 28
Used to detect shorter-term trend reversals (color changes between blue/orange).
Special Signals:
Blue/Teal Triangles ("S+") below the price: Potential buy signal (if EMA 200 is green).
Red/Brown Triangles ("S-") above the price: Potential sell signal (if EMA 200 is red).
Volatility Bands (EMA 21 + ATR 14)
Display bands around the EMA 21, adjusted to volatility (ATR * 2).
Help identify overbought/oversold zones or dynamic support/resistance levels.
Colored Dots
Blue dots below the band: Confirmation of bullish momentum if the SMA 28 is bullish.
Red dots above the band: Bearish momentum if the SMA 28 is bearish.
Usage Rules
Identify the trend with the EMA 200
If EMA 200 is green → Only look for buy (long) signals
If EMA 200 is red → Only look for sell (short) signals
Wait for a reversal signal on the SMA 28
A blue/teal “S+” triangle appears below the price:
Buy only if EMA 200 is green.
A red/brown “S-” triangle appears above the price:
Sell only if EMA 200 is red.
Confirm with the volatility bands and dots
Ideally, the price reacts to a band and/or a colored dot appears in the direction of the trade.
Avoid trading if the signal appears opposite to the EMA 200 trend, even if it is visible.
Risk Management
Always accompany your strategy with risk management suited to your profile (stop-loss, position sizing, etc.).
The bands can serve as indications for stop levels or partial targets.
Visual Summary
EMA 200 green → Only longs (favor “S+” signals and blue dots)
EMA 200 red → Only shorts (favor “S-” signals and red dots)
Never take trades against the color of the EMA 200.
Disclaimer
This indicator is not foolproof. It should be used as a decision support tool and not as a standalone trading system. Always validate your signals with broader analysis and practice on a demo account before using it for real trading.
Moving Averages

Super_Momentum_BandThe Super Momentum Band is a powerful multi-purpose indicator designed for scalpers & intraday. It combines the strength of an EMA Band with the reliability of Supertrend to help you catch momentum trades with clear visual cues.
Key Features:
✅ Dynamic EMA Band with colour-coded zones.
✅ Built-in Supertrend plotted directly on the chart.
✅ Helps to identify scalp opportunities & trend direction.
Ideal For:
🔸 Scalping setups on lower timeframes
🔸 Intraday trend confirmation
🔸 Breakout and retest trading
🔸 Quick visual identification of trend shifts

tornado cash money 3User Guide: Tornado Cash Money 3
General Description
This indicator is designed to help you track and trade with the market’s dominant trend, emphasizing the strength of the 200 EMA (Exponential Moving Average) — considered here as the true "boss" for all trading decisions.
It combines:
a dual-color 200 EMA (the boss),
a dual-color 28 SMA (for timing signals),
volatility bands,
colored visual buy/sell signals (triangles).
Key Points to Remember
Trend is your friend!
This system is designed to ONLY TRADE IN THE DIRECTION OF THE TREND.
Every decision should ALWAYS be filtered and validated according to the direction of the 200 EMA.
200 EMA = The Boss
If price is above the 200 EMA and the 200 EMA is rising: focus only on buy signals (upward triangles).
If price is below the 200 EMA and the 200 EMA is falling: focus only on sell signals (downward triangles).
Visual Interpretation
Dual-color 200 EMA:
Green: Long-term uptrend.
Red: Long-term downtrend.
Dual-color 28 SMA:
Blue: Short-term bullish correction or recovery.
Orange: Short-term bearish correction or pullback.
Teal triangles (below the candle):
Short-term buy signal.
Appears when the 28 SMA shifts from bearish to bullish.
Brown triangles (above the candle):
Short-term sell signal.
Appears when the 28 SMA shifts from bullish to bearish.
Volatility bands:
Dynamic zones showing the amplitude of price moves.
Blue/red dots:
Secondary indications based on the slope of the SMA.
How to Use the Signals
Identify the trend with the 200 EMA:
If it’s green AND sloping upward, you should ONLY look for buy signals (teal triangles below the candles).
If it’s red AND sloping downward, you should ONLY look for sell signals (brown triangles above the candles).
Use triangles for timing:
Triangles indicate a short-term momentum shift in the 28 SMA.
Never buy against the direction of the 200 EMA trend!
Ignore all signals that are against the 200 EMA trend (e.g., don’t sell if the 200 EMA is green).
Practical Tips
The 200 EMA protects you: It tells you which way the wind is blowing. Never trade against it—you’ll be swimming upstream.
Combine with your money management: These signals are powerful when taken in the trend’s direction, but no indicator is infallible! Always use stop-losses and adapt your position size.
Avoid ranges (sideways markets): The indicator works best in trending markets.
Summary
Trade ONLY in the direction of the 200 EMA: Trend is your friend!
Teal triangles: Buy opportunities if the 200 EMA is bullish.
Brown triangles: Sell opportunities if the 200 EMA is bearish.
Ignore all signals that go against the direction of the 200 EMA trend.

EMA 11/22/5 + MACD Zero Cross Buy/SellStrategy to identify entry and sell points using EMA 11/22/5 + MACD Zero Cross Buy/Sell


Stochastic RSI | Chill-Zone |Stochastic RSI | Chill-Zone |
This indicator combines Stochastic RSI with a dynamic Chill-Zone that highlights where momentum is holding or starting to shift. It helps filter out noisy %K moves and gives a clearer view of the trend and sustained directional bias rather than short-term momentum spikes like the standard Stoch.
How the Chill-Zone works
The Chill-Zone is built from the %K line of the Stochastic RSI:
- It measures how much %K moves bar to bar (absolute difference).
- This is smoothed using a running moving average (like an ATR for %K).
- A short SMA (2-period) tracks the base trend level.
- When %K breaks beyond the trend level, the zone flips between bullish and bearish.
The zone is shown as a fill between %K and a trailing EMA of %K (set by the user)
The zone color shows the current trend bias:
Blue fill = bullish zone
Red fill = bearish zone
Divergence spotting:
When price keeps rising but the Chill-Zone is red (bearish), it can signal that momentum isn’t supporting the price move — a possible warning of an upcoming reversal.
Similarly, if price keeps falling but the Chill-Zone is blue (bullish), it may point to weakening downward momentum and potential for a reversal upward.
Disclaimer
This is not a standalone signal tool. It’s designed to be used with other technical analysis tools as part of a broader strategy. Always combine with price action, S/R levels, or other indicators for confluence before making trade decisions.

Premium Algo Indicator Price dips below Lower Band while bands are trending up
Light green "3Engulfing" diamond appears
Multiple green triangles cluster near lows
RSI shows oversold condition
MACD bullish crossover occurs
This would trigger a high-confidence long entry with:
Stop loss below recent swing low
Profit targets at 1.618/2.618/3.618 extensions of risk distance
Key Features
Multi-timeframe analysis: Combines short-term patterns with long-term trends
Confluence trading: Requires multiple indicators to agree for high-probability signals
Visual clarity: Color-coded signals and trend ribbons
Risk management: Clear TP/SL rules based on volatility (ATR) and swing points

EMA 21 Distance Hist - Diamonds V3White Bars- Extreme Distance. Set close stops
Red - Change of Momentum
Green- chop but on the buy side. Stay long
Pink- chop on sell side. stay short
B/S indiates change in monetum backed by EMA cross
Diamond- 8/21 Cross


LON Super Tiangong Index## LON Super Heavenly Palace Indicator
### Description
The LON Super Heavenly Palace indicator is a sophisticated multi-line oscillator that identifies potential trading opportunities through a combination of momentum and trend analysis. It features four distinct lines that work together to provide comprehensive market insights.
### Key Features
- **Four Main Lines**: Short, Mid, Mid-Long, and Long lines with distinct colors
- **Adaptive Signals**: Uses both absolute and relative value analysis for better market adaptation
- **Visual Alerts**: Background highlighting and shape markers for clear signal identification
- **Multiple Signal Types**: Comprehensive signal system for various market conditions
### Trading Signals
#### Bullish Signals
- **Dragon's Treasure**: Blue background when all lines are in relative bottom territory
- **Golden Signal**: Cyan circles when all lines are below 20
- **Bounce Signal**: Pink triangles when long-term momentum turns positive
- **Perfect Opportunity**: Purple triangles for optimal entry conditions
#### Bearish Signals
- **Heaven's Treasure**: Yellow background when mid and long lines reach relative top territory
- **Top Signal**: Yellow circles when mid line exceeds 80
#### Confirmation Signals
- **Bottom Signal**: Magenta circles for oversold conditions
- **Strong Bottom**: Large purple triangles for major reversal opportunities
### How to Use
#### Entry Strategy
1. **Wait for Dragon's Treasure** (blue background) - indicates oversold conditions
2. **Look for Golden Signal** (cyan circles) - confirms bottom formation
3. **Confirm with Bounce Signal** (pink triangles) - momentum turning positive
4. **Enter on Perfect Opportunity** (purple triangles) - optimal timing
#### Exit Strategy
1. **Monitor Heaven's Treasure** (yellow background) - overbought conditions
2. **Watch for Top Signal** (yellow circles) - exit signal
3. **Use reference lines** (20, 80) for additional confirmation
#### Risk Management
- Use the 15 and 80 reference lines as support/resistance
- Combine multiple signals for higher probability trades
- Avoid trading against strong trend signals
- Use the -90 reference line for extreme oversold conditions
### Best Practices
- **Timeframe**: Works best on 1H, 4H, and Daily charts
- **Markets**: Effective on stocks, forex, and crypto
- **Confirmation**: Always wait for multiple signals to align
- **Patience**: Don't force trades - wait for clear signal combinations
### Visual Reference
- **Blue background** = Potential buying opportunity
- **Yellow background** = Potential selling opportunity
- **Colored circles** = Confirmation signals
- **Triangles** = Entry/exit points
- **Dotted lines** = Key reference levels
This indicator excels at identifying oversold/overbought conditions and potential reversal points, making it ideal for swing trading and medium-term position management.

EMA 21 Distance Hist - Diamonds V2EMA distnce with 8/21 cross . Also shows mometum and 8/21 based Buy or sell

EMA 21 Distance Hist - DiamondsIt shows distance from EMA. purple bars show the continuation of momentum and changes red bars to purple. Diamonds show 8/21 EMA cross.

9 EMA vs 21 EMA Cloud (Anchored)ema cloud 9 ema and 21 ema. whenever 9 ema is above 21 ema the trend is bulish and vice versa. when ema is below 21 ema trend bearish

EMA 21 Distance Histogram - TOS Style V2This script displays the distance from EMA. if momentum is on the same side, the following red bar paints as purple to show the continuation of the momentum.


Hull For LoopHull For Loop is a sophisticated trend-following indicator that combines the smoothness of Hull Moving Averages with advanced trend detection algorithms and robust confirmation mechanisms.
## How It Works
At its foundation, Hull For Loop employs a custom-calculated Hull Moving Average using weighted moving average for-loops to achieve optimal smoothness and responsiveness. The system operates through three distinct layers: Hull MA calculation with adjustable smoothing multipliers, advanced trend detection using ATR-based slope thresholds, and multi-bar trend confirmation to filter false breakouts.
The logic flow is elegantly simple yet powerful:
- Hull Calculation combines half-period and full-period weighted moving averages, then applies square-root smoothing for enhanced responsiveness
- Trend Detection analyzes Hull slope against dynamic ATR-based thresholds, classifying market direction as bullish, bearish, or neutral
- Confirmation System requires sustained directional movement across multiple bars before triggering signals, dramatically reducing whipsaws
When Hull slope exceeds the positive threshold, bullish conditions emerge. When it falls below the negative threshold, bearish momentum takes control. The multi-bar confirmation ensures only sustained moves generate actionable signals, making this system ideal for trend-following strategies across volatile markets.
The advanced slope analysis mechanism adapts to market volatility through ATR integration, ensuring sensitivity remains optimal during both high-volatility breakouts and low-volatility consolidations, delivering consistent performance across varying market conditions.
## Features
- Custom Hull Implementation : For-loop calculations for precise weighted moving average control and enhanced smoothness
- Dynamic Trend Detection : ATR-based slope analysis automatically adjusts sensitivity to market volatility conditions
- Multi-Bar Confirmation : Configurable confirmation periods (1-5 bars) eliminate false signals and reduce trading noise
- Advanced Visual System : Dynamic color coding, optional arrows, and statistics table for comprehensive market visualization
- Optimized for Bitcoin : Extensively backtested parameters delivering 128.58% returns with 55% drawdown reduction versus buy-and-hold
- Flexible Configuration : Hull length (1-200), smoothing multiplier (0.1-3.0), sensitivity (1-10), and confirmation settings
- Professional Alerts : Comprehensive alert system for trend changes and entry signals with strength percentages
- Real-time Analytics : Optional statistics table displaying trend direction, strength, Hull value, and current price
## Signal Generation
Hull For Loop generates multiple signal types for comprehensive trend analysis and precise entry/exit timing:
Primary Signals : Confirmed trend changes from bullish to bearish or vice versa - highest probability directional moves
Entry Signals : Initial trend confirmation after multi-bar validation - optimal position entry points
Strength Indicators : Real-time trend strength percentages based on directional momentum over lookback periods
Visual Confirmations : Color-coded Hull line providing instant visual trend status
The confirmation system adds crucial reliability - signals must persist through the specified confirmation period before activation, ensuring only sustained moves trigger trading decisions rather than temporary price fluctuations.
## Visual Implementation
The indicator employs sophisticated visual elements for immediate trend comprehension and professional chart presentation:
- Dynamic Hull Line : Color-changing line (green/red/gray) with configurable width reflecting current trend status
- Optional Directional Arrows : Triangle markers below/above bars marking confirmed trend changes and entry points (disabled by default)
- Statistics Panel : Optional real-time table showing trend direction, strength percentage, Hull value, and current price
- Professional Color Scheme : Customizable bullish (green), bearish (red), and neutral (gray) color system
## Alerts
Hull For Loop includes comprehensive alert conditions for automated trading integration:
- Hull Trend Change - Confirmed trend direction shift with strength percentage
- Hull BUY Signal - Bullish trend confirmation with price and strength data
- Hull SELL Signal - Bearish trend confirmation with price and strength data
- Alert Frequency - Once per bar to prevent spam while maintaining accuracy
All alerts include contextual information: trend direction, current price, and trend strength percentage for informed decision-making.
## Use Cases
Trend Following : Optimized for sustained directional moves with superior drawdown protection compared to buy-and-hold strategies
Swing Trading : Multi-bar confirmation eliminates false breakouts while capturing significant trend changes
Position Trading : Smooth Hull calculation provides stable signals for longer-term directional positioning
Risk Management : Advanced confirmation system dramatically reduces whipsaw trades and false signals
Crypto Trading : Specifically optimized for Bitcoin with parameters delivering exceptional historical performance
The system demonstrates exceptional performance across volatile assets.

EMA 21 Distance IndicatorSImple Indicator which displays the price difference from 21 EMA as Red and green to easily identify if the price is reaching any extreme.

LON超级天宫指标指标名称
LON Oscillator with MA Crossover Signal
简短描述 (Short Description)
A comprehensive LON (Long-term Oscillator) indicator with multiple timeframe analysis and MA crossover signals for identifying optimal entry points.
详细描述 (Detailed Description)
Overview
The LON Oscillator is a powerful multi-timeframe technical analysis tool that combines short-term, medium-term, and long-term price momentum to identify potential trading opportunities. This indicator is particularly effective for swing trading and trend following strategies.
Key Features
Multi-timeframe Analysis: Combines 21-day, 37-day, and 55-day price momentum
MA Crossover Signals: 13-day and 55-day moving average crossovers for entry confirmation
Multiple Signal Types: Bottom detection, golden opportunities, top signals, and bounce signals
Visual Alerts: Color-coded signals and background highlights for easy identification
Signal Types
Bottom Signal: When medium-term line < 15, indicating oversold conditions
Golden Opportunity: When all three lines (short, medium, long) < 20, suggesting strong buying opportunity
Top Signal: When medium-term line > 80, indicating overbought conditions
Bounce Signal: When long-term line crosses above 15, signaling potential reversal
Perfect Opportunity: Short-term line crosses above long-term line with specific conditions
Strong Bottom: Multiple confirmation signals for major bottom formation
Usage Guidelines
Buy Signals: Look for golden opportunities and bounce signals when LON is above zero
Sell Signals: Consider taking profits when top signals appear
Risk Management: Use bottom signals for stop-loss placement
Trend Confirmation: Combine with volume and other technical indicators
Best Timeframes
Daily: Primary timeframe for swing trading
4-Hour: For shorter-term entries
Weekly: For long-term trend analysis
Settings
All parameters are optimized for daily charts
Can be adjusted for different timeframes and market conditions
Color scheme can be customized in settings
Disclaimer
This indicator is for educational and informational purposes only. Past performance does not guarantee future results. Always use proper risk management and combine with other analysis tools.

Multi-Indicator Switch PanelThe Multi-Indicator Switch Panel is a powerful all-in-one TradingView toolkit that allows traders to toggle multiple popular indicators on and off from a single, intuitive control panel — without cluttering the chart or reloading scripts.
This panel gives you real-time control over the following indicators (configurable per version):

8 EMA vs 21 EMA Crossover AlertsThis indicator creates a Buy signal when 8 EMA crosses above 21 EMA and vice versa on any time frame selected on the chart

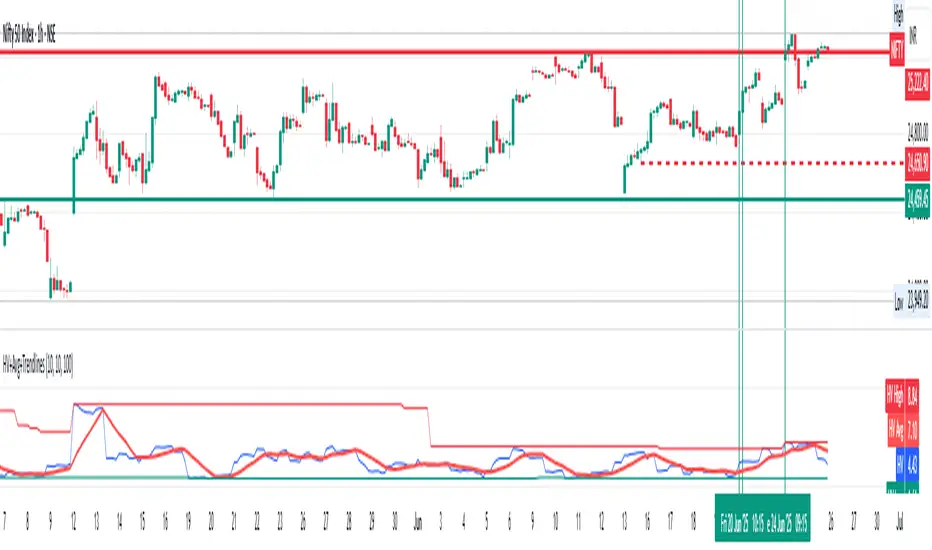
Historical Volatility with HV Average & High/Low Trendlines
### 📊 **Indicator Title**: Historical Volatility with HV Average & High/Low Trendlines
**Version**: Pine Script v5
**Purpose**:
This script visualizes market volatility using **Historical Volatility (HV)** and enhances analysis by:
* Showing a **moving average** of HV to identify volatility trends.
* Marking **high and low trendlines** to highlight extremes in volatility over a selected period.
---
### 🔧 **Inputs**:
1. **HV Length (`length`)**:
Controls how many bars are used to calculate Historical Volatility.
*(Default: 10)*
2. **Average Length (`avgLength`)**:
Number of bars used for calculating the moving average of HV.
*(Default: 20)*
3. **Trendline Lookback Period (`trendLookback`)**:
Number of bars to look back for calculating the highest and lowest values of HV.
*(Default: 100)*
---
### 📈 **Core Calculations**:
1. **Historical Volatility (`hv`)**:
$$
HV = 100 \times \text{stdev}\left(\ln\left(\frac{\text{close}}{\text{close} }\right), \text{length}\right) \times \sqrt{\frac{365}{\text{period}}}
$$
* Measures how much the stock price fluctuates.
* Adjusts annualization factor depending on whether it's intraday or daily.
2. **HV Moving Average (`hvAvg`)**:
A simple moving average (SMA) of HV over the selected `avgLength`.
3. **HV High & Low Trendlines**:
* `hvHigh`: Highest HV value over the last `trendLookback` bars.
* `hvLow`: Lowest HV value over the last `trendLookback` bars.
---
### 🖍️ **Visual Plots**:
* 🔵 **HV**: Blue line showing raw Historical Volatility.
* 🔴 **HV Average**: Red line (thicker) indicating smoothed HV trend.
* 🟢 **HV High**: Green horizontal line marking volatility peaks.
* 🟠 **HV Low**: Orange horizontal line marking volatility lows.
---
### ✅ **Usage**:
* **High HV**: Indicates increased risk or potential breakout conditions.
* **Low HV**: Suggests consolidation or calm markets.
* **Cross of HV above Average**: May signal rising volatility (e.g., before breakout).
* **Touching High/Low Levels**: Helps identify volatility extremes and possible reversal zones.
ATR Trailing Stops Strategy with Cross Arrowsadds signals when the ATR line is crossed.
Can be used for entries as well as a stop loss area.

FlexMAFlexMA – Time-based moving average
FlexMA plots a moving average based on real-world time (like “5 days”) instead of fixed bar lengths.
Choose the MA type (SMA, EMA, etc.), enter a timespan and unit, and the script automatically adjusts across any chart timeframe.
This was created out of a demand for moving average indicator that was easy to configure across any time frame but the results end up consistent. For example, a 5 Day SMA where it looks the same at every interval.
Powered by:
Electrified/Time – Converts spans to lengths
Electrified/MovingAverages – Provides modular MA logic
Example: Want a 3-day EMA? Just set:
Plot: EMA
Timespan: 3
Unit: Days
Clean, adaptive, and great for multi-timeframe setups.
