Fractal Flow BandsFractal Flow Bands
A high-precision trend-following system combining HalfTrend logic with ALMA smoothing — built for clarity, speed, and smart alerts.
🔷 What is Fractal Flow Bands?
Fractal Flow Bands merges the best of both worlds:
HalfTrend for accurate trend detection
ALMA (Arnaud Legoux Moving Average) for smooth, low-lag confirmation
This unique synergy delivers clean, non-repainting Buy/Sell signals, filtering out market noise and keeping your chart crystal clear.
🔍 How It Works
Blue HalfTrend Line + Green ALMA Crossover → BUY
Red HalfTrend Line + Red ALMA Crossover → SELL
You get only ONE alert per trend change, eliminating spammy notifications. Perfect for swing traders, scalpers, and trend followers alike.
⚙️ Core Features
✅ Dual Confirmation Engine
ALMA must confirm HalfTrend — no single-line tricks here.
✅ One Alert per Trend Shift
Clean signals, no noise, no repeats.
✅ Visual Clarity
Color-coded trends. No channels, ribbons, or clutter.
✅ Customizable Settings
Tune HalfTrend amplitude and ALMA smoothness to your strategy.
🎯 Best For
Swing traders wanting confirmation before entries
Scalpers needing fast, accurate signal flow
Anyone who hates messy charts but loves sharp decisions
🛠 Settings Explained
Setting Description
HT Amplitude Controls HalfTrend sensitivity
ALMA Length / Offset / Sigma Adjusts the smoothness of ALMA
Source Choose price source (Close, Open, etc.)
Display Toggles Enable/disable arrows and ribbons
Colors Fully customizable trend color schemes
✅ Built-in Alerts — So you never miss a signal again.
⚡ Lag-free performance — Works on multiple timeframes.
📈 Real strategy-ready code — Not just another repainting overlay.
Moving Averages

Delorean EMAs NSYNC Bye, Bye, Bye# Delorean EMA Trend Alerts - Multi-Timeframe Edition
A Pine Script indicator for TradingView that tracks exponential moving averages (EMAs) across multiple timeframes and generates alerts only when both 1-hour and 4-hour charts agree on the trend direction. As NSYNC says, if the timeframes don't agree, your money will go "Bye, Bye, Bye!"
## Features
- Displays 5 EMAs (5, 13, 50, 200, 800 periods)
- **Multi-Timeframe Analysis**: Checks both 1H and 4H charts simultaneously
- **Trend Agreement Required**: Only signals when BOTH timeframes show the same trend
- Detects bullish trends: 50 EMA > 200 EMA > 800 EMA (on both 1H and 4H)
- Detects bearish trends: 50 EMA < 200 EMA < 800 EMA (on both 1H and 4H)
- **NSYNC Warning**: Orange warning when timeframes disagree
- Visual trend signals with up/down arrows (only when timeframes agree)
- Background coloring: Green (bullish), Red (bearish), Orange (no sync)
- **Status Table**: Shows trend status for each timeframe
- Customizable alert conditions
- Multiple alert types: Bullish, Bearish, NSYNC Warning, Alignment

Panel Pro+ Quantum SmartPromptPanel Pro+ Check 2.0
*It's a panel with integrated artificial intelligence in offline mode.
*It provides live chart prompts.
*It recognizes market types, such as bullish, bearish, box, sideways, volatile, etc.
*It performs a comprehensive evaluation and takes buy or sell actions, with the corresponding profit-taking.

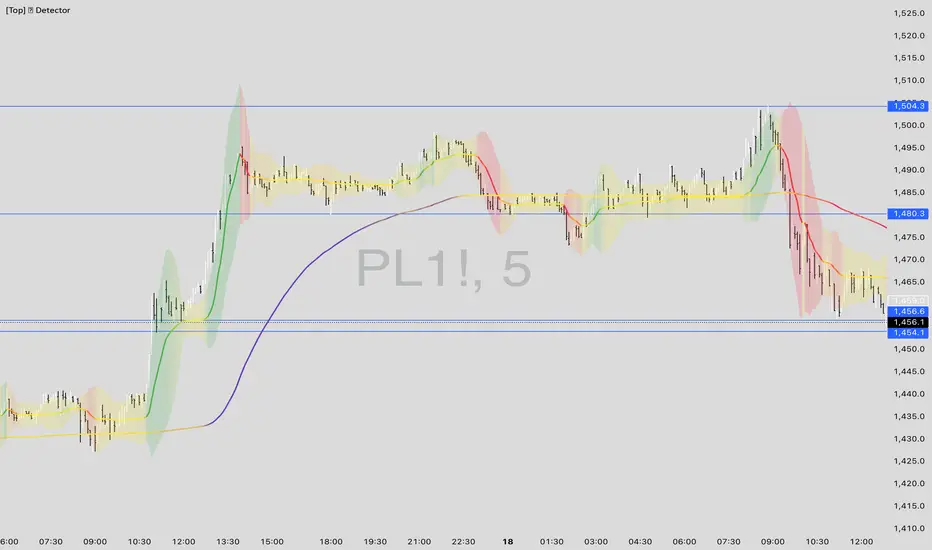
[Top] LHAMA Consolidation DetectorIntroducing the Low-High Adaptive Moving Average (LHAMA 🦙), a powerful tool designed to help traders visually distinguish between trending and consolidating market phases. Unlike traditional moving averages that can produce false signals in choppy markets, the LHAMA is engineered to flatten out during periods of consolidation and become more responsive when a clear trend emerges.
This indicator's primary function is to act as a "Consolidation Detector." When the LHAMA line goes flat and adopts its "Flat Color," it serves as a clear visual cue that the market is range-bound. Conversely, when the line begins to slope and changes to its Bullish or Bearish color, it signals a potential breakout or the start of a new trend.
How It Works
The LHAMA is a type of adaptive moving average. Its adaptiveness is derived from a unique calculation that measures market "trendiness." It does this by tracking whether new highs or new lows are being made within a specified lookback period.
In a Trending Market: When the price consistently makes new highs or lows, the indicator's responsiveness increases, causing the LHAMA to track the price much more closely and responsively.
In a Consolidating Market: When the price is range-bound and fails to make new highs or lows, the responsiveness decreases significantly. This causes the LHAMA to flatten out and become less sensitive to minor price fluctuations, effectively filtering out market noise.
Key Features
Adaptive Calculation: The core engine of the indicator, which automatically adjusts its smoothing based on trend strength.
Slope-Based Coloring: The line's color dynamically changes based on its slope, providing an at-a-glance view of market conditions: bullish, bearish, or flat.
Multi-Line & Multi-Timeframe (MTF): You can enable up to six fully customizable LHAMA lines. Each line can be configured with its own length, colors, and can even be set to a different timeframe, allowing for comprehensive multi-timeframe analysis on a single chart.
Volatility Clouds: Each LHAMA can display an optional cloud around it. The cloud's width is based on your choice of either the Average True Range (ATR) or Standard Deviation (StdDev), offering a visual representation of volatility.
Volume Weighting: An option to incorporate volume into the adaptive calculation, making the LHAMA even more responsive during high-volume price movements.
How to Use
Identify Consolidation: The primary use case. A flat and consistently colored LHAMA line is a strong indication of a sideways or consolidating market. This can help traders avoid taking trend-following trades in choppy conditions.
Confirm Trends: When the LHAMA begins to slope upwards or downwards and changes to its trend color, it can be used to confirm the direction and strength of a new trend. The steeper the slope, the stronger the momentum, and more solid the directional color.
Dynamic Support & Resistance: Like other moving averages, the LHAMA can act as a dynamic level of support in an uptrend or resistance in a downtrend. The optional cloud can further define these zones.
Multi-MA Ribbon Strategy: By enabling multiple LHAMAs with different lengths (e.g., Fibonacci sequence like 14, 21, 34, 55), you can create a ribbon. The expansion of the ribbon indicates a strong trend, while its contraction signals a weakening trend or consolidation.
Settings Explained
Enable 🦙 Line: A simple checkbox to turn each of the six LHAMA lines on or off.
Length: The lookback period for the LHAMA calculation. Shorter lengths are more responsive, while longer lengths are smoother.
Timeframe: Set a specific timeframe for each LHAMA. Leave blank to use the chart's current timeframe.
Volume Weight: If checked, adds volume weighting to make the LHAMA more responsive to high-volume moves.
Colors (Bullish, Bearish, Flat): Customize the colors for each market state. To only see the line during consolidation, set the Bullish and Bearish colors to 100% transparency. To hide the line during consolidation, set the Flat color to 100% transparency.
Color Sensitivity: This is a crucial setting. Because price scales (tick sizes) vary widely between symbols, this setting allows you to adjust the sensitivity of the slope detection. A lower value requires a steeper slope to trigger a trend color, while a higher value is more sensitive.
Recommended settings are provided in the input tooltip as a starting point:
$5 Tick: 0.25 Sensitivity
$1 Tick: 0.75 Sensitivity
$0.25 Tick: 3 Sensitivity
$0.01 Tick: 50 Sensitivity
$0.005 Tick: 100 Sensitivity
Cloud Settings:
Show Cloud: Toggles the visibility of the volatility cloud around the LHAMA.
Width Based On: Choose between "ATR" or "StdDev" to calculate the cloud's width.
Cloud Length & Width: Set the lookback period and multiplier for the ATR/StdDev calculation to control the size of the cloud.
Renko Brick Zone NeelBrick indicator is a brick zone indicator, plotted not in histogram style but instead with a moving average plotted along with it.
40 period is count of same color brick difference between green and red is always 40
40-period brick indicator line and 40-period moving average line of the brick indicator.

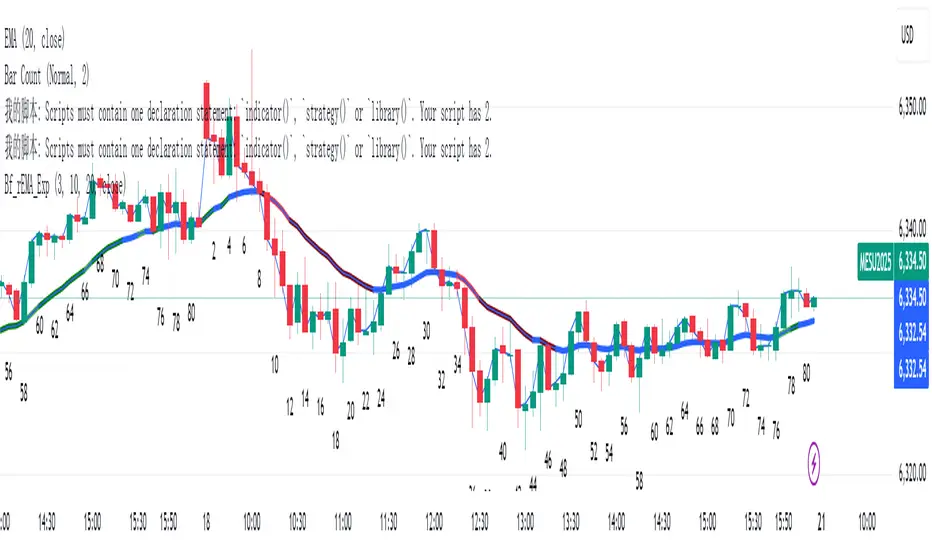
rEMAExpColor Moving Average Indicator This indicator can intuitively show the current state of market power
Suitable for price action traders
Sma-vwap @AnlATAbiliyormuyumThis indicator uses a simple moving average (SMA). When the price moves above the average, it can be considered as a buy signal, and when it falls below, as a sell signal. In addition, weekly, monthly, 3-month, 6-month, and yearly VWAPs have been added. The price's movements above and below these VWAPs can also be evaluated accordingly. Stay in peace and enjoy.

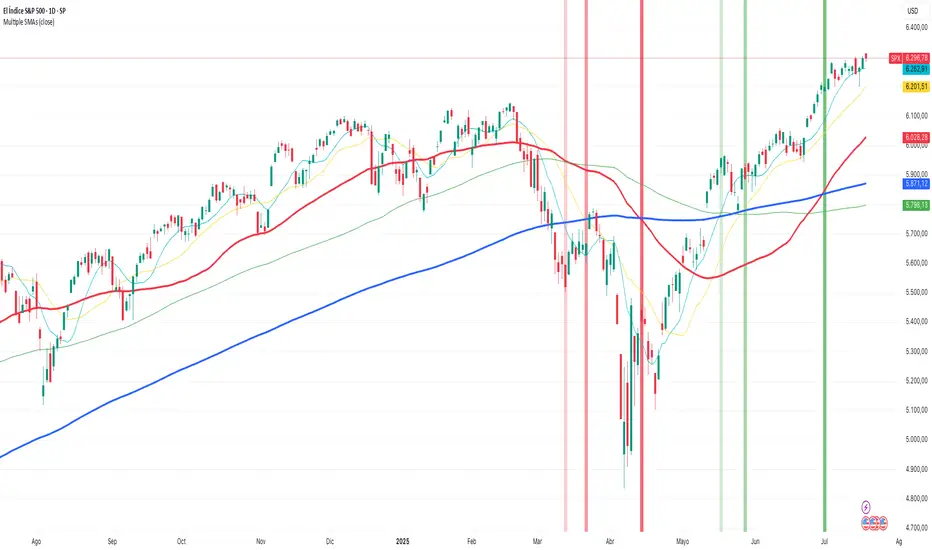
Multiple SMAsPlots multiple SMAs in a single indicator.
This script only plots the SMAs if the timeframe is set to daily.
- SMA10 in light blue
- SMA20 in yellow
- SMA50 in red
- SMA100 in green
- SMA200 in blue
It also plots the crosses between SMA20 and SMA50
10kaDum by NAVHere's a comprehensive description for publishing your "10kaDum by NAV" script on TradingView:
---
# 🎯 10kaDum by NAV - Advanced SMA Alignment Trading System
**A comprehensive trading strategy that combines SMA alignment signals with intelligent dip-buying and automated profit-taking mechanisms.**
## 📊 Strategy Overview
The 10kaDum system identifies optimal entry and exit points using Simple Moving Average (SMA) alignment patterns, while providing additional opportunities through systematic dip buying and profit taking.
### Core Signals:
🟢 **MAIN BUY**: Triggers when Close < SMA20 < SMA50 < SMA200 (bearish alignment - potential reversal)
🟡 **10kaDum BUY**: Secondary buy signal when price drops 10% after main buy (dollar-cost averaging)
🟠 **10kaDum SELL**: Exit signal when price rises 10% from 10kaDum buy (quick profit taking)
🔴 **MAIN SELL**: Exit signal when Close > SMA20 > SMA50 > SMA200 (bullish alignment - trend reversal)
## 🔥 Key Features
### Smart Signal Management
- **One-time signals**: Each signal triggers only once until the opposite condition occurs
- **No signal spam**: Clean, actionable entries without repetitive alerts
- **Cycle-based logic**: Complete trading cycles from entry to exit
### Performance Analytics
- **Real-time statistics table** with configurable position and styling
- **Closed Trades**: Total number of completed 10kaDum cycles
- **Average Days**: Mean holding period for 10kaDum positions
- **Minimum Days**: Fastest trade completion time
- **Min Days Date**: When the fastest trade occurred
### Advanced Label System
- **Performance metrics**: Days held, gain percentage, and CAGR on exit signals
- **Calendar days calculation**: Accurate time-based performance (not just bars)
- **Anti-overlap positioning**: Smart label placement to avoid chart clutter
- **Fully customizable**: Colors, sizes, and text styling
### Professional Customization
- **Label colors**: Separate color controls for each signal type
- **Table styling**: Full control over fonts, colors, and positioning
- **Position controls**: Precise offset adjustments for optimal visibility
- **Alert system**: Built-in alerts for all signal types
## 📈 Trading Logic
**Entry Strategy:**
1. Wait for bearish SMA alignment (potential bottom)
2. Enter initial position on MAIN BUY
3. Add to position on 10% dips (10kaDum BUY)
**Exit Strategy:**
1. Take quick profits on 10kaDum positions (+10% gain)
2. Hold main position until bullish SMA alignment
3. Full exit on MAIN SELL signal
## 🎨 Visual Elements
- **SMA Lines**: 20, 50, and 200-period moving averages
- **Colored Labels**: Distinct visual signals for each action
- **Statistics Table**: Live performance tracking
- **Clean Design**: Minimal chart clutter with maximum information
## ⚡ Best Practices
- Use on daily or higher timeframes for best results
- Combine with volume analysis for confirmation
- Monitor the statistics table for strategy performance
- Adjust position sizes based on signal type
- Set alerts for hands-free trading
## 🔧 Customization Options
- **9 table positions** (top, middle, bottom × left, center, right)
- **5 font sizes** (tiny to huge)
- **Full color customization** for all elements
- **Adjustable label spacing** for different chart scales
- **Toggle statistics display** on/off
---
**Disclaimer**: This indicator is for educational purposes. Past performance doesn't guarantee future results. Always practice proper risk management and consider your financial situation before trading.
**Created by**: NAV
**Version**: 1.0
**Category**: Strategy / Trend Analysis
---
This description highlights the key features, provides clear usage instructions, and maintains a professional tone suitable for TradingView's marketplace.

SMA Crossover Strategy📈 Indicator: SMA Crossover Strategy
This strategy uses optimized fast and slow SMA values tailored to popular timeframes for more responsive trend detection. You can let the script auto-select values or manually define your own crossover settings. Clean visual cues and per-candle signal filtering keep your chart sharp and actionable.
🔧 Key Features:
- Auto Mode: Smart defaults for each timeframe with trader-tested pairs
- Manual Mode: User-defined flexibility when custom values are needed
- Signal Clarity: BUY/SELL labels are plotted only once per confirmed candle
🧠 Default Auto Values (Based on Chart Timeframe)
- 1-min: Fast = 5, Slow = 20
- 5-min: Fast = 5, Slow = 10
- 15-min: Fast = 5, Slow = 13
- 30-min: Fast = 15, Slow = 30
- 1-hr: Fast = 50, Slow = 200
- 4-hr: Fast = 20, Slow = 50
- Daily: Fast = 50, Slow = 200
- Weekly: Fast = 10, Slow = 30
If your timeframe isn't matched exactly, the script falls back to sensible defaults.
📊 How to Improve Conviction
SMA crossovers are strong signals when confirmed by other tools. Here are some add-ons you can layer into your chart:
🔍 Confirmation Indicators
- RSI (14): Look for crossovers near RSI crossing 50 or at oversold/overbought zones for momentum confirmation.
- MACD: Use histogram alignment with crossover signals to detect real trend shifts.
- Volume Filters: Pair signals with rising volume for institutional confirmation.
🌀 Trend & Volatility Filters
- ATR (Average True Range): Helps filter signals during consolidation—watch for expanding ATR as a volatility cue.
- ADX: Trade only when ADX > 20 to avoid false signals in ranging markets.
- HMA (Hull MA): A smoother, faster MA that can act as a trend bias overlay.
🔭 Multi-Timeframe Awareness
Overlay higher-timeframe trend indicators (like a daily 200 SMA on an intraday chart) to avoid trading against macro momentum.

Pegasus Returns EMAs (Green Above, Red Below)This indicator plots up to four customizable Exponential Moving Averages (EMAs) on the price chart, each with user-defined settings for visibility and period length. It is designed to provide a clear visual representation of bullish and bearish momentum based on the closing price relative to each EMA.
Key Features:
Custom EMA Periods: Easily modify the length of each EMA (default: 20, 50, 100, 200).
Dynamic Color Coding:
Green Line when the closing price is above the EMA (bullish signal).
Red Line when the closing price is below the EMA (bearish signal).
Toggle Visibility: You can choose to display or hide any of the four EMAs via checkboxes in the settings.
Overlay on Price Chart: EMAs are plotted directly on the candlestick chart for intuitive analysis.
Inputs:
Show EMA 1–4: Enable or disable each EMA.
EMA 1–4 Period: Set a custom period for each EMA (min 1).
Use Cases:
Identifying trend direction and strength.
Spotting dynamic support and resistance zones.
Entry/exit confirmation in trending markets

TeeLek-HedgingLineXThis indicator is suitable for use with charts that are Down Trend and are about to change to Sideway or Up Trend. It works opposite to another indicator that I created called TeeLek Hedging Line.
Calculation method :
We will use the Highest value of 600 candlesticks in the past to create the average line. After that, we will create the All Time Low line.
How to use :
It is used to tell that this point is the lowest historical High value. This means that this is the point where the best Short buyers start to reach the loss point. At the same time, it is the point where the worst Long buyers start to make a profit. Therefore, it is suitable to be the point of changing from Down Trend to Up Trend.
There are 2 lines that are used to divide the range. If the graph is at the bottom, it will be Down Trend. If the graph is in the middle, it will be Sideway. And if the graph is at the top of both lines, it will be Up Trend.
//-------------------------------------------------------------------
อินดิเคเตอร์นี้ เหมาะสำหรับใช้กับกราฟที่เป็น Down Trend และกำลังจะเปลี่ยนเป็น Sideway หรือ Up Trend จะทำงานตรงข้ามกับ อินดิเคเตอร์อีกตัวที่ผมสร้างขึ้นมา ที่ชื่อว่า TeeLek Hedging Line
วิธีการคำนวณ
เราจะใช้ค่า Highest 600 แท่งเทียนย้อนหลัง ในการสร้างเส้นค่าเฉลี่ย หลังจากนั้น ก็จะสร้างเส้น All Time Low ขึ้นมา
วิธีใช้งาน
เอาไว้บอกว่า จุดนี้คือ ค่า High ย้อนหลังที่ต่ำที่สุด หมายความว่า นี่คือจุดที่คนซื้อ Short ที่ดีที่สุดก็เริ่มถึงจุดขาดทุน ขณะเดียวกัน ก็เป็นจุดที่คนที่ซื้อ Long ที่แย่ที่สุด เริ่มกำไร จึงเหมาะจะเป็นจุดเปลี่ยนจาก Down Trend ไปเป็น Up Trend
มี 2 เส้น ก็เอาไว้ใช้แบ่งช่วง ถ้ากราฟอยู่ด้านล่าง จะเป็น Down Trend ถ้ากราฟอยู่ระหว่างกลางก็จะเป็น Sideway และถ้ากราฟอยู่ด้านบนของทั้งสองเส้น ก็จะเป็น Up Trend

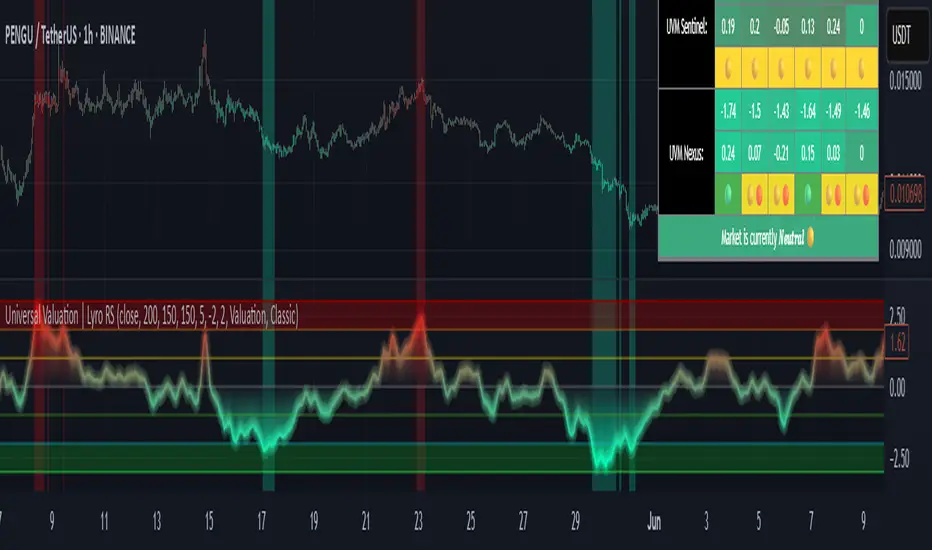
Universal Valuation | Lyro RSUniversal Valuation
⚠️Disclaimer: This indicator is a tool for technical analysis and does not provide guaranteed results. It should be used in conjunction with other analysis methods and proper risk management practices. The creators of this indicator are not responsible for any financial decisions made based on its signals.
Overview
The Universal Valuation indicator helps identify whether the market is undervalued/cheap or overvalued/expensive. And another mode this indicator offers is This cutting-edge tool works flawlessly ACROSS ALL TIMEFRAMES & TICKERS/CHARTS.
By combining regular TradingView indicators & some of our valuation indicators basic/simple with advanced statistical functions, this indicator offers a powerful, universal valuation tool.
Key Features
INPUTS: The Universal Valuation indicator offers flexibility through its customizable input sections. The "Indicator Settings" let you adjust lengths for the raw indicators and statistical functions. The "Signals" section defines thresholds for background color changes, helping you visually spot key market moments. The "Colors" section allows you to pick from pre-defined schemes or personalize colors for better clarity. Lastly, the "Tables" section gives you full control over the UV table’s size and positioning, including options to overlay it on the chart or place it in the allocated space.
A DEEPER INSIGHT: This indicator is built around three distinct categories: "UVM Andromeda," "UVM Sentinel," and "UVM Nexus." Each category has three different drivers. The statistical function powering this indicator is the Z-score. The Z-score is an incredibly powerful tool that helps determine if the market is overvalued/expensive or undervalued/cheap, offering critical insights for traders."
Plotting: The plotted value represents the average of all the drivers. In other words, it is the combined average of all 9 Z-scored indicators, providing a balanced and comprehensive market valuation.
What is Z-score? & Why does this system use it?
Z-score is an advanced statistical function used to measure how far a value deviates from the average in a data set. The formula for Z-score is: (x - h) / o, where x is the observed value, h is the average (mean) of the data set, and o is the standard deviation.
This system uses the Z-score because it helps determine whether the market is overvalued or undervalued based on historical data and how we apply the calculation. By measuring how far a value deviates from the average, the Z-score provides a clearer and more objective valuation of market conditions. In our case, a Z-score of -3 indicates an undervalued market, while a Z-score of 3 signals an overvalued market.
UVM Andromeda:
UVM stands for Universal Valuation Model, which is the core of this indicator. Andromeda, one of the most stunning galaxies in the universe, inspired by its name. We chose this name because a powerful indicator should not only be effective but also visually appealing.
You might be wondering what drives UVM Andromeda. The three key drivers are Price, RSI, and ROC. These indicators are pre-defined, while the "Indicator Settings" allow you to adjust the length of the Z-score calculation, refining how the model analyzes market conditions.
UVM Sentinel:
Sentinel, refers to a guard or watchman, someone or something that keeps watch and provides protection. In our case this name refers to a model that actively observes market conditions, acting as a vigilant tool that signals important shifts in valuation.
Wondering what drives UVM Sentinel? The three key drivers are BB%, CCI, and Crosby. While these indicators are simple on their own, applying our Z-score function elevates them to a whole new level, enhancing their ability to detect market conditions with greater accuracy.
UVM Nexus:
We chose the name Nexus simply because it sounds cool—there’s no deeper meaning behind it for us. However, the word itself does have a meaning; it refers to a connection or link between multiple things.
The three key drivers for UVM Nexus are the Sharpe, Sortino, and Omega ratios. These are all asset performance metrics, but by applying the Z-score, we transform them into powerful valuation indicators/drivers, giving you a deeper insight into market conditions.
Why do we use 9 different indicators instead of 1?
That's a great question, and the answer is quite simple. Think of it like this: if you have one super soldier, and they miss a shot, it’s game over. But if you have many soldiers, even if one misses, the others can step in and take the shot. The strength of using multiple indicators lies in their collective power – if one misses, the others still provide valuable insights, making the overall system more reliable.
Final Thoughts:
In our Universal Valuation indicator, you have the flexibility to customize it however you like using our inputs. The system is divided into three distinct categories, with each category containing three indicators. The value plotted on the chart is the average of all nine indicators. We apply the Z-score, an advanced statistical function, to each of these nine indicators. The final plotted average is the average of all the Z-scores, giving you a comprehensive and refined market valuation. This indicator can work on any timeframe & chart ticker.
Multi Timeframe 50EMA CloudDescription:
The Multi Timeframe 50EMA Cloud is a powerful tool for multi-timeframe trend analysis. This indicator allows you to display the 50-period Exponential Moving Average (EMA) and its volatility "cloud" from several higher timeframes directly on any chart.
Features:
* See the 50EMA cloud from multiple timeframes at once: 15m, 1H, 4H, and 1D.
* Flexible controls: Easily turn each timeframe’s cloud on or off in the settings - overlay as many as you want.
* Distinct colors: Each timeframe has customizable colors for its EMA line, cloud and borders to keep your chart clear and organized.
* Universal perspective: Great for identifying higher timeframe support and resistance, confluence zones and market structure without switching charts.
How it works:
Each enabled EMA cloud is plotted with a band above and below the EMA line, showing ± one-quarter standard deviation (stdev) of price. This "cloud" highlights short-term volatility around the higher timeframe EMA, making it easier to spot dynamic support, resistance and trend strength.
Best for:
* Day traders and swing traders who want to track key EMAs from multiple timeframes on a single chart
* Identifying multi-timeframe confluence, trend direction and volatility zones
Tip:
Try overlaying the 15m, 1H, and 4H EMA clouds on lower timeframe charts (e.g., 1m, 5m, or 15m) for deeper market insight and better trade timing.
⚠️ Important Notice
This tool is provided for educational and informational purposes only . It is designed to assist in technical analysis learning and visual chart study.
It is not intended to be used as financial advice, a buy/sell signal, or any form of investment recommendation .
By using this indicator, you acknowledge that all actions you take are your own and you assume full responsibility for any decisions made.

50/100 EMA Crossover with Candle Confirmation📘 **50/100 EMA Crossover with Candle Confirmation – Strategy Description**
The **50/100 EMA Crossover with Candle Confirmation** is a trend-following strategy designed to filter high-probability entries by combining exponential moving average (EMA) crossovers with strong price action confirmation. This strategy aims to reduce false signals commonly associated with EMA-only systems by requiring a **candle close confirmation in the direction of the trend**, making it more reliable for intraday or swing trading across Forex, crypto, and stock markets.
---
### 🔍 **Core Logic**
* The strategy is based on the interaction of the **50 EMA** (fast-moving average) and the **100 EMA** (slow-moving average).
* **Trend direction** is determined by the crossover:
* **Bullish Trend**: When the 50 EMA crosses **above** the 100 EMA.
* **Bearish Trend**: When the 50 EMA crosses **below** the 100 EMA.
* To **filter out false breakouts**, a **candle confirmation** is used:
* For a **Buy signal**: After a bullish crossover, wait for a strong bullish candle (e.g., full-body green candle) to **close above both EMAs**.
* For a **Sell signal**: After a bearish crossover, wait for a strong bearish candle to **close below both EMAs**.
---
### ✅ **Entry Conditions**
**Buy Entry:**
* 50 EMA crosses above 100 EMA.
* Latest candle closes **above both EMAs**.
* Candle must be bullish (green/full body preferred).
**Sell Entry:**
* 50 EMA crosses below 100 EMA.
* Latest candle closes **below both EMAs**.
* Candle must be bearish (red/full body preferred).
---
### 🛑 **Exit or Take-Profit Options**
* **Fixed TP/SL**: 1:2 or 1:3 risk-reward.
* **Trailing Stop**: Based on recent swing highs/lows or ATR.
* **EMA Exit**: Exit trade when the candle closes on the opposite side of 50 EMA.
---
### ⚙️ **Best Settings**
* **Timeframes**: 5M, 15M, 1H, 4H (works well on most).
* **Markets**: Forex, Crypto (e.g., BTC/ETH), Indices (e.g., NASDAQ, NIFTY50).
* **Recommended filters**:
* Use with RSI divergence or volume confirmation.
* Avoid using during high-impact news (especially on lower timeframes).
---
### 🧠 **Why This Works**
The 50/100 EMA crossover provides a **medium-term trend signal**, reducing noise seen in fast EMAs (like 9 or 21). The candle confirmation adds a **momentum filter**, ensuring price supports the directional bias. This makes it suitable for traders who want a balance of trend and entry precision without overcomplicating with too many indicators.
---
### 📈 **Advantages**
* Simple yet effective for identifying trends.
* Filters out fakeouts using candle confirmation.
* Easy to automate in Pine Script or other trading bots.
* Can be combined with support/resistance or SMC zones for better confluence.
---
### ⚠️ **Limitations**
* May lag slightly in ranging markets.
* Late entries possible due to confirmation candle.
* Works best with additional volume or volatility filter.

PK's Buffer Zones with Extra Zone + EMA + VWAPuse as support and resistance. for any market and stocks.

Momentum-Reversal System Signals Pro
Momentum-Reversal System Signals Pro
Overview
A sophisticated signaling system designed to identify high-probability trend-following entries after a price pullback. This indicator is optimized for index futures like the S&P 500 (ES/SPX) on a 5-minute timeframe .
It performs best during periods of established trends and lower volatility. To aid in this, the indicator includes a customizable "No-Trade Zone" highlighter, which is pre-set to the often volatile 8:30 AM - 11:30 AM EST market open. While the default settings are robust and effective in most conditions, the indicator is fully customizable to suit your specific trading style.
How It Works
The core logic is based on a three-step process to filter for high-quality setups:
Trend Confirmation: The script first establishes the overall market direction using an EMA on a higher timeframe (15-minute by default). This ensures you are only looking for trades that align with the dominant trend.
Pullback Detection: Once the trend is confirmed, the script waits for the price to pull back to a dynamic area of value on the main chart (5-minute by default). This "pullback zone" is defined by the 5m EMA and an ATR-based channel around it, which adapts to current market volatility.
Momentum Entry: After a valid pullback occurs, the script waits for a clear sign that momentum is returning in the direction of the primary trend. This is confirmed by a combination of a MACD crossover and a strong RSI reading, signaling that the pullback has likely ended and the trend is ready to resume.
Advanced Quality Filters
What makes this indicator powerful is its multi-layered filtering system designed to weed out low-probability signals and avoid choppy market conditions.
Trend Strength: It doesn't just check the trend direction; it measures the slope of the 15m EMA to ensure the trend has sufficient strength. This is a key filter for avoiding flat, sideways markets.
Momentum Confirmation: An RSI "Dead Zone" around the 50-level ensures that the RSI shows decisive momentum before a signal is generated.
Signal Cooldown: A built-in timer ( Min Bars Between Signals ) prevents the same signal from firing repeatedly in a short period, reducing noise and over-trading.
RSI Volatility: The script checks that the RSI itself is not flat, which is often a sign of market indecision and a precursor to chop.
Pullback Quality: An optional filter ensures that by the time the signal fires, the price has already moved back to the "correct" side of the 5m EMA, confirming the reversal's strength.
Volatility Filter: A crucial risk management filter that blocks signals on abnormally large, high-risk "gasoline" bars that could lead to immediate stops.
How To Use
For Long Signals (Green 'Long' Tag):
Look for the 15m EMA to be green and trending upwards.
Wait for price to pull back towards the orange 5m EMA.
A "Long" signal appears when momentum indicators confirm a reversal back in the direction of the trend.
For Short Signals (Red 'Short' Tag):
Look for the 15m EMA to be red and trending downwards.
Wait for price to pull back towards the orange 5m EMA.
A "Short" signal appears when momentum indicators confirm a reversal back in the direction of the trend.
This tool provides high-probability signals, not guarantees. It is designed to be a core component of a complete trading plan. Always use proper risk management and confluence from your own analysis.
Fine-Tuning & Customization
All settings are fully adjustable in the script's "Inputs" tab to match your risk tolerance and market conditions.
Timeframe & EMA Settings: Adjust the core moving averages that define the trend and pullback zones.
Pullback Settings: Define what constitutes a valid pullback by adjusting the lookback period and the size of the ATR-based "near" zone.
Quality Filters: This is the most important section for tailoring the script's strictness. Increase the EMA Slope, RSI Dead Zone, or Signal Cooldown to receive fewer but potentially higher-quality signals.
Advanced Filters: Enable or disable the Pullback Quality and Volatility filters for an extra layer of confirmation or risk management.
No-Trade Zone Highlighter: Adjust the session and timezone to highlight periods you wish to avoid, such as news events or low-liquidity hours.
Happy trading, and please use this tool responsibly.

20-Day SMA BIAS%20-day Bias is a commonly used indicator in technical analysis. It is used to measure the gap between the stock price and its 20-day moving average to determine whether the stock price deviates from the normal state and whether there is an overbought or oversold phenomenon.
How to calculate the 20-day deviation value:
The calculation formula of the deviation rate is: ((closing price of the day - 20-day moving average price) / 20-day moving average price) * 100%.
Interpretation of 20-day deviation value:
Positive deviation rate:
Indicates that the stock price is higher than the 20-day moving average, which means that the stock price is high and may face correction pressure.
Negative deviation rate:
Indicates that the stock price is lower than the 20-day moving average, which means that the stock price is low and there may be a rebound opportunity.
Absolute value of the deviation rate:
The larger the absolute value, the higher the deviation of the stock price, and the higher the degree of overbought or oversold.
Apply the deviation rate to determine the buying and selling opportunities:
Positive deviation rate is too large:
When the positive deviation rate of the stock price from the 20-day moving average is too large, and the stock price is already at a high level, this may be a sell signal.
Negative deviation rate is too large:
When the negative deviation rate of the stock price from the 20-day moving average is too large, and the stock price is already at a low level, this may be a buy signal.
Stock price fluctuates around the moving average:
Stock price usually fluctuates around the moving average and adjusts after over-rising or over-falling.
Practical operation suggestions:
The standards of the market and individual stocks are different:
When the positive and negative deviation rate of the market and the quarterly line is greater than 5%, there is a greater chance of correction; large-cap stocks are between 5% and 10%; small and medium-sized stocks may be above 15% to 20%.
Combined with other indicators:
The deviation rate is only one of the technical analysis indicators. It is recommended to combine it with other indicators, such as KD indicators, RSI, etc., to make a comprehensive judgment and improve accuracy.
Reference to historical experience:
You can refer to the situation where the deviation rate of the stock was too large in the past to determine whether the current deviation rate is also too large.
Summary:
The 20-day deviation value is an indicator to determine whether the stock price is overbought or oversold, which can help investors determine the timing of buying and selling, but it needs to be combined with other indicators and historical data, and adjusted according to market conditions.

📊 TREND Indicator by Yogesh Mandloi 📊This custom-built TradingView indicator provides a visual and logic-based trend analysis dashboard using 4-hour RSI and EMA/SMA conditions, combined with entry/exit signals, alerts, and a toggle-controlled condition table.
🔍 Core Logic
The strategy uses 4-hour timeframe data to identify potential bullish or bearish trends based on:
RSI (14):
Buy: RSI > 48
Sell: RSI < 52
EMA/SMA (Trend Filters):
Buy: EMA 21 > SMA 55 High → uptrend confirmation
Sell: EMA 21 < SMA 55 Low → downtrend confirmation
Buy Signal = RSI > 48 AND EMA21 > SMA55 High
Sell Signal = RSI < 52 AND EMA21 < SMA55 Low
It only signals on first bar of condition (no repetitive signals) and gives exit alerts when the condition ends.
📈 Features
✅ Signal Plotting
Green "BUY" arrows below bars when buy setup forms
Red "SELL" arrows above bars when sell setup forms
Gray "EXIT" markers when the trend condition invalidates
✅ Real-Time Alerts
Entry alerts for both BUY and SELL signals
Exit alerts to close positions
✅ Dynamic Visual Table
An on-screen signal table shows the live status of each condition with color-coded clarity:
✅ Green: Condition met
❌ Red: Condition not met
🟧 Orange: Warning (bearish potential forming)
✅ Toggle Switches for Sections
Users can control the visibility of each table section:
Buy Conditions ✔️
Sell Conditions 🔻
Signal Summary 📌
Indicator Values 📊
This makes it easier to focus on relevant sections or declutter the chart view.
✅ Customizable Table Position
You can change the table location:
top_left, top_right, bottom_left, bottom_right
✅ Background Highlights
Light Green background when buy conditions are active
Light Red background when sell conditions are active

Strategy with DI+/DI-, ADX, RSI, MACD, EMA + Time Stop [EXP. 1]Strategy Overview
This is an experimental trend-following strategy combining directional movement indicators, momentum filters, and time-based exits. Built for low timeframes like BTCUSDT 5m, it aims to detect clean directional setups while managing risk tightly.
Indicator Components
• DI+/DI- + ADX – Confirms trend direction and strength
• RSI (14) – Momentum filter (entries only if RSI > 55 or < 45)
• MACD Histogram – Confirms momentum shift in signal direction
• Candle Body % Filter – Screens for strong price commitment bars
• EMA 600 & EMA 2400 – Defines long-term trend alignment
• Time-Based Stop – Closes trade if it doesn’t move 0.75% in 85 bars
• Reward:Risk – 1% stop-loss, 7.5:1 reward-to-risk
• One Trade per EMA Cross – Only trades first valid signal per trend shift
Entry Logic
Long Entry:
• DI+ crosses above DI−
• RSI > 55
• MACD histogram > 0
• Strong bullish candle
• EMA600 > EMA2400
• Occurs within 25 bars of an EMA crossover
Short Entry:
• DI+ crosses below DI−
• RSI < 45
• MACD histogram < 0
• Strong bearish candle
• EMA2400 > EMA600
• Occurs within 25 bars of an EMA crossover
Exit Logic
• Stop-loss: 1% from entry
• Take-profit: 7.5x risk
• Time-stop: Trade closed if price doesn’t move 0.75% in 85 bars
Testing Parameters
• Initial Capital: $10,000
• Commission: 0.04% per trade
• Timeframe: 5-minute
• Tested on: BTCUSDT
• ⚠️ Early-stage strategy — trade count may be low depending on market context. This is shared for educational use and community feedback.
Notes
• This script is experimental and educational
• Please forward-test in a demo environment before using it live
• Open-source for learning and improvement — contributions welcome!

10/20 MA Coil: Progressive Colors & Multi-Day BreakoutThis indicator detects price “coil” setups and highlights potential breakout or breakdown opportunities using moving average alignment and volatility compression.
Features:
• Coil Detection:
• Identifies consolidation when:
• The 10 and 20 MAs are tightly aligned (within user-defined tolerance)
• Price is above both MAs and within 1.5x ADR of them
• The 50 MA is rising
• Progressive Coil Coloring:
• Coil candles are colored in progressively darker orange as the streak continues
• Bullish Breakout Signal:
• Triggers when a green candle follows a coiled bar
• The candle’s body must be greater than or equal to 1 ATR
• Colored lime green
• Bearish Breakdown Signal:
• Triggers when a red candle follows a coiled bar
• The candle’s body must be greater than or equal to 1 ATR to the downside
• Colored black
• Custom Candle Rendering:
• Candle body color represents coil or breakout state
• Wick and border are red or green to reflect price direction
• Optional Debug Tools:
• Coil streak, ATR, and distance from MAs can be plotted for deeper analysis
This script is designed for traders looking to spot price compression and prepare for high-probability moves following low-volatility setups.
Hybrid Strategy with Position Control//@version=6
indicator('Hybrid Strategy with Position Control', overlay=true)
// === INPUTS ===
emaFastLen = input.int(8, 'Fast EMA')
emaSlowLen = input.int(21, 'Slow EMA')
rsiLen = input.int(14, 'RSI Length')
rsiOverbought = input.int(70, 'RSI Overbought')
rsiOversold = input.int(30, 'RSI Oversold')
macdFast = input.int(12, 'MACD Fast')
macdSlow = input.int(26, 'MACD Slow')
macdSignal = input.int(9, 'MACD Signal')
// === CALCULATIONS ===
emaFast = ta.ema(close, emaFastLen)
emaSlow = ta.ema(close, emaSlowLen)
rsi = ta.rsi(close, rsiLen)
= ta.macd(close, macdFast, macdSlow, macdSignal)
// === POSITION TRACKING ===
var int position = 0 // 0 = no position, 1 = long, -1 = short
// === ENTRY CONDITIONS ===
longCondition = ta.crossover(emaFast, emaSlow) and rsi < rsiOverbought and macdLine > signalLine and position != 1
shortCondition = ta.crossunder(emaFast, emaSlow) and rsi > rsiOversold and macdLine < signalLine and position != -1
// === EXIT CONDITIONS (Optional logic for reset) ===
exitLong = ta.crossunder(emaFast, emaSlow)
exitShort = ta.crossover(emaFast, emaSlow)
// === SIGNAL PLOTS ===
buySignal = longCondition
sellSignal = shortCondition
plotshape(buySignal, title='Buy Signal', location=location.belowbar, color=color.green, style=shape.triangleup, size=size.small, text='BUY')
plotshape(sellSignal, title='Sell Signal', location=location.abovebar, color=color.red, style=shape.triangledown, size=size.small, text='SELL')
// === STATE MANAGEMENT ===
if (longCondition)
position := 1
if (shortCondition)
position := -1
// Reset position if trend reverses
if (exitLong and position == 1)
position := 0
if (exitShort and position == -1)
position := 0
// === PLOT EMAs ===
plot(emaFast, color=color.orange, title='Fast EMA')
plot(emaSlow, color=color.blue, title='Slow EMA')

Crypto Trend StrengthCrypto Trend Strength Dashboard (11-Point System)
Description:
This indicator is a visually enhanced dashboard that evaluates 11 key technical signals to assess bullish momentum for crypto. Each condition is displayed in a easy reading table for quick interpretation and visual appeal.
Signals include:
Higher highs and higher lows
Price above SMA18 and SMA365
SMA180 > SMA365
Positive slope on SMA180 and SMA365
RSI trending upward
Ideal for traders who want a clean, at-a-glance summary of market strength without scanning multiple charts or indicators.
