Options

2Saucy custom MA'sEMA's 9/21/50/200 - Designated for "scalping" 1m/3m/5m/15/1h/4h. Works best as it EMA's move faster with price.
SMA's 10/20/50/200 - Works more for swing trading and/or finding setups on weekly and daily time frames.
By combining these two simultaneously trading intra-day is made much simpler.
Yours truly,
#2Saucy

SR360 OSCILLATOR 2025Unlock deeper insights into momentum and trend strength with the SR360 Oscillator 2025, a high-precision dual-indicator system designed for traders focusing on NSE stocks.
🚀 Key Features:
🔹 GVR Oscillator (RSI on VWAP)
Identify powerful shifts in price momentum using a smart blend of RSI and VWAP — ideal for catching trend reversals and breakouts.
Dynamic coloring: 🔴 Overbought, 🟢 Oversold, 🔵 Neutral zones
🔹 Multi-Symbol Trend Table (Supertrend or EMA)
Stay ahead with a real-time trend dashboard for RELIANCE, SBIN, INFY, HDFCBANK, TCS, and more.
Choose your trend logic: Supertrend or EMA crossover
Custom watchlist + include current chart symbol
💼 Who’s It For?
Intraday & swing traders in the Indian equity markets
Analysts seeking clean, trend-verified setups
Anyone needing a reliable trend/momentum combo tool

Dynamic 5% Below SuperTrend ResistanceA indicator which give me horizontal line 5% distant from supertrend price and price of this indicator should be on the price bar

Support & Resistance by O Dinesh BabuThis Script is Specifically Designed to Work with NIFTY, BANKNIFTY & FINNIFTY Indices Only..
For Optimal Results, Please Wait for the 1st 15-Minute Candle to Complete Before Initiating Any Trades..
Wishing All Traders the Very Best in Their Journey..
Warm Regards,
O. Dinesh Babu
Son of Mr. & Mrs. O. Asha Rama Krishna

Hourly Divider with Opening Price🕐 Hour Lines with Opening Price — Utility Indicator
This lightweight TradingView script helps short-term option traders quickly visualize hourly structure and bias.
What it does:
Draws a vertical blue line at the start of each new hour
Draws a horizontal yellow line from the opening price of the hour, extending until the next hour
Purpose:
This tool makes it easy to:
Track hourly price context on lower timeframes like 1-minute
See how far price moves relative to the hourly open
Identify mean-reversion or breakout conditions around hourly transitions
Best used on:
1-minute (1m) charts, where understanding the position of price relative to the hourly open can inform "Up or Down" binary trades.

Arambhik's Option Buyer Trend PublicThis indicator is designed specifically for option buyers with small capital. It performs well in most market conditions, but we strongly recommend backtesting or paper trading before using it in live markets.
For optimal results, use a 3-minute chart.
Please ensure you set the correct underlying asset/market symbol in the designated input field.
All other settings can be left at their default values.
Note: I am not a SEBI-registered advisor. This tool is shared strictly for educational purposes only.

Intraday Reversal Pro1. CALL (Long/Buy) Setup
Green "CALL" label appears below a candle:
The system thinks a bullish reversal is likely.
This happens when there’s a liquidity sweep (price sweeps below recent lows), an FVG (Fair Value Gap) below price, RSI is oversold, and short-term EMA is above the long-term EMA.
Red dashed line (Stop Loss):
This is your suggested stop loss (for a call/long option) — place it at or just below this line.
Green dashed line (Take Profit):
This is your suggested take profit (for the option) — consider exiting here for a 2:1 reward/risk trade.
2. PUT (Short/Sell) Setup
Red "PUT" label appears above a candle:
The system thinks a bearish reversal is likely.
This happens when there’s a liquidity sweep above recent highs, an FVG above price, RSI is overbought, and short-term EMA is below the long-term EMA.
Red dashed line (Stop Loss):
This is your suggested stop loss (for a put/short option) — place it at or just above this line.
Green dashed line (Take Profit):
This is your suggested take profit (for the put/short option).
How to Trade with It:
Wait for a CALL or PUT label to appear (ideally after a sweep + FVG).
Enter your option position at/near the signal candle close.
Set your stop loss at the red dashed line (for calls, below; for puts, above).
Take profit at the green dashed line.
Optional: Use alerts to be notified when a new signal appears.

📍 Strike Tracker (Current Option Strike Price)This indicator is designed for options traders who want to visually track the current strike price based on the price of the underlying stock or ETF — but only when the price fully crosses into a new strike level.
Unlike typical midpoint rounding methods, this version uses ceiling logic:
The strike line stays at the current level until price equals or exceeds the next strike step.
For example, with a 0.5 interval:
Price = 85.74 → strike remains 85.5
Price = 86.00 → strike moves to 86.0
⚙️ Key Features:
Automatically tracks strike levels based on configurable intervals (e.g., 0.5, 1.0, 2.5, etc.)
Strike line only updates once price crosses the threshold
Dynamic label showing the current strike
Works in real time on any stock, ETF, or futures chart
🧪 Ideal For:
Traders managing ATM (At-The-Money) or rolling strike options
Traders using TradingView charting to quickly visualize when to adjust strikes
Traders who want to avoid premature strike shifts from midpoint logic
📌 How to Use:
Load the indicator on the chart of the underlying (e.g., TLT, SPY, AAPL)
Set the correct strike interval (e.g., 0.5 for TLT, 1.0 for SPY)
Watch the strike line update only when price has fully moved into a new bracket
❗ Do not apply this script to option symbols (like TLT250711C85.5) — it must be used on the base chart (e.g., TLT) to function correctly.

Position Size Calculator with Fees# Position Size Calculator with Portfolio Management - Manual
## Overview
The Position Size Calculator with Portfolio Management is an advanced Pine Script indicator designed to help traders calculate optimal position sizes based on their total portfolio value and risk management strategy. This tool automatically calculates your risk amount based on portfolio allocation percentages and determines the exact position size needed while accounting for trading fees.
## Key Features
- **Portfolio-Based Risk Management**: Calculates risk based on total portfolio value
- **Tiered Risk Allocation**: Separates trading allocation from total portfolio
- **Automatic Trade Direction Detection**: Determines long/short based on entry vs stop loss
- **Fee Integration**: Accounts for trading fees in position size calculations
- **Risk Factor Adjustment**: Allows scaling of position size up or down
- **Visual Display**: Shows all calculations in a clear, color-coded table
- **Automatic Risk Calculation**: No need to manually input risk amount
## Input Parameters
### Total Portfolio ($)
- **Purpose**: The total value of your investment portfolio
- **Default**: 0.0
- **Range**: Any positive value
- **Step**: 0.01
- **Example**: If your total portfolio is worth $100,000, enter 100000
### Trading Portfolio Allocation (%)
- **Purpose**: The percentage of your total portfolio allocated to active trading
- **Default**: 20.0%
- **Range**: 0.0% to 100.0%
- **Step**: 0.01
- **Example**: If you allocate 20% of your portfolio to trading, enter 20
### Risk from Trading (%)
- **Purpose**: The percentage of your trading allocation you're willing to risk per trade
- **Default**: 0.1%
- **Range**: Any positive value
- **Step**: 0.01
- **Example**: If you risk 0.1% of your trading allocation per trade, enter 0.1
### Entry Price ($)
- **Purpose**: The price at which you plan to enter the trade
- **Default**: 0.0
- **Range**: Any positive value
- **Step**: 0.01
### Stop Loss ($)
- **Purpose**: The price at which you will exit if the trade goes against you
- **Default**: 0.0
- **Range**: Any positive value
- **Step**: 0.01
### Risk Factor
- **Purpose**: A multiplier to scale your position size up or down
- **Default**: 1.0 (no scaling)
- **Range**: 0.0 to 10.0
- **Step**: 0.1
- **Examples**:
- 1.0 = Normal position size
- 2.0 = Double the position size
- 0.5 = Half the position size
### Fee (%)
- **Purpose**: The percentage fee charged per transaction
- **Default**: 0.01% (0.01)
- **Range**: 0.0% to 1.0%
- **Step**: 0.001
## How Risk Amount is Calculated
The script automatically calculates your risk amount using this formula:
```
Risk Amount = Total Portfolio × Trading Allocation (%) × Risk % ÷ 10,000
```
### Example Calculation:
- Total Portfolio: $100,000
- Trading Allocation: 20%
- Risk per Trade: 0.1%
**Risk Amount = $100,000 × 20 × 0.1 ÷ 10,000 = $20**
This means you would risk $20 per trade, which is 0.1% of your $20,000 trading allocation.
## Portfolio Structure Example
Let's say you have a $100,000 portfolio:
### Allocation Structure:
- **Total Portfolio**: $100,000
- **Trading Allocation (20%)**: $20,000
- **Long-term Investments (80%)**: $80,000
### Risk Management:
- **Risk per Trade (0.1% of trading)**: $20
- **Maximum trades at risk**: Could theoretically have 1,000 trades before risking entire trading allocation
## How Position Size is Calculated
### Trade Direction Detection
- **Long Trade**: Entry price > Stop loss price
- **Short Trade**: Entry price < Stop loss price
### Position Size Formulas
#### For Long Trades:
```
Position Size = -Risk Factor × Risk Amount / (Stop Loss × (1 - Fee) - Entry Price × (1 + Fee))
```
#### For Short Trades:
```
Position Size = -Risk Factor × Risk Amount / (Entry Price × (1 - Fee) - Stop Loss × (1 + Fee))
```
## Output Display
The indicator displays a comprehensive table with color-coded sections:
### Portfolio Information (Light Blue Background)
- **Portfolio (USD)**: Your total portfolio value
- **Trading Portfolio Allocation (%)**: Percentage allocated to trading
- **Risk as % of Trading**: Risk percentage per trade
### Trade Setup (Gray Background)
- **Entry Price**: Your specified entry price
- **Stop Loss**: Your specified stop loss price
- **Fee (%)**: Trading fee percentage
- **Risk Factor**: Position size multiplier
### Risk Analysis (Red Background)
- **Risk Amount**: Automatically calculated dollar risk
- **Effective Entry**: Actual entry cost including fees
- **Effective Exit**: Actual exit value including fees
- **Expected Loss**: Calculated loss if stop loss is hit
- **Deviation from Risk %**: Accuracy of risk calculation
### Final Result (Blue Background)
- **Position Size**: Number of shares/units to trade
## Usage Examples
### Example 1: Conservative Long Trade
- **Total Portfolio**: $50,000
- **Trading Allocation**: 15%
- **Risk per Trade**: 0.05%
- **Entry Price**: $25.00
- **Stop Loss**: $24.00
- **Risk Factor**: 1.0
- **Fee**: 0.01%
**Calculated Risk Amount**: $50,000 × 15% × 0.05% ÷ 100 = $3.75
### Example 2: Aggressive Short Trade
- **Total Portfolio**: $200,000
- **Trading Allocation**: 30%
- **Risk per Trade**: 0.2%
- **Entry Price**: $150.00
- **Stop Loss**: $155.00
- **Risk Factor**: 2.0
- **Fee**: 0.01%
**Calculated Risk Amount**: $200,000 × 30% × 0.2% ÷ 100 = $120
**Actual Risk**: $120 × 2.0 = $240 (due to risk factor)
## Color Coding System
- **Green/Red Header**: Trade direction (Long/Short)
- **Light Blue**: Portfolio management parameters
- **Gray**: Trade setup parameters
- **Red**: Risk-related calculations and results
- **Blue**: Final position size result
## Best Practices
### Portfolio Management
1. **Keep trading allocation reasonable** (typically 10-30% of total portfolio)
2. **Use conservative risk percentages** (0.05-0.2% per trade)
3. **Don't risk more than you can afford to lose**
### Risk Management
1. **Start with small risk factors** (1.0 or less) until comfortable
2. **Monitor your total exposure** across all open positions
3. **Adjust risk based on market conditions**
### Trade Execution
1. **Always validate calculations** before placing trades
2. **Account for slippage** in volatile markets
3. **Consider position size relative to liquidity**
## Risk Management Guidelines
### Conservative Approach
- Trading Allocation: 10-20%
- Risk per Trade: 0.05-0.1%
- Risk Factor: 0.5-1.0
### Moderate Approach
- Trading Allocation: 20-30%
- Risk per Trade: 0.1-0.15%
- Risk Factor: 1.0-1.5
### Aggressive Approach
- Trading Allocation: 30-40%
- Risk per Trade: 0.15-0.25%
- Risk Factor: 1.5-2.0
## Troubleshooting
### Common Issues
1. **Position Size shows 0**
- Verify all portfolio inputs are greater than 0
- Check that entry price differs from stop loss
- Ensure calculated risk amount is positive
2. **Very small position sizes**
- Increase risk percentage or risk factor
- Check if your risk amount is too small for the price difference
3. **Large risk deviation**
- Normal for very small positions
- Consider adjusting entry/stop loss levels
### Validation Checklist
- Total portfolio value is realistic
- Trading allocation percentage makes sense
- Risk percentage is conservative
- Entry and stop loss prices are valid
- Trade direction matches your intention
## Advanced Features
### Risk Factor Usage
- **Scaling up**: Use risk factors > 1.0 for high-confidence trades
- **Scaling down**: Use risk factors < 1.0 for uncertain trades
- **Never exceed**: Risk factors that would risk more than your comfort level
### Multiple Timeframe Analysis
- Use different risk factors for different timeframes
- Consider correlation between positions
- Adjust trading allocation based on market conditions
## Disclaimer
This tool is for educational and planning purposes only. Always verify calculations manually and consider market conditions, liquidity, and correlation between positions. The automated risk calculation assumes you're comfortable with the mathematical relationship between portfolio allocation and individual trade risk. Past performance doesn't guarantee future results, and all trading involves risk of loss.

Easy Position Size Calculator with Fees# Easy Position Size Calculator with Fees - Manual
## Overview
The Easy Position Size Calculator is a Pine Script indicator designed to help traders calculate the optimal position size for their trades while accounting for trading fees. This tool automatically determines whether you're planning a long or short position and calculates the exact position size needed to risk a specific dollar amount.
## Key Features
- **Automatic Trade Direction Detection**: Determines if you're going long or short based on entry price vs stop loss
- **Fee Integration**: Accounts for trading fees in position size calculations
- **Risk Management**: Calculates position size based on your specified risk amount
- **Risk Factor Adjustment**: Allows you to scale your position size up or down
- **Visual Display**: Shows all calculations in a clear, organized table
## Input Parameters
### Entry Price ($)
- **Purpose**: The price at which you plan to enter the trade
- **Default**: 0.0
- **Range**: Any positive value
- **Step**: 0.01
### Stop Loss ($)
- **Purpose**: The price at which you will exit the trade if it goes against you
- **Default**: 0.0
- **Range**: Any positive value
- **Step**: 0.01
### Risk ($)
- **Purpose**: The maximum dollar amount you're willing to lose on this trade
- **Default**: 0.0
- **Range**: Any positive value
- **Step**: 0.01
### Risk Factor
- **Purpose**: A multiplier to scale your position size up or down
- **Default**: 1.0 (no scaling)
- **Range**: 0.0 to 10.0
- **Step**: 0.1
- **Examples**:
- 1.0 = Normal position size
- 2.0 = Double the position size
- 0.5 = Half the position size
### Fee (%)
- **Purpose**: The percentage fee charged per transaction (buy/sell)
- **Default**: 0.01% (0.01)
- **Range**: 0.0% to 1.0%
- **Step**: 0.001
## How It Works
### Trade Direction Detection
The script automatically determines your trade direction:
- **Long Trade**: Entry price > Stop loss price
- **Short Trade**: Entry price < Stop loss price
### Position Size Calculation
#### For Long Trades:
```
Position Size = -Risk Factor × Risk Amount / (Stop Loss × (1 - Fee) - Entry Price × (1 + Fee))
```
#### For Short Trades:
```
Position Size = -Risk Factor × Risk Amount / (Entry Price × (1 - Fee) - Stop Loss × (1 + Fee))
```
### Fee Adjustment
The script accounts for fees on both entry and exit:
- **Long trades**: You pay fees when buying (entry) and selling (exit)
- **Short trades**: You pay fees when shorting (entry) and covering (exit)
## Output Display
The indicator displays a table with the following information:
### Trade Information
- **Trade Type**: Shows whether it's a LONG, SHORT, or INVALID trade
- **Entry Price**: Your specified entry price
- **Stop Loss**: Your specified stop loss price
- **Fee (%)**: The fee percentage being used
### Risk Parameters
- **Risk Amount**: The dollar amount you're willing to risk
- **Risk Factor**: The multiplier being applied
### Calculated Values
- **Effective Entry**: The actual cost per share including fees
- **Effective Exit**: The actual exit value per share including fees
- **Expected Loss**: The calculated loss if stop loss is hit
- **Deviation from Risk %**: Shows how close the expected loss is to your target risk
- **Position Size**: The number of shares/units to trade
## Usage Examples
### Example 1: Long Trade
- Entry Price: $100.00
- Stop Loss: $95.00
- Risk Amount: $500.00
- Risk Factor: 1.0
- Fee: 0.01%
**Result**: The script will calculate how many shares to buy so that if the stop loss is hit, you lose approximately $500 (accounting for fees). Position Size: 99.61152
### Example 2: Short Trade
- Entry Price: $50.00
- Stop Loss: $55.00
- Risk Amount: $300.00
- Risk Factor: 1.0
- Fee: 0.01%
**Result**: The script will calculate how many shares to short so that if the stop loss is hit, you lose approximately $300 (accounting for fees). Position Size: 59.87426
## Important Notes
### Validation Requirements
For the script to work properly, all of the following must be true:
- Entry price > 0
- Stop loss > 0
- Risk amount > 0
- Entry price ≠ Stop loss (to determine direction)
### Negative Position Sizes
The script may show negative position sizes, which is normal:
- **Negative values for long trades**: Represents shares to buy
- **Negative values for short trades**: Represents shares to short
### Risk Deviation
The "Deviation from Risk %" shows how closely the calculated position size matches your target risk. Small deviations are normal due to:
- Fee calculations
- Rounding
- Market precision
## Color Coding
The table uses color coding for easy identification:
- **Green**: Long trade information
- **Red**: Short trade information
- **Gray**: Invalid trade (when inputs are incorrect)
- **Blue**: Final position size
- **Red background**: Risk-related calculations
## Troubleshooting
### Common Issues
1. **Position Size shows 0**
- Check that all inputs are greater than 0
- Ensure entry price is different from stop loss
2. **Trade Type shows INVALID**
- Verify that entry price and stop loss are both positive
- Make sure entry price ≠ stop loss
3. **Large Risk Deviation**
- This is normal for very small position sizes
- Consider adjusting your risk amount or price levels
## Best Practices
1. **Always validate your inputs** before placing actual trades
2. **Double-check the trade direction** shown in the table
3. **Review the expected loss** to ensure it aligns with your risk management
4. **Consider the effective entry/exit prices** which include fees
5. **Use appropriate risk factors** - avoid extreme values that could lead to overexposure
## Disclaimer
This tool is for educational and planning purposes only. Always verify calculations manually and consider market conditions, liquidity, and other factors before placing actual trades. The script assumes that fees are charged on both entry and exit transactions.

OPERATOR Option Trading IndicatorOption Trading Indicator Positional+Intraday v1.0
Developed by Bulls of Stockmarket+Option Engineer
How to apply:
Apply the indicator on chart and use liscense code = option
You can see this in settings of indicator after appying in chart. After liscence code is given the indicator will open.
Features:
1) Gives Buy and Sell signals for option buyer and option seller.
2) Also tracks FII and DII involvement in the option market only on option strike charts.
3) Tracks 2-4 months after market options for better signals and insights.
Timeframe= Only 1 day (1D) Timeframe
How to use:(For Option Buyers)
1) Keep watching Fii and DII buy in table. If both are in buy mode then be ready for buying that strike option.
2) Also simultaneosly keep seeing any buy signal generated below the candle or not.. If buy on chart is not generated then we dont have to buy.
3) In simple words . If FII Buy+ Dii Buy + BUY SIGNAL On Candle Chart then we have to buy that option.
4) Our sl is any candle closing below the green line in the chart, so the more good buy if (3) conditions is followed when price is near green line .
5) Target after bought as per (3) and (4) step will be Red line which has been ploted.
How to use:(For Option Sellers )
1) Keep watching the charts. See full ITM Options always(minimum 2 months after option)
2) If sell signal comes then sell with Sl as per your trading psychology and money management.
3) For this Target is not decided, But you will get atleast 100 points profit for sure.. Profit can be 500+ points also 70% Time.
If have doubt on how to trade using this indicator.... Feel free to contact me at
shaktiwithshivaeternal@gmail.com
OR
tradingoperatorperfect@gmail.com
Currently the indicator is free to use... Enjoy and keep supporting so that i can increase more features into it .

Volume Shelf Breakout WatcherThis indicator detects potential breakout opportunities from high-volume price shelves (HVNs) using a custom volume profile engine. It scans the past 100 bars (adjustable) to identify price ranges with heavy volume accumulation, then monitors for a breakout when price is near the top of that range.
To increase accuracy, it optionally confirms momentum using:
✅ MACD bullish crossover
✅ RSI > 55
✅ Volume spike above 20-bar average
When all enabled conditions are met, the indicator highlights the bar with a green label and background shading, and can trigger alerts for trade setups.
Use this indicator to:
Identify volume-based consolidation zones
Anticipate price surges through low-volume areas ("volume gaps")
Catch breakouts with momentum confirmation
Inputs:
Volume Profile Range (bars)
HVN Sensitivity (top % of volume)
MACD confirmation toggle
RSI level toggle
Volume spike toggle
Ideal for:
Traders looking to enter early on momentum moves as price escapes compression zones into areas of less resistance.

Option Maxpain & WallsThis simple script plots three lines on your chart based on options data: Call Wall, Put Wall and Max Pain. These three numbers must be obtained elsewhere. While Tradingview has delayed options data, to my knowledge Pinescript does not allow looping through this data to calculate the numbers within the script. So the user must obtain or calculate them elsewhere then type them into the input dialog. Labels and alerts are included as user options.

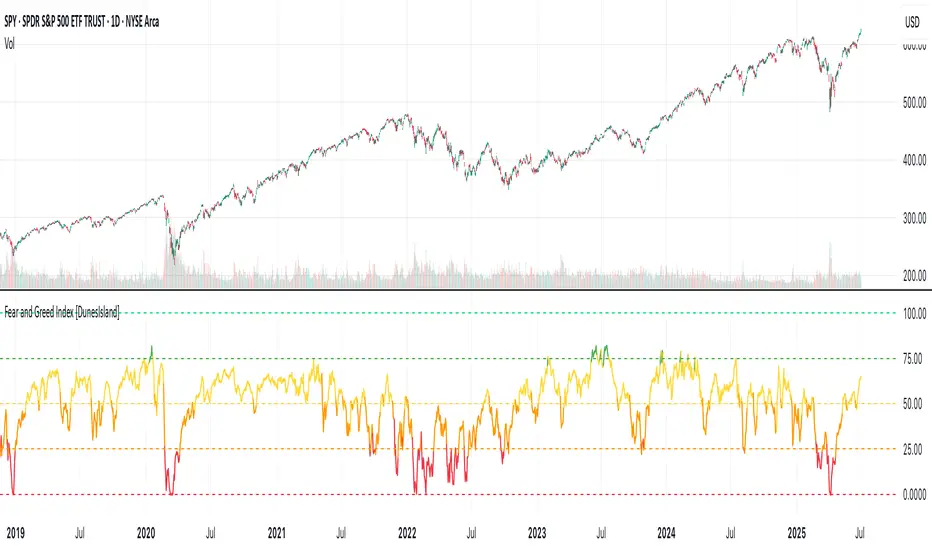
Fear and Greed Index [DunesIsland]The Fear and Greed Index is a sentiment indicator designed to measure the emotions driving the stock market, specifically investor fear and greed. Fear represents pessimism and caution, while greed reflects optimism and risk-taking. This indicator aggregates multiple market metrics to provide a comprehensive view of market sentiment, helping traders and investors gauge whether the market is overly fearful or excessively greedy.How It WorksThe Fear and Greed Index is calculated using four key market indicators, each capturing a different aspect of market sentiment:
Market Momentum (30% weight)
Measures how the S&P 500 (SPX) is performing relative to its 125-day simple moving average (SMA).
A higher value indicates that the market is trading well above its moving average, signaling greed.
Stock Price Strength (20% weight)
Calculates the net number of stocks hitting 52-week highs minus those hitting 52-week lows on the NYSE.
A greater number of net highs suggests strong market breadth and greed.
Put/Call Options (30% weight)
Uses the 5-day average of the put/call ratio.
A lower ratio (more call options being bought) indicates greed, as investors are betting on rising prices.
Market Volatility (20% weight)
Utilizes the VIX index, which measures market volatility.
Lower volatility is associated with greed, as investors are less fearful of large market swings.
Each component is normalized using a z-score over a 252-day lookback period (approximately one trading year) and scaled to a range of 0 to 100. The final Fear and Greed Index is a weighted average of these four components, with the weights specified above.Key FeaturesIndex Range: The index value ranges from 0 to 100:
0–25: Extreme Fear (red)
25–50: Fear (orange)
50–75: Neutral (yellow)
75–100: Greed (green)
Dynamic Plot Color: The plot line changes color based on the index value, visually indicating the current sentiment zone.
Reference Lines: Horizontal lines are plotted at 0, 25, 50, 75, and 100 to represent the different sentiment levels: Extreme Fear, Fear, Neutral, Greed, and Extreme Greed.
How to Interpret
Low Values (0–25): Indicate extreme fear, which may suggest that the market is oversold and could be due for a rebound.
High Values (75–100): Indicate greed, which may signal that the market is overbought and could be at risk of a correction.
Neutral Range (25–75): Suggests a balanced market sentiment, neither overly fearful nor greedy.
This indicator is a valuable tool for contrarian investors, as extreme readings often precede market reversals. However, it should be used in conjunction with other technical and fundamental analysis tools for a well-rounded view of the market.
VMATOR v1VMATOR
Originally based on a personal strategy that i designed as i'm not familiar with every candlestick pattern and other strategies. This indicator is a something i created for my self trying to get better entries with lower risk. In my research and test back i found out that the lowest risk is found when entering to a position when price is close to VWAP and EMA 50 and 200. Hence the name of this indicator: VMATOR.
The indicator looks for the closest price to VWAP and those EMAs and generates a signal. It also makes an attempt to estimate exits based on the amount of times price retracts to the closest EMA.
This indicator works best if there are defined uptrends or downtrends. It may not work well during consolidations or accumulations.
If you trade Options consider that when the market opens you may have already a signal before. If by the time market opens price has not retracted to EMA 50 is safe to enter but it's up to you to define your risk.
Contact me if you have any questions.

Option Auto Anchored VWAPThis indicator automatically shows two Anchored VWAP lines.
The first gets placed on the very first candle of the chart.
The second is set on the last or current day you select in the settings.

Nifty Option Auto Anchored VWAPThis indicator automatically shows two Anchored VWAP lines.
The first gets placed on the very first candle of the chart.
The second is set on the last or current day you select in the settings.

SP Indicator Clone## 💡 **SCRIPT का STRUCTURE और FUNCTION**
### 📌 **Indicator Name**
* नाम: `SP Indicator Clone`
* Overlay पर plot होती है — मतलब ये indicator chart पर ही lines, dots, shapes बनाता है।
---
### 📌 **Inputs**
User से कुछ values input लेता है:
1️⃣ **Short EMA Length** → default: 5
👉 ये एक छोटा EMA बनाता है ताकि short term trend दिखे।
2️⃣ **Long EMA Length** → default: 50
👉 ये एक लंबा EMA बनाता है — इसे black trendline जैसा use करते हैं।
3️⃣ **ATR Length** → default: 14
👉 ये ATR निकालता है ताकि trailing stop calculate कर सके।
---
### 📌 **Indicators Plotted**
1️⃣ **Short EMA (blue)**
* Chart पर एक हल्की तेजी/मंदी की direction दिखाता है।
2️⃣ **Long EMA (black)**
* ये SP Indicator की तरह main trend line की तरह काम करता है।
* इस black line के ऊपर/नीचे price जाने पर signals generate होते हैं।
---
### 📌 **Signal Conditions**
#### Long Signal
* जब price का **close** black line (Long EMA) के ऊपर cross करता है।
👉 मतलब market नीचे से ऊपर की तरफ जा रहा है।
#### Short Signal
* जब price का **close** black line (Long EMA) के नीचे cross करता है।
👉 मतलब market ऊपर से नीचे गिर रहा है।
---
### 📌 **Signal Shapes**
* Long signal पर: Green triangle (नीचे candle के नीचे दिखेगा)
* Short signal पर: Red triangle (candle के ऊपर दिखेगा)
---
### 📌 **Trailing Stop**
* Trailing Stop को ATR से निकाला जाता है:
* Long trade में: close price - ATR
* Short trade में: close price + ATR
👉 ये stoploss points green/red dots की तरह दिखते हैं।
---
### 📌 **Visualization**
आप chart पर देख पाते हैं:
* Short EMA (blue line)
* Long EMA (black line)
* Long/Short signal markers (triangles)
* Trailing stop points (dots)
---
## ⚙️ **इस Script से आप क्या देख सकते हैं?**
✅ कब trend बदला (black line के cross पर signal मिलेगा)।
✅ कहाँ approximate trailing stop लगाना है (ATR dots से)।
✅ कब entry लेनी थी (triangles से)।
---
## 🚫 **इस Script की Limitations**
⚠️ यह सिर्फ signals और trailing stop show करता है — **ये Pine Strategy नहीं है** यानी ये Trades को backtest नहीं करता।
⚠️ आप इसका use visual reference के लिए कर सकते हैं, लेकिन P\&L, win/loss stats Strategy Tester में नहीं आएंगे।
---
💡 **अगर आप चाहते हो कि मैं इसी को एक Pine Strategy में बदलूं ताकि Strategy Tester में actual performance दिखे (number of trades, profit, loss आदि)?**
बस बताओ — मैं code तैयार कर दूँ! 🚀

Simulated OI Proxy with Trend Table1. In Simple Terms
This script mimics open interest analysis using price and volume changes.
It visually marks possible bullish and bearish setups directly on your price chart.
It’s especially useful for markets where real OI data is not available (like Indian stocks)
=======================================================================
2. Calculating Price and Volume Changes
close - close: Calculates the change in closing price from the previous bar to the current bar.
volume - volume: Calculates the change in trading volume from the previous bar to the current bar.
Purpose:
These calculations help determine if price and volume are increasing or decreasing, which is used as a proxy for open interest (OI) since real OI data may not be available.
===================================================================
3. Proxy Logic for OI Signals
long_buildup: Both price and volume are rising. This suggests new buying interest (bullish signal).
short_buildup: Price is falling but volume is rising. This suggests new short positions are being opened (bearish signal).
short_covering: Price is rising but volume is falling. This suggests shorts are closing their positions, causing a price rise (cautiously bullish).
long_unwinding: Both price and volume are falling. This suggests long positions are being closed (cautiously bearish).
====================================================================
4. Plotting the Signals
plotshape(condition, ...): Draws a shape on the chart when the condition is true.
Long Buildup: Green triangle below the bar (bullish).
Short Buildup: Red triangle above the bar (bearish).
Short Covering: Blue circle below the bar (cautiously bullish).
Long Unwinding: Orange circle above the bar (cautiously bearish).
======================================================================
5. Signal Detection:
The script checks price and volume changes to determine which signal is active.
Trend Assignment:
It assigns a text label and color for the detected trend.
Table Display:
A table appears at the top-right of your chart, showing the current trend based on the latest bar.

🎯 M7Ai Algo"M7Ai Algo": شرح موجز
مؤشر M7Ai Algo هو أداة متطورة تم تطويرها باستخدام Pine Script v6، مصممة لتزويد المتداولين بنظرة شاملة لديناميكيات السوق وإشارات التداول المحتملة. يدمج هذا المؤشر مكونات تحليلية متعددة لتقديم رؤى قوية:
محرك الاتجاه (Trend Engine): يستخدم متوسطًا متحركًا مدمجًا ("Fusion MA") يتكون من عدة متوسطات متحركة (مثل EMA، SMA، WMA، ALMA، و VWAP) لتحديد اتجاه السوق السائد وقوته بدقة. كما يشتمل على كشف الانعكاسات بناءً على مؤشر RSI.
الدعم والمقاومة (Support & Resistance): يقوم بحساب ورسم مستويات الدعم والمقاومة الديناميكية تلقائيًا، بما في ذلك النقاط المحورية، مما يساعد المتداولين على تحديد مناطق الأسعار الرئيسية.
تحليل هيكل السوق (Market Structure Analysis): يكشف عن عناصر هيكل السوق الحاسمة مثل مناطق الأوامر (Order Blocks)، شموع المطرقة/المطرقة المقلوبة (Hammer/Inverted Hammer candles)، كسور الهيكل (BOS - Breaks of Structure)، تغيرات الطابع (CHOCH - Changes of Character)، ومناطق السيولة (Liquidity Zones). هذه العناصر حيوية لفهم تحركات السعر المحتملة.
توليد إشارات التداول (Trading Signal Generation): بناءً على تقاطع اتجاه السوق، تأكيد الحجم، الزخم، وهيكل السوق المحدد، يولد المؤشر إشارات تداول "شراء" (LONG) أو "بيع" (SHORT). وتأتي كل إشارة مصحوبة بـ درجة ثقة تشير إلى موثوقيتها.
مستويات الدخول، وقف الخسارة، والأهداف (Entry, Stop-Loss, and Targets): لكل إشارة، يحسب المؤشر نقاط دخول تكيفية، ومستويات وقف الخسارة، وأهداف جني الأرباح المتعددة (T1، T2، T3)، وكل ذلك يتم تعديله ديناميكيًا باستخدام متوسط المدى الحقيقي (ATR) ليعكس التقلبات الحالية.
الرسوم البيانية ولوحة المعلومات (Visualizations & Dashboard): يوفر المؤشر عناصر بصرية قابلة للتخصيص، بما في ذلك الشموع الملونة، سحابات الاتجاه، والنطاقات الديناميكية. كما يتضمن لوحة معلومات (Dashboard) على الرسم البياني لتقديم ملخص سريع لحالة السوق الحالية، معلومات الإشارة، ومستويات الدخول.
باختصار، يهدف مؤشر M7Ai Algo إلى تبسيط عملية التحليل الخاصة بك عن طريق تجميع أدوات فنية قوية لمساعدتك على اتخاذ قرارات تداول أكثر استنارة.
M7Ai Algo: A Brief Explanation
English
The M7Ai Algo is a sophisticated Pine Script v6 indicator designed to provide traders with a comprehensive view of market dynamics and potential trading signals. It integrates multiple analytical components to offer robust insights:
Trend Engine: Utilizes a "Fusion MA" (a composite of multiple moving averages like EMA, SMA, WMA, ALMA, and VWAP) to accurately identify the prevailing market trend and its strength. It also incorporates RSI-based reversal detection.
Support & Resistance: Automatically calculates and plots dynamic support and resistance levels, including pivot points, helping traders identify key price areas.
Market Structure Analysis: Detects crucial market structure elements such as Order Blocks, Hammer/Inverted Hammer candles, Breaks of Structure (BOS), Changes of Character (CHOCH), and Liquidity Zones. These elements are vital for understanding institutional footprints and potential price movements.
Trading Signal Generation: Based on a confluence of trend direction, volume confirmation, momentum, and identified market structure, the indicator generates "LONG" or "SHORT" trading signals. Each signal comes with a confidence score, suggesting its reliability.
Entry, Stop-Loss, and Targets: For each signal, the indicator calculates adaptive entry points, stop-loss levels, and multiple take-profit targets (T1, T2, T3), all dynamically adjusted using Average True Range (ATR) to reflect current volatility.
Visualizations & Dashboard: The indicator offers customizable visual elements, including colored candles, trend clouds, and dynamic bands. A dashboard is included on the chart to provide a quick summary of the current market state, signal information, and entry levels.
In essence, the M7Ai Algo aims to streamline your analysis process by bringing together powerful technical tools to help you make more informed trading decisions.

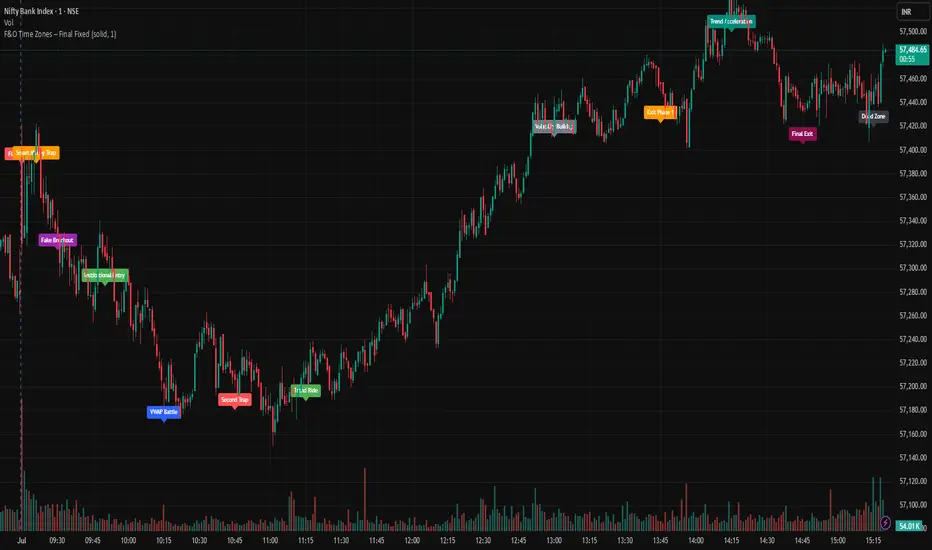
F&O Time Zones – Final Fixed📌 This indicator highlights high-probability intraday time zones used in Indian F&O (Futures & Options) strategies. Ideal for scalping, breakout setups, and trap avoidance.
🕒 Covered Time Zones:
• 9:15 – 9:21 AM → Flash Trades (first 1-minute volatility)
• 9:21 – 9:30 AM → Smart Money Trap (VWAP fakeouts)
• 9:30 – 9:50 AM → Fake Breakout Zone
• 9:50 – 10:15 AM → Institutional Entry Timing
• 10:15 – 10:45 AM → VWAP Range Scalps
• 10:45 – 11:15 AM → Second Trap Zone
• 11:15 – 1:00 PM → Trend Continuation Window
• 1:00 – 1:45 PM → Volatility Compression
• 1:45 – 2:15 PM → Institutional Exit Phase 1
• 2:15 – 2:45 PM → Trend Acceleration / Reversals
• 2:45 – 3:15 PM → Expiry Scalping Zone
• 3:15 – 3:30 PM → Dead Zone (square-off time)
🔧 Features:
✓ Clean vertical lines per zone
✓ Optional label positions (top or bottom)
✓ Adjustable line style, width, and color
🧠 Best used on: NIFTY, BANKNIFTY, FINNIFTY (5-min or lower)
---
🔒 **Disclaimer**:
This script is for **educational purposes only**. It is not financial advice. Trading involves risk. Please consult a professional or do your own research before taking any positions.
—
👤 Script by: **JoanJagan**
🛠️ Built in Pine Script v5
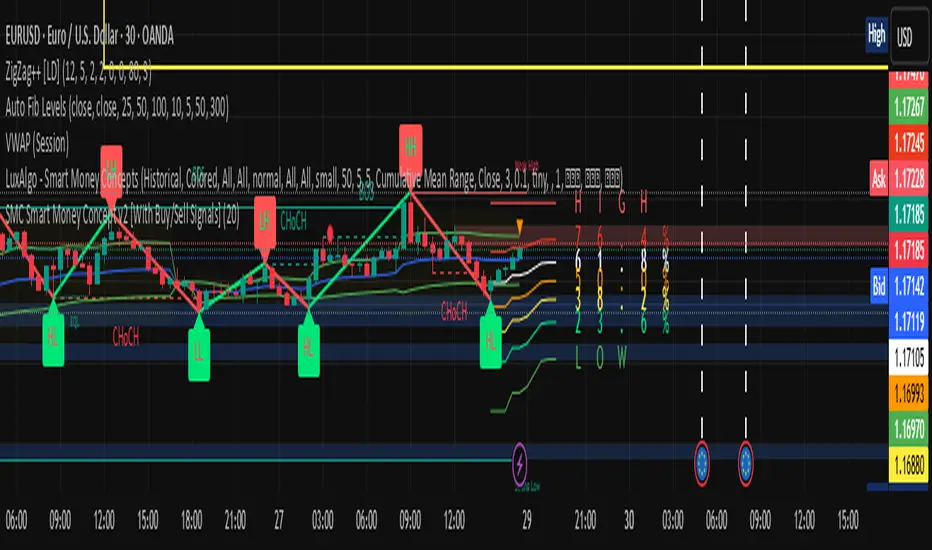
Smart Money Trap SignalSmart Money Trap Signal – Indicator Description
The Smart Money Trap Signal is a precision-based trading tool designed to identify areas where institutional traders (smart money) are likely to trap retail traders through false breakouts and liquidity grabs. These traps often occur near key highs and lows, where retail traders are lured into trades just before price reverses sharply.
🔍 Key Features:
Liquidity Sweep Detection
Identifies false breakouts of recent swing highs or lows, signaling potential liquidity grabs by large players.
Reversal Confirmation
Confirms the trap using a classic price action reversal pattern (bullish or bearish engulfing), helping filter out weak signals.
Optional Volume Spike Filter
Allows additional confirmation based on a significant spike in volume, indicating potential institutional involvement.
Buy and Sell Trap Signals
🔴 Smart Money Short (SMT↓) – Triggered when price sweeps a high and reverses down.
🟢 Smart Money Long (SMT↑) – Triggered when price sweeps a low and reverses up.
Alerts & Labels
Real-time alert conditions and on-chart labels to help you catch setups without missing opportunities.
📈 How to Use:
Apply on Higher Timeframes (1H, 4H, Daily) for cleaner signals.
Look for SMT signals at key supply/demand zones or market structure points.
Combine with your existing trading strategy, such as order blocks or break of structure (BoS), for higher accuracy.
Use volume filter only if you're analyzing markets where volume data is reliable.
⚠️ Disclaimer:
This tool is meant to assist with trade identification, not trade execution. Always use proper risk management and validate setups with your trading plan.