Reversion to Mean - TLT [with Metrics]Reversion-to-Mean Strategy
Buy when RSI < 30 and price is in bottom 10% of 52-week range.
Exit when price returns to 50% or RSI > 70.
Indicators and strategies

DIVAP RSI by:TMThe DIVAP RSI by:TM is a precision-focused RSI-based indicator designed to identify high-confidence entry and exit points. It uses a faster RSI (length 7) combined with extended levels (20 and 80) to capture momentum reversals at extreme zones.
✅ Green arrows signal entries when RSI crosses above 20 (exit from oversold)
✅ Red arrows signal exits when RSI crosses below 80 (exit from overbought)
This minimalist tool is ideal for traders who prefer clean chart setups with clear, timely alerts.
🔧 This is a test version and is actively being improved. Feedback is welcome!

Binary Satisfaction20‑EMA Trend Filter: Only long above EMA(20), short below (EMA isn’t plotted).
Volume Filter: Bar’s volume > 10‑bar SMA × volMult.
RSI Filter: Requires RSI(14) > 50 for buys, < 50 for sells.
ATR Volatility Filter: Only trade when ATR(14) > its 20‑bar SMA (avoids low‑vol markets).
Breakout Confirmation: BUY only if current close > prior high; SELL only if < prior low.

No Wick Candle MarkerDescription
The "No Wick Candle Marker" indicator identifies and highlights candles with no upper or lower wicks on your chart, helping traders spot potential reversal or continuation patterns. A candle with no lower wick (open equals low) is marked with a green triangle below the bar, while a candle with no upper wick (open equals high) is marked with a red triangle above the bar. This indicator is customizable, allowing you to use either the chart’s timeframe or a user-defined timeframe for detection.
Features
Wick Detection: Marks candles with no lower wick (bullish) and no upper wick (bearish) for easy identification.
Timeframe Flexibility: Choose between the chart’s current timeframe or a custom timeframe (e.g., 1-minute, 4-hour, daily, etc.).
Visual Clarity: Uses clear, color-coded triangles (green for no lower wick, red for no upper wick) for intuitive analysis.
Overlay Indicator: Seamlessly integrates with your chart without cluttering the view.
How It Works
The indicator checks each candle to determine if its open price equals its low (no lower wick) or high (no upper wick). When conditions are met, it plots a triangle marker below or above the candle, respectively. The timeframe setting allows you to analyze wick patterns on your preferred timeframe, making it versatile for scalping, swing trading, or long-term analysis.
Settings
Use Chart Timeframe: Enable to detect no-wick candles on the chart’s current timeframe. Disable to select a custom timeframe.
Custom Timeframe: Choose a specific timeframe (e.g., 1M, 5M, 15M, 1H, 4H, D, W, M) when not using the chart’s timeframe.
Use Cases
Identify strong bullish or bearish candles with no wicks, often associated with significant price momentum.
Combine with other technical tools to confirm reversals, breakouts, or trend continuations.
Analyze patterns across different timeframes for multi-timeframe trading strategies.
Notes
Best used in conjunction with other technical analysis tools to validate signals.
Works on any market (stocks, forex, crypto, etc.) and any timeframe supported by the platform.
Get Started
Add the "No Wick Candle Marker" to your chart, adjust the timeframe settings to suit your trading style, and start identifying key candle patterns with ease!

Purple Dot IndicatorDescription:
Identifies high-momentum candles using price % move + volume spike.
Purple = Combined signal | Blue = Price only | Orange = Volume only.
Created by Haseeb Badar (@HB_Stocks).


PL TrackerIt's a very simple script that returns daily and open PL given entry price and quantity of shares.
You can have a list of stocks owned and keep them as a list in this format:
$Ticker1, EntryPrice1, SharesOwned1, $Ticker2, EntryPrice2, SharesOwned2, etc...

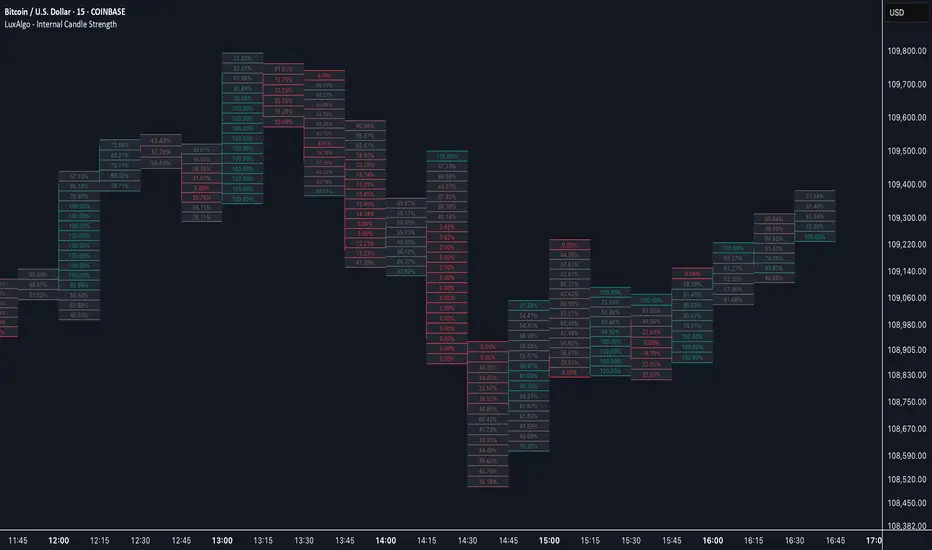
Internal Candle Strength [LuxAlgo]The Internal Candle Strength tool allows traders to divide each chart bar into multiple rows of custom size and inspect the strength of the lower timeframes trends located within each row.
This tool effectively helps traders in identifying the power dynamic between bulls and bears within multiple areas within each bar, providing the ability to conduct LTF analysis.
🔶 USAGE
The strength displayed within each row ranges from 0% to 100%, with 0% being the most bearish and 100% being the most bullish.
Traders should be aware of the extreme probabilities located at the higher/lower end of the bars, as this can signal a change in strength and price direction.
Traders can select the lower timeframe to pull the data from or the row size in the scale of the chart. Selecting a lower timeframe will provide more data to evaluate an area's strength.
Do note that only a timeframe lower than the chart timeframe should be selected.
🔹 Row Size
Selecting a smaller row size will increase the number of rows per bar, allowing for a more detailed analysis. A lower value will also generally mean that less data will be considered when calculating the strength of a specific area.
As we can see on the chart above (all BTCUSD 30m), by selecting a different row size, traders can control how many rows are displayed per bar.
🔶 SETTINGS
Timeframe: Lower timeframe used to calculate the candle strength.
Row Size: Size of each row on the chart scale, expressed as a fraction of the candle range.
Price Ranged FVG📌 Price Ranged FVG
Is a clean and efficient tool designed to detect Fair Value Gaps (FVGs) with adjustable filters and structural context. It’s especially useful for traders looking to filter out insignificant gaps and focus on high-probability areas, particularly around swing breaks or structural shifts.
🧠 What is a Fair Value Gap (FVG)?
A Fair Value Gap appears when there’s a price imbalance between candles — typically after a strong move — where the market skips over certain price levels without trading there. These zones can act as potential areas for price to return to (mean reversion), or serve as support/resistance depending on market structure.
🔍 FVG Detection Types
You can choose between three different detection modes under the "FVG Detection" input:
Same Type: Only detects FVGs where the last 3 candles are in the same direction (all bullish or all bearish).
All: Detects any FVG, regardless of candle direction.
Twin Close: Detects FVGs only when the last two candles are in the same direction and close accordingly — offering a stricter confirmation.
🎯 FVG % Filters
To filter out noise or insignificant gaps, this indicator includes:
Minimum FVG % Filter: Ignores FVGs smaller than your specified percentage of the current close.
Maximum FVG % Filter: Ignores overly large gaps that may be unreliable or caused by anomalies.
These filters help focus on relevant FVGs that are more likely to act as reaction zones.
🏛 Structural Context (Swing Highs and Lows)
The indicator plots swing highs and swing lows with dots to provide structure-based context:
Set Swing Strength to 3 for detecting internal structure (shorter-term moves).
Use a higher setting like 5 to focus on external structure (more significant highs/lows).
These levels can help you determine whether an FVG is forming within a consolidation, breakout, or key structural transition.
✅ Use Case (My Personal Workflow)
I personally use this indicator to:
Filter out weak or irrelevant FVGs using the % filters.
Watch for price interaction at swing breaks — especially when an FVG aligns with a break in internal or external structure.
Refine entry and exit planning in confluence with other tools or strategies.
⚠️ Disclaimer
This indicator is not financial advice. It is a technical analysis tool intended to support your own decision-making process. Always do your own research and risk management.

Friedrich IndicatorThis indicator visualizes trend zones using two Exponential Moving Averages (EMAs) with user-defined lengths (default 32 and 58). It identifies bullish and bearish trends based on the relationship between the shorter and longer EMA and confirms these trends only after they persist for a specified number of bars (confirmBars).
Bullish zone (green): When the shorter EMA remains above the longer EMA for at least the confirmation number of bars, both EMAs and the area between them are colored green, indicating a confirmed upward trend.
Bearish zone (red): When the shorter EMA stays below the longer EMA for at least the confirmation bars, EMAs and the filled zone turn red, signaling a confirmed downward trend.
Neutral zone (white): Before the trend confirmation, the EMAs and the area between are colored white with transparency, representing an unconfirmed or neutral state.
The area between the two EMAs is filled with the respective color, providing an intuitive visual cue of market momentum and trend strength directly on the price chart.

TTT Sentiment IndicatorThis indicator plots the NYSE uptick vs. downtick volume ratios and can be used as a short-term sentiment indicator of buying pressure (FOMO) when UVOL/DVOL is high and selling pressure (panic selling) when DVOL/UVOL is high. These ratios are used informally by Chris Vermeulen of The Technical Traders as a contrarian indicator on a 30 minute chart.
This script isn't created, approved, or supported by The Technical Traders, but was created by a TTT subscriber to support the request of other subscribers. I'm not planning to upgrade or support this indicator or answer questions on how to use it. It's open source, so users can make their own copy and edit as they see fit.

Gold Power Hours Strategy📈 Gold Power Hours Trading Strategy
Trade XAUUSD (Gold) or XAUEUR during the most volatile hours of the New York session, using momentum and trend confirmation, with session-specific risk/reward profiles.
✅ Strategy Rules
🕒 Valid Trading Times ("Power Hours"):
Trades are only taken during high-probability time windows on Tuesdays, Wednesdays, and Thursdays , corresponding to key New York session activity:
Morning Session:
08:00 – 11:00 (NY time)
Afternoon Session:
12:30 – 16:00
19:00 – 22:00
These times align with institutional activity and economic news releases.
📊 Technical Indicators Used:
50-period Simple Moving Average (SMA50):
Identifies the dominant market trend.
14-period Relative Strength Index (RSI):
Measures market momentum with session-adjusted thresholds.
🟩 Buy Signal Criteria:
Price is above the 50-period SMA (bullish trend)
RSI is greater than:
60 during Morning Session
55 during Afternoon Session
Must be during a valid day (Tue–Thu) and Power Hour session
🟥 Sell Signal Criteria:
Price is below the 50-period SMA (bearish trend)
RSI is less than:
40 during Morning Session
45 during Afternoon Session
Must be during a valid day and Power Hour session
🎯 Trade Management Rules:
Morning Session (08:00–11:00)
Stop Loss (SL): 50 pips
Take Profit (TP): 150 pips
Risk–Reward Ratio: 1:3
Afternoon Session (12:30–16:00 & 19:00–22:00)
Stop Loss (SL): 50 pips
Take Profit (TP): up to 100 pips
Risk–Reward Ratio: up to 1:2
⚠️ TP is slightly reduced in the afternoon due to typically lower volatility compared to the morning session.
📺 Visuals & Alerts:
Buy signals: Green triangle plotted below the bar
Sell signals: Red triangle plotted above the bar
SMA50 line: Orange
Valid session background: Light pink
Alerts: Automatic alerts for buy/sell signals

Fempires (9 SMA + 21 EMA)Fempires (9 SMA + 21 EMA) Trading Indikator
This indicator is a simple yet effective trend-following tool based on the relationship between the 9-period Simple Moving Average (SMA) and the 21-period Exponential Moving Average (EMA). It visually highlights bullish and bearish conditions using dynamic color changes and a shaded zone between the two lines.
🔍 How It Works:
Green color indicates that the price is trading above the 21 EMA → Bullish bias
Red color shows that the price is trading below the 21 EMA → Bearish bias
The shaded area between the 9 SMA and 21 EMA helps you quickly identify momentum and potential trend reversals
📈 Ideal For:
Trend-following strategies
Entry/exit confirmation
Visual clarity in fast-moving markets
⚙️ Settings:
9-period SMA (fast trend)
21-period EMA (slow trend)
No complicated signals – just clear, visual guidance for intraday, swing, or scalping trades.

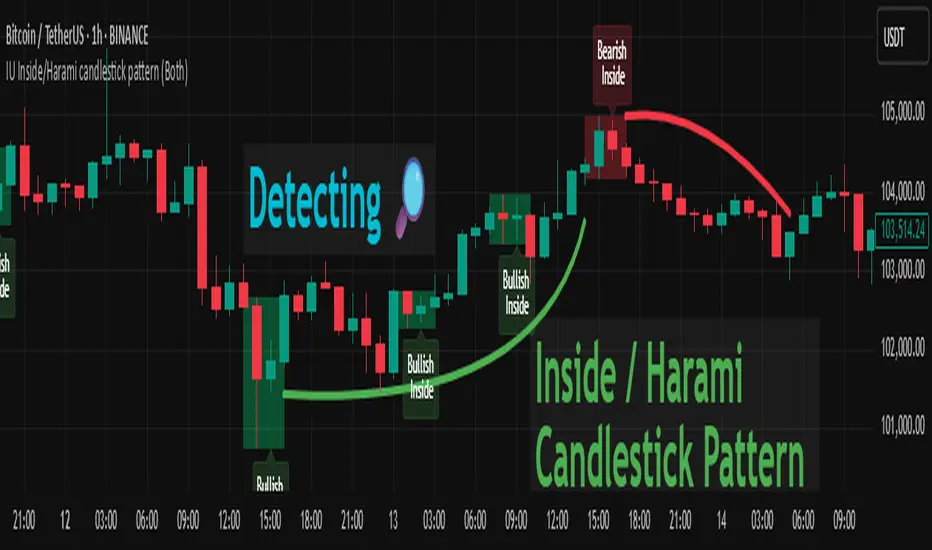
IU Inside/Harami candlestick patternDESCRIPTION
The IU Inside/Harami Candlestick Pattern indicator is designed to detect bullish and bearish inside bar formations, also known as Harami patterns. This tool gives users flexibility by allowing pattern detection based on candle wicks, bodies, or a combination of both. It highlights detected patterns using colored boxes and optional text labels on the chart, helping traders quickly identify areas of consolidation and potential reversals.
USER INPUTS :
Pattern Recognition Based on =
Choose between "Wicks", "Body", or "Both" to determine how the inside candle pattern is identified.
Show Box =
Toggle the appearance of colored boxes that highlight the pattern zone.
Show Text =
Toggle on-screen labels for "Bullish Inside" or "Bearish Inside" when patterns are detected.
INDICATOR LOGIC :
Bullish Inside Bar (Harami) is detected when:
* The current candle's high is lower and low is higher than the previous candle (wick-based),
* or the current candle’s open and close are inside the previous candle’s body (body-based),
* and the current candle is bullish while the previous is bearish.
Bearish Inside Bar (Harami) is detected when:
* The current candle's high is lower and low is higher than the previous candle (wick-based),
* or the current candle’s open and close are inside the previous candle’s body (body-based),
* and the current candle is bearish while the previous is bullish.
The user can choose wick-based, body-based, or both logics for pattern confirmation.
Boxes are drawn between the highs and lows of the pattern, and alert messages are generated upon confirmation.
Optional labels show the pattern name for quick visual identification.
WHY IT IS UNIQUE :
Offers three different logic modes: wick-based, body-based, or combined.
Highlights patterns visually with customizable boxes and labels.
Includes built-in alerts for immediate notifications.
Uses clean and transparent plotting without repainting.
HOW USER CAN BENEFIT FROM IT :
Receive real-time alerts when Inside/Harami patterns are formed.
Use the boxes and text labels to spot price compression zones and breakout potential.
Combine it with other tools like trendlines or support/resistance for enhanced accuracy.
Suitable for scalpers, swing traders, and price action traders looking to trade inside bar breakouts or reversals.
DISCLAIMER :
This indicator is not financial advice, it's for educational purposes only highlighting the power of coding( pine script) in TradingView, I am not a SEBI-registered advisor. Trading and investing involve risk, and you should consult with a qualified financial advisor before making any trading decisions. I do not guarantee profits or take responsibility for any losses you may incur.
Clean 20/40/60 High/Low LabelsIPDA Data Ranges
Works on all timeframes
20 period high and low, 40 period high and low, and 60 period high and low
This helps to identify large cycles on the daily and 4H chart
Can also be useful at liquidity injections and opening and closing prices of the market.


MTF Trend + SMC Structure (EMA/SMA Mix - HH/HL)Objective
To provide a quick, visual, and reliable reading of market trends and structure.
Combines dynamic moving averages and SMC (market structure) logic.
Effectively integrates into the chart via a clear table displayed in the top right corner.
📊 What the indicator displays (by timeframe: M5, M15, M30, H1, H4, D1, W1)
🟢 1. MA Trend
Based on two moving averages (short and long).
Average Type:
EMA for M5 to M30 (reactive)
SMA for H1 to Weekly (smoother)
Display:
🟢 Up if short MA > long MA
🔴 Down if short MA < long MA
Customizable lengths per timeframe
🧱 2. Structure (SMC logic)
Detects Higher High / Higher Low and Lower High / Lower Low
Based on significant pivots (pivothigh, pivotlow)
Logic inspired by SMC swing trading
Display:
🟢 Up = bullish structure (HH + HL)
🔴 Down = bearish structure (LH + LL)
⚪ Neutral = no clear structure
✅ Advantages
🔍 Instant view of the overall multi-timeframe context
📉 Combines trend by MA and SMC structure
🎯 Helps filter out bad entries Countertrend
⚡️ Very useful for intraday, swing, or SMC traders

FutureObitz Official Bank Levels// © 2025 FutureObitz - Custom version for private use
This Bank Levels indicator automatically calculates daily high, low, mid, and premium/discount zones using dynamic ranges.
Ideal for intraday traders using supply/demand, liquidity concepts, and institutional levels. Labels are cleanly aligned and update once per day for minimal chart clutter.
This version was customized for my personal trading style and refined for visual clarity.

Smart Money Premium | Made by EF (Improved)📊 Smart Money Premium | Made by EF (Improved)
A powerful all-in-one toolkit built for Smart Money / ICT traders.
It helps you clearly identify market structure, liquidity, order blocks, fair value gaps, and high-probability entry signals — all visualized directly on your chart.
✨ Key features:
✅ Automatic detection of Swing High / Swing Low points
✅ Real-time BOS / CHOCH (Break of Structure / Change of Character) labeling
✅ Dynamic Order Blocks with adjustable duration and color
✅ Detection of Fair Value Gaps (FVG) and visualization with customizable zones
✅ Liquidity zones (EQH/EQL) with tolerance settings
✅ Smart Swing Failure Patterns (SFP) with instant labels
✅ Built-in Kill Zones for London & New York sessions
✅ Automatic adaptation of key parameters to your timeframe
✅ Volume filter for additional signal confirmation
✅ Clear SL/TP levels with customizable Risk:Reward
✅ Interactive status panel showing trend, structure, session, and live signal readiness
⚙️ How to use:
1️⃣ Add the indicator to your chart
2️⃣ Choose your preferred settings (or let it auto-tune by timeframe)
3️⃣ Follow the on-chart signals: BOS, CHOCH, SFP, OB & FVG zones
4️⃣ Use the SL/TP levels and Risk:Reward built into each signal to plan your trades
✅ Designed for:
• Traders who follow Smart Money Concepts / ICT methodology
• Those who want a clean, visual and data-driven approach
• Both beginners and advanced traders looking to save time and keep discipline
🛠 All logic is transparent and customizable — colors, lookback periods, OB/FVG duration, liquidity sensitivity and more.
🔔 Alerts included for Long and Short setups.

Highlight Candles with Open-Close Difference ≥ 24momentum candle. price starts big move or continue momentum on either side.

Adj Momentum (3M / 6M / 12M)Mirza Salman Volatility Adjusted Momentum.
The Volatility Adjusted Momentum Indicator distills a security’s recent performance into a single, decision-ready metric that captures both the velocity and the reliability of its trend. By simultaneously rewarding sustained price appreciation and discounting erratic fluctuations, the indicator highlights those stocks that are not only advancing but doing so with a consistent, low-volatility profile—attributes typically favoured by quantitative momentum and trend-following frameworks. A high positive reading points to instruments exhibiting strong, orderly upward trajectories, making them prime candidates for capital allocation in momentum-oriented portfolios. Conversely, muted or negative readings reveal markets whose returns have been lacklustre, unstable, or downward-sloping, signalling that they warrant caution or exclusion. In practice, this indicator enables portfolio managers and traders to rank broad watch-lists swiftly, focus due-diligence on the most robust price leaders, and enforce systematic discipline in scaling back exposure to choppier, less reliable names—all without resorting to subjective chart interpretation or ad-hoc volatility filters.

GalihRidha ZoneX — Adaptive MTF S&R + Smart Money AreasWelcome to ZoneX: The new frontier of Support & Resistance for modern traders!
ZoneX is more than just S&R — it’s a hybrid price map that fuses classic pivots with institutional logic, visualizing the zones that really matter.
What Makes ZoneX Different?
Multi-Timeframe S&R:
Instantly spot the true key levels from higher timeframes, not just what everyone else sees on the current chart.
Smart Money Order Blocks:
Automatically highlights supply and demand zones where institutions accumulate or distribute — find the real “trap” areas and avoid getting faked out.
VWAP Bands:
See where the liquidity is thickest — these bands act as magnets for price, great for both reversals and breakouts.
Midline Channel:
Identify the market’s equilibrium — know when you’re in value and when you’re at the edge.
Previous High/Low:
Mark institutional magnets and classic stop-hunt zones, updated in real-time.
Ultra Customizable:
One-click to enable/disable any feature. Clean for minimalists, packed for pros.
How to Use ZoneX
Breakout?
Wait for price to clear a ZoneX band or order block with momentum — enter on the retest.
Reversal?
Fade wicks and exhaustion right in the highlighted zone — confirm with price action or volume.
Range/Balance?
Trade the ping-pong between ZoneX midline and outer bands — great for scalping and mean reversion.
Who’s It For?
Active traders who want an edge beyond standard S&R.
Institutional-mindset scalpers and swing traders.
Anyone who loves a clean chart but craves real market context.
Level up your chart, see what the big players see —
and never trade blind again. This is ZoneX.

OTC supply & demand Candleshi traders and OTC colleagues,
this simple indicator used to spot easly the (indecisive , decisive , explosive) candles
i suggest to keep the candle boarders from the chart setting (blue or green for bullish ) and (red for bearish) . this indicator simplify spotting the supply and demand zones and the most powerful explosive candles in eye plink based on Bernd Skorupinski
theory.
from indicator setting
colour 0 (indecisive)
colour 1 (decisive) bullish
colour 2 (decisive) bearish
colour 3 (explosive) bullish
colour 4 (explosive) bearish
you can change the colour as u wish.
have a good trading day
