HSHS Volume Divergence MTF v6 (Final Fix)HSHS Volume Divergence MTF v6
Zmienność
Dywergencja
Momentum
RSI
Indicators and strategies

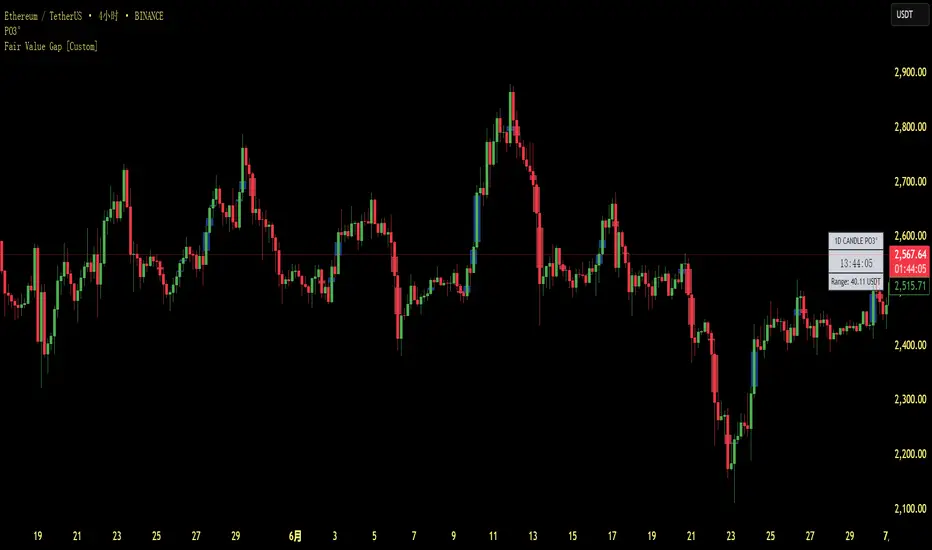
Fair Value Gap [Custom]📌 FVG Indicator – Smart Money Concepts Tool
This script is based on Smart Money Concepts (SMC) and automatically detects and marks Fair Value Gaps (FVG) on the chart, helping traders identify unbalanced price areas left behind by institutional moves.
🧠 What is an FVG?
An FVG (Fair Value Gap) is the price gap formed when the market moves rapidly, leaving behind a candle range where no trading occurred — typically between Candle 1’s high and Candle 3’s low (in a three-candle pattern). These gaps often signal imbalance, created during structural breaks or liquidity grabs, and may act as retrace zones or entry points.
🛠 Features:
✅ Automatically detects and highlights FVG zones (high-low range)
✅ Differentiates between open (unfilled) and closed (filled) FVGs
✅ Adjustable timeframe settings (works best on 1H–4H charts)
✅ Option to toggle display of filled FVGs
✅ Great for identifying pullback entries, continuation zones, or reversal setups
💡 Recommended Use:
After BOS/CHoCH, watch for price to return to the FVG for entry
Combine with Order Blocks and liquidity zones for higher accuracy
Best used as part of an ICT or SMC-based trading system
Market Structure by HorizonAImarket structure with BOS and CHOCH. It has full accuracy. Identify structure and trade accordingly.

15-Minute King (VWAP + Z-Score + CVD Oscillator)fridrich instituational secret . ( limited time only 4 free )


Siyonacci-CheapResult:
Single line %K → colors change depending on the signal
Overbought and oversold zones are indicated by levels 80–20
Orange color appears in indecisive signals

Siyonacci-powerWith this indicator:
Volume momentum volume line filters the trend.
ATR bands control volatility.
You get alerts for volume mismatch.
MSB peak-bottom breakouts are visible.
MACD momentum histogram in the bottom panel confirms the strength of the signal.

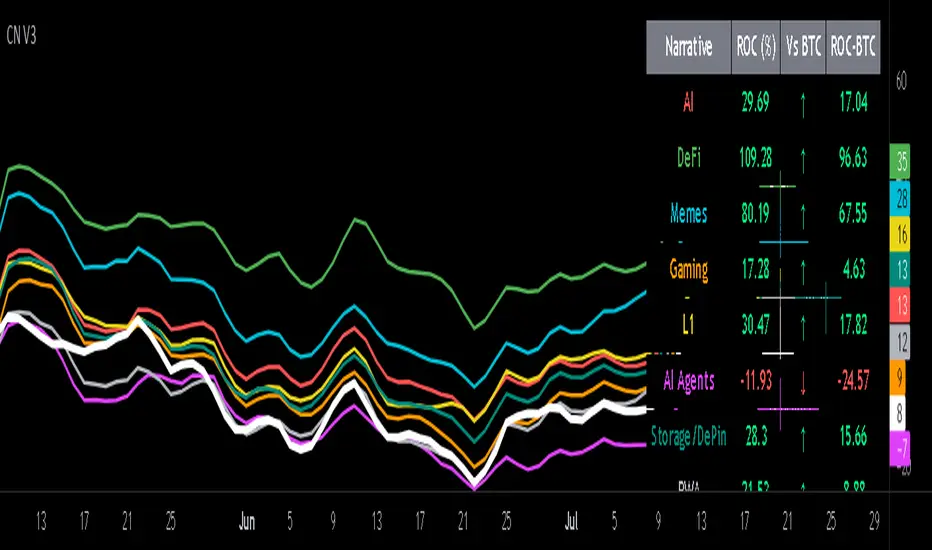
Crypto Narratives: Relative Strength V2Simple Indicator that displays the relative strength of 8 Key narratives against BTC as "Spaghetti" chart. The chart plots an aggregated RSI value for the 5 highest Market Cap cryopto's within each relevant narrative. The chart plots a 14 period SMA RSI for each narrative.
Functionality:
The indicator calculates the average RSI values for the current leading tokens associated with ten different crypto narratives:
- AI (Artificial Intelligence)
- DeFi (Decentralized Finance)
- Memes
- Gaming
- Level 1 (Layer 1 Protocols)
- AI Agents
- Storage/DePin
- RWA (Real-World Assets)
- BTC
Usage Notes:
The 5 crypto coins should be regularly checked and updated (in the script) by overtyping the current values from Rows 24 - 92 to ensure that you are using the up to date list of highest marketcap coins (or coins of your choosing).
The 14 period SMA can be changed in the indicator settings.
The indicator resets every 24 hours and is set to UTC+10. This can be changed by editing the script line 19 and changing the value of "resetHour = 1" to whatever value works for your timezone.
There is also a Rate of Change table that details the % rate of change of each narrative against BTC
Horizontal lines have been included to provide an indication of overbought and oversold levels.
The upper and lower horizontal line (overbought and oversold) can be adjusted through the settings.
The line width, and label offset can be customised through the input options.
Alerts can be set to triggered when a narrative's RSI crosses above the overbought level or below the oversold level. The alerts include the narrative name, RSI value, and the RSI level.


Chaithanya Tattva Volume Zones📜 "Chaitanya Tattva" Volume Zones:-
A Sacred Framework of Supply, Demand & Market Energy
In the world of financial markets, price is said to reflect all information. But the true pulse of the market — its life force, its intent, and its moment of truth — is most vividly expressed not in price itself, but in volume.
Chaitanya Tattva Volume Zones is a spiritually inspired volume-based tool that transforms your chart into a canvas of market consciousness, revealing moments where supply and demand engage in visible energetic spikes. These moments are often disguised as ordinary candles, but with this tool, you uncover zones of intent — footprints left by the market’s deeper intelligence.
🌟 Why “Chaitanya Tattva”?
Chaitanya (चैतन्य) is a Sanskrit word meaning consciousness, awareness, or the spark of life energy. It is that which animates — the subtle intelligence behind all movement.
Tattva (तत्त्व) refers to essence, truth, or the underlying principle of a thing. In classical yogic philosophy, the tattvas are the elemental building blocks of reality.
Together, Chaitanya Tattva represents the conscious essence — the living pulse that animates the market through volume surges and imbalances.
This tool is not just a technical indicator — it is a spiritual observation device that aligns with the rhythm of volume and price action. It doesn't predict the market. It reveals when the market has already spoken — loudly, clearly, and energetically.
📈 What Does the Tool Do?
Chaitanya Tattva Volume Zones identifies exceptional volume spikes within the recent price history and visually marks the areas where market intent has been most active.
Specifically, the tool:
Scans for volume spikes that exceed all the volume of the last N bars (default is 20)
Confirms whether the spike happened on a bullish candle (close > open) or bearish candle (close < open)
For a bullish spike, it marks a Supply Zone — the area between the high and close of the candle
For a bearish spike, it marks a Demand Zone — the area between the low and close
Visually paints these zones with soft translucent boxes (red for supply, green for demand) that extend forward across multiple bars
🧘♂️ The Spiritual Framework
🔴 Supply = "Agni" — The Fire of Expansion
When a bullish candle erupts with historically high volume, it symbolizes the fire (Agni) of market optimism and upward expansion. It means that buyers have absorbed available supply at that level and established dominance — but such fire may also signal exhaustion, making it a potential supply barrier if price returns.
These Supply Zones are areas where:
Sellers are likely to re-engage
Smart money may be unloading
Future resistance can be anticipated
But unlike traditional indicators, this tool doesn’t guess. It reacts only to a clear volume-based event — when market energy surges — and locks in that awareness through zone marking.
🟢 Demand = "Prithvi" — The Grounding of Price
On the other hand, a bearish candle with extremely high volume represents the Earth (Prithvi) — grounding the price with firm hands. A strong volume drop often means buyers are stepping in, absorbing the selling pressure.
These Demand Zones are areas where:
Buying interest is proven
Market memory is stored
Future support can be expected
By respecting these zones, you're aligning your trading with natural market boundaries — not theoretical ones.
🧠 How Is It Different from Regular Volume Tools?
While most volume indicators show bars on a lower panel, they leave interpretation up to the trader. “High” or “low” becomes subjective.
Chaitanya Tattva Volume Zones is different:
It quantifies "spike": a bar must exceed all previous N volumes
It qualifies the intent: was the spike bullish or bearish?
It marks zones on the price chart: no need to guess levels
It preserves market memory: the zones persist visually for easy reference
In essence, this tool doesn’t just report volume — it interprets volume’s context and visually encodes it into the chart.
🧘 How to Use
1. Support/Resistance Mapping
Use the tool to understand where volume proved itself. If price revisits a red zone, expect possible rejection (resistance). If price revisits a green zone, expect possible absorption (support).
2. Entry Triggers
You may enter:
Long near demand zones if bullish confirmation appears
Short near supply zones if bearish confirmation appears
3. Stop Placement
Stops can be placed just beyond the zone boundary to align with areas where smart money historically defended.
4. Breakout Confidence
When price breaks through one of these zones with momentum, it often signals a new energetic wave — the old balance has been overcome.
🔔 Key Features
Volume spike detection across any timeframe
Clear visual zones — no clutter, no lag
Highly customizable: zone width, volume lookback, colors
Philosophy-aligned with supply and demand theory, Wyckoff, and Order Flow
🌌 A Metaphysical View of Volume
In yogic science, volume is akin to Prana — life-force energy. A market is not moved by price alone but by intent, force, and participation — all encoded in volume.
Just as a human body pulses with blood when action intensifies, the market pulses with volume when institutional decisions are made.
These pulses become sacred footprints — and Chaitanya Tattva Volume Zones helps you walk mindfully among them.
🔮 Final Thoughts
In a sea of indicators that shout at you with every tick, Chaitanya Tattva is calm. It speaks only when energy concentrates, only when the market sends a signal born of intent.
It doesn’t predict.
It doesn’t repaint.
It simply shows the truth, when the truth becomes undeniable.
Like a sage that speaks only when needed, it waits for volume to prove itself — then draws a memory into space, a zone where traders can re-align their actions with what the market has already honored.
Use it not just to trade —
But to listen.
To observe.
To follow the Chaitanya — the conscious pulse of the market’s own breath.

Smart Directional Fib Zone (Selectable Session)🎯 Overview
This indicator plots a dynamic Fibonacci zone between the 0.5 and 0.618 levels , calculated from the previous day’s price action , and is designed specifically for intraday traders.
It visually highlights key retracement or reaction areas where the market often pauses or reverses.
🔍 How it works
At the start of each day, the script automatically captures:
the previous day’s open (pdo),
high (pdh),
low (pdl),
and close (pdc).
It then determines if the previous day was bullish (Close > Open) or bearish (Close < Open).
Based on that:
If the previous day was bullish, it projects the Fibonacci levels down from the high (typical for expecting retracements).
If bearish, it projects them up from the low.
The two key levels are:
0.5 (50%) retracement / projection
0.618 (61.8%) retracement / projection
A colored zone is plotted between these levels to act as a leading guide for intraday setups.
⏰ Time filtering & session customization
A unique feature is the dynamic session filtering:
By default, the zone is only plotted during active market hours, keeping your chart clean outside trading hours.
The script provides a dropdown selector so you can quickly switch between:
India session (9:15 to 15:30)
Europe session (9:00 to 17:30)
US session (9:30 to 16:00)
Or even define your own custom session times.
This makes it ideal for intraday traders in any region.
🎨 Visual features
The fill zone changes color based on the previous day’s sentiment:
Green zone if the previous day was bullish
Red zone if the previous day was bearish
🚨 Alerts
The script includes an alert condition, so you can easily set up TradingView alerts to notify you when:
Price enters the Fibonacci zone.
This is extremely helpful for catching retracements or reversals without staring at the screen all day.
⚙️ How to use
✅ Works on any intraday timeframe (1 min, 5 min, 15 min, etc.).
✅ Simply add it to your chart, pick your session in the dropdown, and watch the Fibonacci zone automatically adjust to your selected market hours.
Use it as a confluence tool alongside other indicators like VWAP, EMAs, Bollinger Bands, or price action patterns to time entries and exits.
💪 Why this is powerful
This is more than a simple Fib retracement tool:
It dynamically adapts to the previous day’s sentiment, helping you trade in alignment with recent market psychology.
The session filtering ensures your charts are focused only on the periods


Retracement Bar🔍 Retracement Bar – RB
The Retracement Bar (RB) indicator is designed to highlight potential reversal zones by identifying candles where price shows a clear rejection from the extremes. It helps traders spot moments where institutional inventory rebalancing may be occurring — often a precursor to a strong move in the opposite direction.
RB highlights bars that:
Have a relatively small real body compared to the total candle range.
Show a long wick (upper or lower) that exceeds a user-defined percentage of the candle range.
Suggest a potential rejection of price — upward or downward — based on candle structure.
When these conditions are met, a triangle symbol is plotted:
🔻 Red triangle above a candle suggests a possible short opportunity.
🔺 Green triangle below a candle suggests a possible long opportunity.
This indicator does not repaint and triggers only at candle close.
📈 Example – Long Entry
Signal: A green triangle appears below a candle (suggesting rejection of lower prices).
Steps:
Wait for the current RB candle to close.
On the next candle:
Enter long if price breaks above the high of the RB candle.
Alternatively, wait for a pullback and enter based on confirmation (e.g., bullish engulfing, hammer, trendline bounce).
Place a stop-loss just below the low of the RB candle.
Set a target:
Based on a 2:1 risk-reward ratio.
Or use the next resistance/Fibonacci level.
📉 Example – Short Entry
Signal: A red triangle appears above a candle (suggesting rejection of higher prices).
Steps:
Wait for the current RB candle to close.
On the next candle:
Enter short if price breaks below the low of the RB candle.
Or wait for confirmation (e.g., bearish engulfing, shooting star, breakdown from a level).
Place a stop-loss just above the high of the RB candle.
Set a target:
2:1 risk-reward ratio.
Or the next support/Fibonacci zone.
✅ Recommended Filters for Better Results:
Confluence with support/resistance zones.
Trend alignment or reversal context.
Additional confirmation from price action patterns or oscillators.
Volume analysis for entry strength.
🙏 Acknowledgment
Special thanks to Rob Hoffman for inspiring this concept through his original Inventory Retracement Bar (IRB) idea — this indicator is a reinterpretation meant to visually and practically support discretionary price action traders.

Session Visualizer by Timezone (Fixed)Session Visualizer by Timezone (Asia, London, New York)
This indicator highlights the Asian, London, and New York trading sessions directly on your chart — adjusted to your local timezone (via UTC offset).
🔧 Key Features:
Session times automatically adjust based on your chosen UTC offset
Toggle each session on/off individually
Custom background colors for each session
Designed for all intraday timeframes (1m – 4H)
📍 Sessions Covered:
Asian Session – Generally lower volatility and slower price movement; ideal for range traders and pre-positioning
London Session – Marked increase in volatility as European markets open
New York Session – Highest volume and volatility, especially during the London-New York overlap
🕓 Time Offset Setting:
Input your local UTC offset (e.g., UTC+10 for Sydney, UTC+1 for Berlin, UTC-5 for New York). The indicator adjusts session display accordingly.

DAX Setup ScreenerPine Script – Setup Screener
This code detects:
Range trading zone
Breakout long & breakdown short signals
With visual overlay
Use it like this:
Adjust rangeHigh, rangeLow, and breakoutBuffer
Enabled: Draws signals on the live chart

MULTI INDICATOR BY DEEPANINDIAThis TradingView strategy combines EMA, SuperTrend, and swing high/low to identify trend breakouts. A long trade is triggered when the previous candle closes above the EMA High and the current candle breaks the prior high. A short trade occurs (if not in Long Only mode) when the opposite happens with the EMA Low. The SuperTrend confirms trend direction, while swing points act as dynamic stop-loss levels. The script includes customizable inputs for EMA lengths, SuperTrend settings, and swing lookback. It helps traders capture strong trends with defined entries and exits using a rules-based, multi-indicator approach.

MULTI INDICATOR BY DEEPANINDIAThis TradingView strategy combines EMA, SuperTrend, and swing high/low to identify trend breakouts. A long trade is triggered when the previous candle closes above the EMA High and the current candle breaks the prior high. A short trade occurs (if not in Long Only mode) when the opposite happens with the EMA Low. The SuperTrend confirms trend direction, while swing points act as dynamic stop-loss levels. The script includes customizable inputs for EMA lengths, SuperTrend settings, and swing lookback. It helps traders capture strong trends with defined entries and exits using a rules-based, multi-indicator approach.

Single EMA Buy/Sell + Touch + Alerts + Signal Candle Colorsthis is pure buy sell indicator based on ema
you'll use this with the help of volume
risk reward ratio 1:1.5

RSI EMA9 + WMA45The Relative Strength Index (RSI) is one of the most popular momentum oscillators used by traders. It's so widely adopted that every charting software package and professional trading system worldwide includes it as a core indicator. Not only is this indicator included in every charting package, but it's also highly likely to be part of the default settings in every system.

doublepattern_dachengLibrary "doublepattern_dacheng"
f_detect_top_bottom(x, sig, color_green, color_red, var_sequence, state)
Parameters:
x (int)
sig (bool)
color_green (color)
color_red (color)
var_sequence (array)
state (TopBottomState)
store
Fields:
dir (series int)
n (series int)
y (series float)
TopBottomState
Fields:
lpt (series int)
prev_lpt (series int)
pph (series float)
ppl (series float)
cpph (series float)
cppl (series float)
ln (series int)
hn (series int)
awaiting_DBC (series int)
awaiting_DTC (series int)
tthresh (series float)
bthresh (series float)
自定义类型定义说明(Type Definitions)
该库定义了三个核心类型(type),用于结构化处理双顶双底形态识别逻辑:
This library defines three custom types to structurally manage double top/bottom pattern detection logic:
store
TopBottomState
f_detect_top_bottom() 函数
// 引入库(请将 {version_code} 替换为具体版本号)
// Import the library (replace {version_code} with the actual version code)
import dachengsuper/doublepattern_dacheng/{version_code} as dp
// ====================== 以下为 M 顶 和 W 底 的检测 开始 ====================
// ====================== Start of M Top and W Bottom Detection ====================
// 用一个 store 类型的动态数组 sequence 保存最近的枢轴点(最多 3 个)
// A dynamic array of type `store` to store recent pivot points (up to 3 points)
var dp.store sequence = array.new()
// 初始化状态对象,用于跟踪当前和历史的顶部/底部状态
// Initialize a TopBottomState object to track current and historical top/bottom state
var dp.TopBottomState state = dp.TopBottomState.new(0, 0, na, na, na, na, na, na, 0, 0, 0.0, 0.0)
// 调用检测函数:检测是否形成了 M 顶 或 W 底
// Call the detection function to check for M Top or W Bottom patterns
= dp.f_detect_top_bottom(x, sig, green, red, sequence, state)
// ====================== M 顶 和 W 底 的检测 结束 ====================
// ====================== End of M Top and W Bottom Detection ====================
// 当 DTC 为 true 时,表示检测到双顶形态
// When DTC is true, it indicates a double top pattern is detected
// 当 DBC 为 true 时,表示检测到双底形态
// When DBC is true, it indicates a double bottom pattern is detected
// 示例:如果需要发送 webhook 信号,请加上 `barstate.isconfirmed` 判断,这样就不会重绘
// Example: To send a webhook signal, use `DTC and barstate.isconfirmed` to avoid repainting

Engulfing Swing Low Strategy Indicatorcisd with fvg entry model on the 1min this will help with finding the swing low and helping those struggling.

RSI- RSI 8 Level Indicator
- Finally, The Bullish and Bearish 8 Level Power Zone indicator with alerts on each level!
Customize the colors however you like and remember if you need to set alerts you can also do that in the alerts section of the indicator. Just make sure what level the alert is for, and always look out for regular divergence, hidden divergence, and exaggerated divergence using this indicator that goes along with the power zones. :)
- RSI Strategy
Trading Bullish & Bearish Power Zones using regular divergence, hidden divergence, and exaggerated divergence.
P.s.
90, 80, 50, 40 Bullish Power Zones in green
65, 55, 30, 20 Bearish Power Zones in red
