Normalized Fibonacci Retracement (MTF/LOG)A question: Instead of creating indicators that constantly plot Fibonacci Retracement levels in a visually overwhelming way, why don't we redefine them on a different scale? 🤨
Overview
The Normalized Fibonacci Retracement indicator converts price data to a 0-100 scale based on the selected timeframe's high-low range, displaying normalized candlesticks alongside standard Fibonacci levels (23.6%, 38.2%, 50%, 61.8%, 78.6%). This normalization reveals patterns that may be hidden in absolute price charts and allows consistent analysis across different instruments.
Originality
By normalizing prices to percentages, this indicator enables pattern recognition independent of absolute price levels. The same formation at $10-$20 and $1000-$2000 appears identical on the normalized scale, helping traders identify recurring structures across various assets and timeframes.
Concepts
The indicator uses a simple formula to transform price data into percentages. This creates a bounded scale where patterns become comparable regardless of the underlying asset's price range. The normalized view often reveals symmetries and relationships not visible in traditional price charts.
Mechanics
The system tracks highs and lows within the selected timeframe as anchor points. When a new period begins, fresh boundaries are established and prices recalculated. Trend direction is determined by timing of extremes. Linear scaling uses direct percentage calculation, while logarithmic scaling applies exponential interpolation for assets with large percentage moves.
Functions
Timeframe Selection: Higher timeframe analysis on any chart resolution
Normalized Display: OHLC data converted to 0-100 percentage scale
Fibonacci Levels: Standard retracement levels plotted automatically
Scaling Options: Linear or logarithmic calculation methods
Pattern Recognition: Reveals formations hidden in absolute price charts
Moving Average: Optional 20-period SMA overlay
Notes
Ensure chart data covers the full selected timeframe for accurate calculations. Use logarithmic scaling for volatile assets with large percentage moves. The normalized scale is effective at revealing patterns and structures that remain consistent across different price ranges, making it particularly useful for comparative analysis and pattern-based trading strategies.
I hope it helps everyone. Do not forget to manage your risk. And trade as safely as possible. Best of luck!
Indicators and strategies

{FREE} Candlestick Patterns [NASAlgoTrading]{FREE} Candlestick Patterns identifies and plots various candlestick patterns on price charts. It helps traders visualize potential reversal and continuation patterns in the market.
Key Features
Bullish Reversal Patterns Detected:
Hammer - Signals potential bullish reversal after a downtrend
Inverted Hammer - Indicates possible bullish reversal
Three White Soldiers - Strong bullish reversal pattern showing consecutive bullish candles
Bullish Harami - Shows potential trend reversal from bearish to bullish
Bearish Reversal Patterns Detected:
Hanging Man - Warns of potential bearish reversal after an uptrend
Shooting Star - Suggests possible bearish reversal
Three Black Crows - Strong bearish reversal pattern showing consecutive bearish candles
Bearish Harami - Indicates potential trend reversal from bullish to bearish
Dark Cloud Cover - Shows bearish reversal potential
Continuation Patterns Detected:
Rising Three Methods - Bullish continuation pattern
Falling Three Methods - Bearish continuation pattern
Gravestone Doji - Can indicate potential reversals (shown in orange)
Long-legged Doji - Shows market indecision (shown in orange)
Dragonfly Doji - Can signal potential reversals (shown in orange)
Benefits for Traders
Visual Pattern Recognition: Automatically identifies and labels patterns on the chart, saving traders time in manual analysis.
Comprehensive Coverage: Detects multiple important candlestick patterns in a single indicator.
Clear Visual Cues:
Bullish patterns marked in green below price bars
Bearish patterns marked in red above price bars
Doji patterns marked in orange
Trend Analysis: Helps identify both reversal and continuation patterns, providing insights into potential market direction.
Confirmation Tool: Can be used alongside other technical indicators to confirm trading signals.
Educational Value: Helps new traders learn to recognize important candlestick patterns.
Customization: The indicator allows for up to 50 lines to be displayed (max_lines_count = 50).
Implementation Notes
The indicator uses precise mathematical conditions to identify each pattern, including:
Relative candle body and wick sizes
Previous candle patterns and trends
Price relationships between current and historical candles
This systematic approach ensures consistent pattern recognition that might be subjective when done manually.

Fair Value Gap Profiles [AlgoAlpha]🟠 OVERVIEW
This script draws and manages Fair Value Gap (FVG) zones by detecting unfilled gaps in price action and then augmenting them with intra-gap volume profiles from a lower timeframe. It is designed to help traders find potential areas where price may return to fill liquidity voids, and to provide extra detail about volume distribution inside each gap to assess strength and likely mitigation. The script automatically tracks each gap, updates its state over time, and can show which gaps are still unfilled or have been mitigated.
🟠 CONCEPTS
A Fair Value Gap is a zone between candles where no trades occurred, often seen as an inefficiency that price later revisits. The script checks each bar to see if a bullish (low above 2-bars-ago high) or bearish (high below 2-bars-ago low) gap has formed, and measures whether the gap’s size exceeds a threshold defined by a volatility-adjusted multiplier of past gap widths (to only detect significantly large gaps). Once a qualified gap is found, it gets recorded and visualized with a box that can stretch forward in time until filled. To add more context, a mini volume profile is built from a lower timeframe’s price and volume data, showing how volume is distributed inside the gap. The lowest-volume subzone is also highlighted using a sliding window scan method to visualise the true gap (area with least trading activity)
🟠 FEATURES
Visual gap boxes that appear automatically when bullish or bearish fair value gaps are detected on the chart.
Color-coded zones showing bullish gaps in one color and bearish gaps in another so you can easily see which side the gap favors.
Volume profile histograms plotted inside each gap using data from a lower timeframe, helping you see where volume concentrated inside the gap area.
Highlight of the lowest-volume subzone within each gap so you can spot areas price may target when filling the gap.
Dynamic extension of the gap boxes across the chart until price comes back and fills them, marking them as mitigated.
Customizable colors and transparency settings for gap boxes, profiles, and low-volume highlights to match your chart style.
Alerts that notify you when a new gap is created or when price fills an existing gap.
🟠 USAGE
This indicator helps you find and track unfilled price gaps that often act as magnets for price to revisit. You can use it to spot areas where liquidity may rest and plan entries or exits around these zones.
The colored gap boxes show you exactly where a fair value gap starts and ends, so you can anticipate potential pullbacks or continuations when price approaches them.
The intra-gap volume profile lets you gauge whether the gap was created on strong or thin participation, which can help judge how likely it is to be filled. The highlighted lowest-volume subzone shows where price might accelerate once inside the gap.
Traders often look for entries when price returns to a gap, aiming for a reaction or reversal in that area. You can also combine the mitigation alerts with your trade management to track when gaps have been closed and adjust your bias accordingly. Overall, the tool gives a clear visual reference for imbalance zones that can help structure trades around supply and demand dynamics.

TrendZonesTrendZones
This is an indicator which I use, have tested, tweaked and added features to for use in my trend following investing system. I got the idea for it when for some reason I was looking for a dynamic reference to measure the height of a channel or something. In search of this I made MA’s of the high and low borders of a Donchian channel which turned out to be two near parallel and stunningly smooth curves. This visual was so appealing that I immediately tried to turn it into a replacement for the KeltCOG which I previously used in my system. First I created a curve in the middle of the upper and lower curves, which I called COG (Center Of Gravity). Then I decided to enter only one lookback and let the script create a Donchian channel with half the lookback and use this to create the curves with an MA of whole lookback. For this reason the minimum lookback is set to 14, enough room for the Donchian Channel of 7 periods. This Donchian ChanneI has a special way of calculating the borders, involving a 5 period Median value. Thanks to this these borders are really a resistance and support level, which won’t change at a whim, e.g. when a ‘dead cat bounce’ occurs. I prevented the Donchian channel to show itself between the curves and only pop out from behind these. These pop outs now function as “strong trend zones”. I gave it colors (blue:-strong up, green: moderate up, orange: moderate down, red: strong down, near COG: gray, curves horizontal: gray) and it looked very appealing. I tested it in different time frames. In some weekend, when I was bored, I observed for a few hours the minute chart of bitcoin. It turned out that you can reliably tell that an uptrend ends when the candles go under the COG beginning a downtrend. Uptrend starts again once the candles go above COG. As Trends on minute charts only last around half an hour, this entertainment made the potential of this indicator very clear to me in just one afternoon.
Risk Management, Safe Level and Logical Stops.
In the inputs are settings for “Risk Tolerance”, and to activate “Show Logical Stop Level” (activated in example chart) and “Show Safe Level”. As a rule of thump a trade should not expose the invested capital to a risk of losing more than 2 percent. I divided my investment capital in ten equal parts which are allocated to ten different stocks or other instruments or kept liquid. This means that when a position is closed by triggering a Stop with a loss of 20 percent, the invested capital suffers only 2 percent (20% x 10% = 2%). This is why the value for “Risk Tolerance” has a default of 20. Because I put my Stops on the lower curve, a “Safe Level” can be calculated such that when you buy for a price below or at this level, the stop will protect the position sufficiently. Because I only buy when the instrument is in uptrend, the buying price should be between COG and Safe Level. Although I never do that, putting the stop at other curves is feasible and when you want to widen the stop (I never lower my stops btw) in a downtrend situation, even 1 ATR below the “Low Border”. I call these “Logical Stop Levels”, marked with dark green circles on the lower curve when safe buying by placing the Stoploss on this curve is possible, gray circles on the other curves, on the Upper Curve navy when price enters very profitable level. In a downtrend situation maroon circles appear.
Target lines
When I open a position I always set a Stoploss and a Target, for this purpose two types of Target values can be set and corresponding Target lines activated. These lines are drawn above the “High Border” at the set distance. If one expects some price to be used, differences will occur.
Other Features
Support Zone, this is 1 ATR below the “Low Border”, the maroon circles of the “Logal Stops” are placed on this “Support level”.
Stop distance and Channel Width. (activated in example chart) These are reported in a two cell table in the right lower corner of the main panel. I created this because I want to be able to check the volatility, whether the channel shows a situation in which safe buying in most levels of the channel is possible or what risk you take when you buy now and set the Stop at the nearest logical level (which is not always the “Lower curve”). This feature comes in handy for creating a setup I propose in the “Day Trading Fantasy” below.
Some General and User Settings. I never activate this, perhaps you will.
Use Of TrendZones In My System.
Create a list of stocks in uptrend. I define ‘stock in uptrend’ as in uptrend zone in all three monthly, weekly and daily charts, all three should at the same time be in uptrend. The advantage of TrendZones is that you can immediately see in which zone the candle moves.
Opening a position in a stock from the above list. I do this only when in both the daily and weekly the green dot on the lower curve indicates a buying opportunity. This is usually not the case in most of the items of the list, this feature thus provides a good timing for opening a position. Sometimes you need to wait a few weeks for this to happen.
Setting a target over a position. For this I use the Target percent line of the weekly chart with the default value of 10.
Updating the Stoploss and Target values. Every week or two weeks I set these to the new values of the “Lower Curve” and the Target line of the weekly. Attention: never shift down Stops, only up or let them stay the same when the curve moves down. I never use Stop levels on other curves.
I Check the charts whenever I like to do this. Close the position when the uptrend obviously shifts down. Otherwise I let the profits run until the Target triggers which closes the position with some profit.
For selecting stocks an checking charts for volume events, I also use a subpanel indicator called “TZanalyser”, which borrows the visual of my “Fibonacci Zone Oscillator”, is based on TrendZones and includes code from my REVE indicators. I intend to publish that as well.
Day Trading Fantasy.
Day trading is an attempt to earn a dime by opening a position in the morning and close it during the day again with a profit (or a loss). Before the market closes, you close all day trading positions.
In my fantasy the “Logical Stop Level” is repurposed for use as entry point and the ATR-based Target line is used to provide a target setting in an intraday chart, like e.g. 15 minute. To do this the “Safe Level” should be limited to between Channel width and COG. This can be done by showing “Safe Level” and “Channel Width” and then set “Risk Tolerance” to around the shown Channel Width. In this setting you can then wait for the green circle to show up for entering your trade and protect it with the stop.
I don’t know if this works fine or if it’s better than other day trade systems, because I don’t do day trading.
Take care and have fun.

Monday Range +Monday Range+
A precision tool for early-week price action traders.
🔧 Features:
- Auto-draws Monday High, Low & Midrange
- Clear LONG/SHORT signal labels
- Midrange Reset (reloads trade logic)
- Ex-Line Protection (sweep filter)
- ½ Risk to Reward extension option
- Multi-Timeframe (MTF) support
📈 Trade Setup Logic:
LONG Setup:
- Valid only after Monday
- Price breaks below Monday Low
- Closes back above the Low and under the Midrange
- Candle must close higher than previous candle
- If Ex-Line Protection is on, trade is blocked if price swept below extension
- Enter at the Low of the range, target the High
SHORT Setup:
- Valid only after Monday
- Price breaks above Monday High
- Closes back below the High and above the Midrange
- Candle must close lower than previous candle
- If Ex-Line Protection is on, trade is blocked if price swept above extension
- Enter at the High of the range, target the Low
🎯 Ideal for liquidity fades and range reversal setups.

EdgeXplorer - Profit Bottoms EdgeXplorer – Profit Bottoms
⸻
🔍 What This Indicator Does
Profit Bottoms is a custom momentum oscillator designed to reveal price strength inflections through correlation logic. It identifies potential market exhaustion zones, highlights overbought/oversold conditions, and visually marks swing tops and bottoms — helping traders pinpoint profit-taking opportunities or early reversals across any asset or timeframe.
It features a flexible histogram view, color-coded background trends, and precision labels for clearer insight into market sentiment momentum shifts.
⸻
⚙️ How It Works
At the core of this indicator is a correlation function:
• It measures how strongly the price (close) correlates with bar index progression over a lookback window — essentially evaluating how directional recent price action has been.
• This results in a “strength index” ranging between +1 (strong uptrend) and -1 (strong downtrend).
• It tracks the slope of this index to infer trend direction and visually represent shifts.
From there, the indicator layers on:
• Dynamic overbought/oversold zones (±0.9)
• Swing high/low detection based on local peaks and troughs
• Trend background shading based on momentum slope
• Optional histogram and fill display styles
⸻
📈 Visual Components Explained
Element Meaning
🔮 Pulse Strength Line (purple line) Primary oscillator showing strength of directional movement
🌈 Colored Fill Fills above/below baseline to represent bullish/bearish intensity
🟢 Green Background Slope of strength index is rising (trend gaining)
🔴 Red Background Slope of strength index is falling (trend weakening)
🔼 ↑ Label Price is entering extreme overbought territory
🔽 ↓ Label Price is entering extreme oversold territory
🟠 Circle Markers Swing Top (Teal) or Swing Bottom (Orange)
📊 Histogram / Line Style Alternate visualizations of the oscillator based on user preference
⸻
📊 Input Settings Explained
Setting Description
Window Size Lookback period for correlation calculation
Bull Fill / Bear Fill Gradient colors for up/down momentum
Mark Tops/Bottoms Enables visual detection of swing highs/lows
Highlight Overbought/Oversold Displays zone entry markers (↑/↓) near extremes
Show Pulse Histogram Adds either histogram or line view
Histogram Style Choose between histogram bars, a thin line, or hide the visual entirely
⸻
🧠 How to Interpret in Different Market Conditions
Condition Interpretation
Strength Index near +1 Strong upward correlation — trend likely maturing or overbought
Strength Index near -1 Strong downward correlation — trend possibly exhausted or oversold
Cross below 0 Momentum shift from bullish to bearish
Cross above 0 Momentum shift from bearish to bullish
Swing Top Detected Potential short-term exhaustion — profit zone for longs
Swing Bottom Detected Early reversal zone or buying opportunity
The colored background makes it easy to visually segment the chart by trend environment, while the swing markers and zone labels add precision entry/exit timing cues.
⸻
🧪 Use Cases & Strategy Tips
• Scalpers & intraday traders: Use swing tops/bottoms with zone labels for tight entries.
• Swing traders: Watch for strength fading as a warning sign to exit positions.
• Divergence Spotting: Compare price action to the oscillator for hidden signals.
• Momentum Riders: Use histogram mode with background coloring to stay in trend longer.
For example:
If you see a swing bottom occur just below the -0.9 zone, paired with a background color flip from red to green — that’s a high-probability setup for reversion or breakout.
⸻
🧷 Alerts Included
This indicator provides built-in alerts for key conditions:
• EPS+ Top Detected → Swing Top
• EPS+ Bottom Detected → Swing Bottom
• EPS+ Overbought Zone → Strength Index > 1
• EPS+ Oversold Zone → Strength Index < -1
These can be used in alert-based automation or simply for manual signal confirmation.

Buy sell Trend VolumeThis indicator analyzes the flow of volume and price changes to identify potential trends.
Understanding Volume Indicator: A Comprehensive Guide
Introduction. The volume indicator is a vital tool investors and traders use to understand the liquidity and market activity in trading.


Crowding model ║ BullVision🔬 Overview
The Crypto Crowding Model Pro is a sophisticated analytical tool designed to visualize and quantify market conditions across multiple cryptocurrencies. By leveraging Relative Strength Index (RSI) and Z-score calculations, this indicator provides traders with an intuitive and detailed snapshot of current crypto market dynamics, highlighting areas of extreme momentum, crowded trades, and potential reversal points.
⚙️ Key Concepts
📊 RSI and Z-Score Analysis
RSI (Relative Strength Index) evaluates the momentum and strength of each cryptocurrency, identifying overbought or oversold conditions.
Z-Score Normalization measures each asset's current price deviation relative to its historical average, identifying statistically significant extremes.
🎯 Crowding Analytics
An integrated analytics panel provides real-time crowding metrics, quantifying market sentiment into four distinct categories:
🔥 FOMO (Fear of Missing Out): High momentum, potential exhaustion.
❄️ Fear: Low momentum, potential reversal or consolidation.
📈 Recovery: Moderate upward momentum after a downward trend.
💪 Strength: Stable bullish conditions with sustained momentum.
🖥️ Visual Scatter Plot
Assets are plotted on a dynamic scatter plot, positioning each cryptocurrency according to its RSI and Z-score.
Color coding, symbol shapes, and sizes help quickly identify main market segments (BTC, ETH, TOTAL, OTHERS) and individual asset conditions.
🧩 Quadrant Classification
Assets are categorized into four quadrants based on their momentum and deviation:
Overbought Extended: High RSI and positive Z-score.
Recovery Phase: Low RSI but positive Z-score.
Oversold Compressed: Low RSI and negative Z-score.
Strong Consolidation: High RSI but negative Z-score.
🔧 User Customization
🎨 Visual Settings
Bar Scale: Adjust the scatter plot visual scale.
Asset Visibility: Optionally display key market benchmarks (TOTAL, BTC, ETH, OTHERS).
Gradient Background: Enhances visual interpretation of asset clusters.
Crowding Analytics Panel: Toggle the analytics panel on/off.
📊 Indicator Parameters
RSI Length: Defines the calculation period for RSI.
Z-score Lookback: Historical lookback period for normalization.
Crowding Alert Threshold: Sets alert sensitivity for crowded market conditions.
🎯 Zone Settings
Quadrant Labels: Displays descriptive labels for each quadrant.
Danger Zones: Highlights extreme RSI levels indicative of heightened market risk.
📈 Visual Output
Dynamic Scatter Plot: Visualizes asset positioning clearly and intuitively.
Gradient and Grid: Professional gridlines and subtle gradient backgrounds assist visual assessment.
Danger Zone Highlights: Visually indicates RSI extremes to warn of potential market turning points.
Crowding Analytics Panel: Real-time summary of market sentiment and asset distribution.
🔍 Use Cases
This indicator is particularly beneficial for traders and analysts looking to:
Identify crowded trades and potential reversal points.
Quickly assess overall market sentiment and individual asset strength.
Integrate a robust momentum analysis into broader technical or fundamental strategies.
Enhance market timing and improve risk management decisions.
⚠️ Important Notes
This indicator does not provide explicit buy or sell signals.
It is intended solely for informational, analytical, and educational purposes.
Past performance and signals are not indicative of future market results.
Always combine with additional tools and analysis as part of comprehensive decision-making.

Volumatic + Adaptive Trend Flow [Fusion] by Ignotus📌 Description
```
This script combines two public open source indicators available on TradingView:
1. Volumatic Variable Index Dynamic Average
© BigBeluga
License: Creative Commons Attribution-NonCommercial-ShareAlike 4.0 International https:creativecommons.org/licenses/by-nc-sa/4.0/
Original link:
2. Adaptive Trend Flow
© QuantAlgo
License: Mozilla Public License 2.0 (MPL-2.0)
https:mozilla.org/MPL/2.0/
Original link:
This indicator merges both scripts without modifying their internal logic, maintaining all their functionality, settings, and alerts.
This work is a custom compilation for educational and analytical purposes, complying with the attribution and redistribution terms of both licenses.
I do not claim to be the author of the original code for either indicator.
⚠️ Note on the CC BY-NC-SA license:
The license for the first indicator prohibits commercial use without explicit permission.
Therefore, this script should not be used for commercial purposes without the authorization of the original creator (BigBeluga).
```
---
✅ What does this indicator include?
This indicator combines two powerful tools in a single script:
🔹 Volumatic Variable Index Dynamic Average
- Volume and trend-based indicator.
- Detects liquidity zones and dynamic support/resistance.
- Uses VIDYA (Variable Index Dynamic Average) along with ATR to identify trend changes.
- Includes visual volume signals, dynamic support/resistance lines, and smart labels.
🔹 Adaptive Trend Flow
- Adaptive indicator for market volatility.
- Identifies bullish and bearish trends using calculations based on EMAs and standard deviation.
- Includes candle color, dynamic background, entry/exit signals, and built-in alerts.
---
🛡️ Responsible Use
- This indicator is NOT designed for automatic trading and does not guarantee profits.
- It is recommended to use it as a technical analysis tool, always under your own supervision and discretion.
- Do not use this script for commercial purposes or on external platforms without the explicit consent of the original authors.
---
📣 Credits
- Creator of the combined indicator: Ignotus
- Original source of the indicators: TradingView
- Final result license: MPL-2.0 (except where otherwise indicated by copyright of the original author)

智能货币概念 [LuxAlgo]Designed to seamlessly integrate the complex "Smart Money Concepts" (SMC) directly onto your TradingView charts. It's more than just a single indicator; it's a complete analytical framework that automates the identification and visualization of key price action patterns used by institutional traders, helping you to decode the market like a professional.
Whether you are a newcomer to the world of SMC or a seasoned trader seeking to enhance your efficiency, this tool offers unparalleled insight.
Core Feature Highlights:
Dual Market Structure Analysis:
Automatically plots Breaks of Structure (BOS) and Changes of Character (CHoCH).
Uniquely differentiates between Internal Structure and Swing Structure, allowing you to grasp both short-term dynamics and the overarching trend for a more holistic market view.
Order Blocks (OB):
Precisely identifies both bullish and bearish Internal and Swing Order Blocks, highlighting key potential reversal zones.
Includes a built-in volatility filter (ATR or Cumulative Average Range) to effectively screen out insignificant blocks and automatically tracks if they have been "mitigated."
Liquidity Identification:
Automatically marks Equal Highs (EQH) and Equal Lows (EQL), clearly revealing the liquidity pools targeted by smart money.
Market Imbalances (FVG):
Intelligently detects and draws Fair Value Gaps (FVG), representing areas of imbalance where price is likely to return. It supports custom timeframes and an automatic threshold filter.
Premium & Discount Zones:
Based on the major swing structure, it automatically delineates Premium, Discount, and Equilibrium zones, helping you identify optimal locations for entries.
Multi-Timeframe (MTF) Confluence:
With a single click, you can overlay key high/low levels from the Previous Day, Week, and Month onto your current chart, providing powerful, higher-timeframe context for your trading decisions.
Unique Advantages:
Highly Customizable: From colors and styles to display modes (Historical vs. Present), nearly every element can be tailored to your personal preference, creating a bespoke analysis interface.
Real-time Alert System: Comprehensive alerts are built-in for all key events (BOS/CHoCH formation, Order Block mitigation, FVG appearance, etc.), ensuring you never miss a trading opportunity.
Clear Visual Presentation: It transforms abstract theories into intuitive on-chart markers and zones, significantly simplifying the learning curve and the daily analysis workflow.

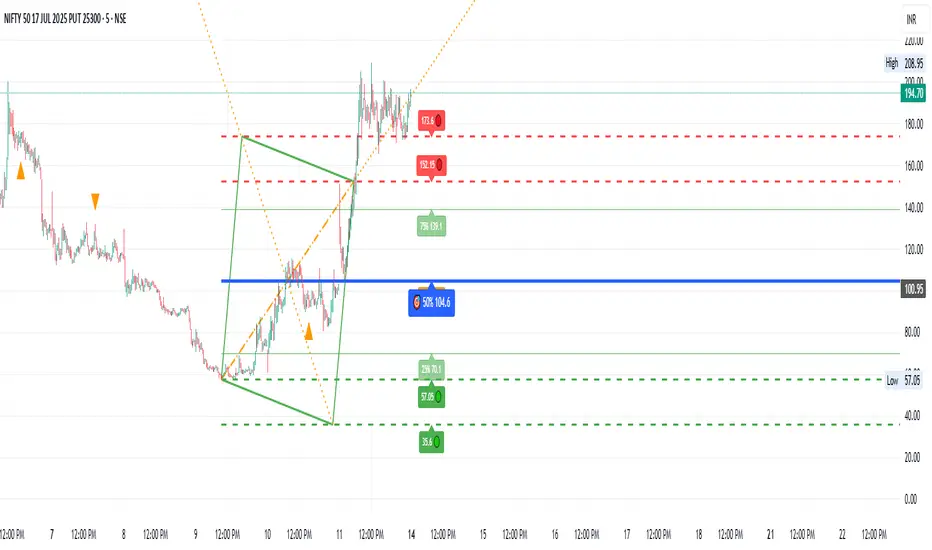
AshishBediSPLThis tool, called "AshishBediSPL," is a special indicator for traders using TradingView. Its main purpose is to help you track and trade the combined price of a Call and a Put option at the same strike price, a strategy known as a Short Straddle.
What It Does:
Tracks Straddle Prices: You can select a specific Indian index or a stock like Reliance, choose a strike price and expiry date, and the indicator will show you the combined price of that Call and Put option as a single line on your chart.
Calculates Everything for You: You don't need to manually add the prices. The indicator automatically does the math to show you the total premium of the straddle.
Adds Trading Signals: You can turn on various popular trading tools (like VWAP, EMA, Supertrend, etc.). The indicator will then use these tools to automatically show "Buy" and "Sell" signals directly on the chart, helping you decide when to enter or exit a trade.
Customizable: You can choose which trading tools you want to use and adjust their settings to fit your personal trading style.
What is it Used For?
This indicator is specifically for traders who:
Trade a Short Straddle: This is a neutral options strategy where you expect the market to stay in a small range. The indicator helps you monitor the total premium you've collected.
Want to Simplify Analysis: Instead of looking at a Call chart and a Put chart separately, this tool combines them into one easy-to-read chart.
Use Technical Analysis: It helps you apply standard technical indicators directly to the combined premium price, giving you clear signals for your straddle trades.

EdgeXplorer - Support vs ResistanceEdgeXplorer – Support vs Resistance
Spot the battle zones. Catch the breakouts. Ride the volume.
EdgeXplorer – Support vs Resistance is your visual compass for identifying institutional support and resistance levels in real time. By dynamically detecting pivot zones, tracking volume shifts, and highlighting high-conviction breakouts, this tool gives traders a clean, no-fluff map of where price is likely to react, reject, or rip through.
No guesswork — just clear structure and smarter signal flow.
⸻
🧱 What It Does
This tool automatically maps support and resistance zones based on swing pivots, overlays visual boxes on your chart, and triggers breakout signals when those zones are tested with volume confirmation. It’s built for traders who want more than just lines — they want intent.
⸻
⚙️ Core Components
Component Description
🟩 Support Boxes Detected from pivot lows, with label and visual zone
🟥 Resistance Boxes Detected from pivot highs, styled for clean contrast
📉 Breakout Signals Volume-validated support/resistance breaks
🕳️ Wick Detectors Wick rejections after breakout attempts (false breaks)
🎨 Visual Styling Auto-colored candles at pivots + zone label toggles
⸻
🔍 How It Works
1. Pivot Logic:
The script uses a flexible left/right pivot length (default 15) to detect local highs/lows that form reliable turning points. These are your anchors for support/resistance zones.
2. Zone Construction:
Each pivot creates a dynamic price zone with adjustable thickness. These zones are plotted as shaded rectangles, giving you real-time visual structure.
3. Breakout Detection:
When price crosses a zone and the volume oscillator confirms strength, the script triggers a B (Breakout) label above/below the bar.
4. Wick Filters:
It also highlights W (Wick) setups — signs of false breaks or stop hunts — based on wick-to-body comparisons. These can be excellent reversal signals when confirmed.
⸻
🛠️ Custom Settings
Setting What It Controls
🔁 Pivot Left/Right Controls how far left/right the script looks for highs/lows
🔻 Volume Threshold Sets how strong the volume shift must be to trigger breakouts
🎨 Zone Height Adjusts how thick each S/R box appears
🟢 Show Zones Toggle visual boxes on/off
🔔 Show Breaks Turn on/off the breakout + wick signals
🏷️ Show Labels Toggle support/resistance text labels
⸻
📈 Use Cases
• Breakout Traders:
Watch for high-volume breaks of resistance/support with clean confirmation. Enter on candle closes or wick rejections.
• Range Traders:
Use zones as reversal points during sideways markets. The wick markers help filter traps.
• Swing & Intraday Scalping:
Zoom out for higher timeframes to establish zones, then drill down to 1m–15m for breakout execution using the live signals.
• Liquidity Hunters:
Combine this with internal order blocks or EQH/EQL markers. S/R zones = liquidity pools.
⸻
🔔 Built-In Alerts
✅ Resistance Breakout
✅ Support Breakdown
Get notified in real-time when key zones get broken with strong volume follow-through.

Trend Impulse Channels (Zeiierman)Jun 8
Support & Resistance Aries
This indicator automatically identifies support and resistance levels based on the highest and lowest closing prices within a configurable period.
How it works:
The user sets a calculation period (default is 20 candles).
The indicator plots:
Green line = Support: lowest closing price within the period.
Red line = Resistance: highest closing price within the period.
Adjustable parameter:
Calculation Period (1 to 200): defines how many candles are used to find the price extremes.
Purpose:
Helps users quickly visualize dynamic support and resistance zones that adjust as price evolves, making it easier to identify areas for potential entries, exits, and stop placements.
Important:
This indicator should not be used as a standalone buy or sell signal, nor as a trend confirmation tool on its own.
It is recommended to use it in combination with other technical analysis tools such as MACD, RSI, Volume, Moving Averages, among others, for a more complete market view.
Disclaimer:
Investing involves financial risk. Be cautious with both profits and losses. Always define a stop loss to avoid larger losses if the trend reverses.
One of the golden rules in trading is: a trader should not lose more than 3% to 5% of their capital per trade. Protecting your capital should always be the priority.

Bollingr+supertrend
📘 Bollinger Bands + Supertrend (Buy/Sell Area Notes)
1. Bollinger Bands consist of a moving average (Basis) and upper/lower bands based on standard deviation.
2. Price near lower band may indicate a potential buy area (oversold).
3. Price near upper band may indicate a potential sell area (overbought).
4. Band squeeze shows low volatility — often followed by a breakout (good for entries).
5. Supertrend uses ATR and price to determine trend direction with green (up) and red (down) lines.
6. Supertrend flips from red to green → indicates a possible Buy signal.
7. Supertrend flips from green to red → indicates a possible Sell signal.
8. Best Buy Area: When Supertrend turns green and price is near or below the lower Bollinger Band.
9. Best Sell Area: When Supertrend turns red and price is near or above the upper Bollinger Band.
10. Use both indicators together to confirm trend direction and time entries more reliably.
Would you like a chart example or image to visualize these Buy/Sell zones?

Bitcoin Cycle Log-Curve (JDK-Analysis)Important: The standard parameters provided in the script are specifically tuned for the TradingView Bitcoin Index chart on a monthly timeframe on logarithmic scale, and will yield the most accurate visual alignment when applied to that dataset. (more below)
This very simple script visualizes Bitcoin’s long-term price behavior using a logarithmic regression model designed to reflect the cyclical nature of Bitcoin’s historical market trends. Unlike typical technical indicators that react to recent price movements, this tool is built on the assumption that Bitcoin follows an exponential growth path over time, shaped by its fixed supply structure and four-year halving cycles.
The calculation behind the curved bands:
An upper boundary, a lower boundary, and a central midline, are calculated based on logarithmic functions applied to the bar index (which serves as a proxy for time). The upper and lower bounds are defined using exponential formulas of the type y = exp(constant + coefficient * log(bar_index)), allowing the curves to evolve dynamically over time. These bands serve as a macro-level guide for identifying periods of historical overvaluation (upper red curve) and undervaluation (lower green curve), with a central black curve representing the geometric average of the two.
How to customize the parameters:
The lower1_const and upper1_const values vertically shift the respective lower and upper curves—more negative values push the curve downward, while higher values lift it.
The lower1_coef and upper1_coef control the steepness of the curves over time, with higher values resulting in faster growth relative to time.
The shift_factor allows for uniform vertical adjustment of all curves simultaneously.
Additionally, the channel_width setting determines how far the mirrored bands extend from the original curves, creating a visual “channel” that can highlight more conservative or aggressive valuation zones depending on preference.
How to use this indicator:
This indicator is not intended for short-term trading or intraday signals. Rather, it serves as a contextual framework for long-term investors to identify high-risk zones near the upper curve and potential long-term value opportunities near the lower curve. These areas historically align with cycle tops and bottoms, and the model helps to place current price action within that broader cyclical narrative. While the concept draws inspiration from Bitcoin’s halving-driven market cycles and exponential adoption curve, the implementation is original in its use of time-based logarithmic regression to define dynamic trend boundaries.
It is best used as a strategic tool for cycle analysis, macro positioning, and trend anchoring—rather than as a short-term signal provider.

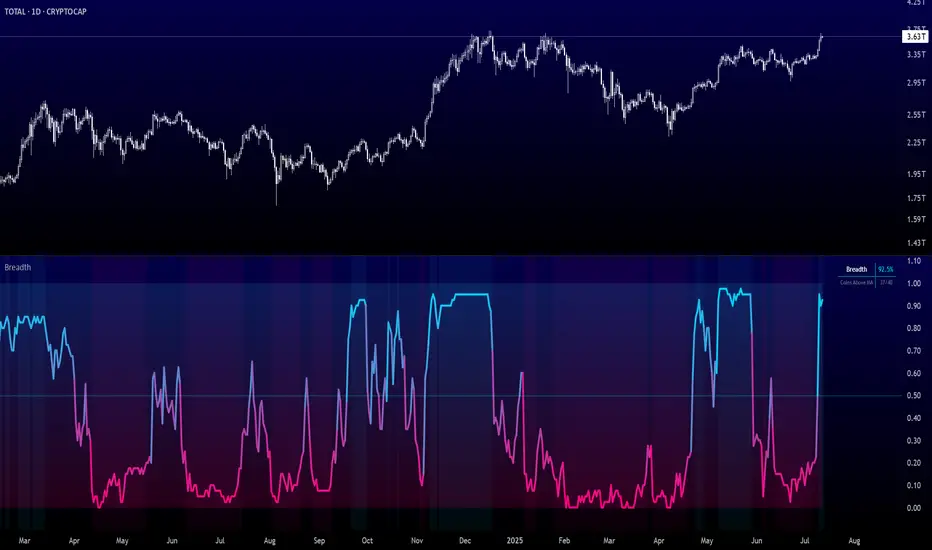
Crypto Breadth | AlphaNatt\ Crypto Breadth | AlphaNatt\
A dynamic, visually modern market breadth indicator designed to track the strength of the top 40 cryptocurrencies by measuring how many are trading above their respective 50-day moving averages. Built with precision, branding consistency, and UI enhancements for fast interpretation.
\ 📊 What This Script Does\
* Aggregates the performance of \ 40 major cryptocurrencies\ on Binance
* Calculates a \ breadth score (0.00–1.00)\ based on how many tokens are above their moving averages
* Smooths the breadth with optional averaging
* Displays the result as a \ dynamic, color-coded line\ with aesthetic glow and gradient fill
* Provides automatic \ background zones\ for extreme bullish/bearish conditions
* Includes \ alerts\ for key threshold crossovers
* Highlights current values in an \ information panel\
\ 🧠 How It Works\
* Pulls real-time `close` prices for 40 coins (e.g., XRP, BNB, SOL, DOGE, PEPE, RENDER, etc.)
* Compares each coin's price to its 50-day SMA (adjustable)
* Assigns a binary score:
• 1 if the coin is above its MA
• 0 if it’s below
* Aggregates all results and divides by 40 to produce a normalized \ breadth percentage\
\ 🎨 Visual Design Features\
* Smooth blue-to-pink \ color gradient\ matching the AlphaNatt brand
* Soft \ glow effects\ on the main line for enhanced legibility
* Beautiful \ multi-stop fill gradient\ with 16 transition zones
* Optional \ background shading\ when extreme sentiment is detected:
• Bullish zone if breadth > 80%
• Bearish zone if breadth < 20%
\ ⚙️ User Inputs\
* \ Moving Average Length\ – Number of periods to calculate each coin’s SMA
* \ Smoothing Length\ – Smooths the final breadth value
* \ Show Background Zones\ – Toggle extreme sentiment overlays
* \ Show Gradient Fill\ – Toggle the modern multicolor area fill
\ 🛠️ Utility Table (Top Right)\
* Displays live breadth percentage
* Shows how many coins (e.g., 27/40) are currently above their MA
\ 🔔 Alerts Included\
* \ Breadth crosses above 50%\ → Bullish signal
* \ Breadth crosses below 50%\ → Bearish signal
* \ Breadth > 80%\ → Strong bullish trend
* \ Breadth < 20%\ → Strong bearish trend
\ 📈 Best Used For\
* Gauging overall market strength or weakness
* Timing trend transitions in the crypto market
* Confirming trend-based strategies with broad market support
* Visual dashboard in macro dashboards or strategy overlays
\ ✅ Designed For\
* Swing traders
* Quantitative investors
* Market structure analysts
* Anyone seeking a macro view of crypto performance
Note: Not financial advise
Intraday vs Overnight OBV🔍 Purpose
This indicator provides a volume-weighted cumulative flow model that mimics On-Balance Volume (OBV) logic but splits the volume impact into intraday vs. overnight sessions. It allows traders to track how volume contributes to price movement in each session and identify whether buying/selling pressure is stronger during or outside of regular trading hours.
This indicator attempts to alleviate some of the downfalls of the standard OBV indicator, which only looks at total volume and total direction. The price of stocks generally behaves extremely differently during market hours and outside market hours, and many of the large moves happen outside of regular market hours on low volume.
⚙️ Core Features
1) OBV-style calculation:
If price increases → volume is added to the OBV stream.
If price decreases → volume is subtracted.
If price is flat → OBV remains unchanged.
2) Session splitting:
Intraday session: movement from today's open to close.
Overnight session: movement from yesterday’s close to today’s open.
Volume is split proportionally between these two periods based on user input.
3) Four visualization modes:
"Intraday" — plots only OBV from intraday price movement.
"Overnight" — plots only OBV from overnight price movement.
"Aggregate" — plots the sum of intraday and overnight OBV for a holistic view.
"Both Intraday and Overnight" — plots intraday and overnight OBV separately on the same chart.
📐 Inputs
1) Synthetic OBV Type:
"Intraday" — Show OBV from open to close only.
"Overnight" — Show OBV from prior close to today's open only.
"Aggregate" — Show a single line combining both.
"Both Intraday and Overnight" — Show both lines on the same chart.
2) Estimated Overnight Volume %:
Percentage of total daily volume assumed to occur during extended hours.
The rest is allocated to regular session (intraday).
Default: 20% overnight, 80% intraday.
🧮 How It Works
Volume Splitting:
Total bar volume is split into overnight Volume and intraday Volume:
Intraday change is the difference between today’s close and open.
Overnight change is the difference between today’s open and yesterday’s close.
Session OBV Calculations:
OBV is incremented/decremented by the session's allocated volume, depending on whether the session’s price change was positive or negative.
Aggregate OBV:
Combines both session deltas for a holistic volume flow view.
📊 Interpretation
Rising OBV (any stream) suggests accumulation; falling OBV suggests distribution.
Divergences between price and OBV lines (especially overnight vs. intraday) can reveal where hidden buying/selling is occurring.
Comparing intraday vs overnight OBV can help:
Spot whether institutional demand is building off-hours.
Detect retail vs. institutional behavior (retail trades often dominate intraday; institutional may prefer after-hours).
💡 Use Cases
Identify whether overnight gaps are supported by overnight volume momentum.
Detect accumulation in low-volume overnight sessions.
Compare intraday and overnight strength during earnings season or news events.
Complement traditional OBV by seeing session-based breakdowns.

Elite Trend FusionThis indicator combines multiple technical analysis tools to assist traders in identifying trends, support/resistance levels, and potential trading opportunities. Developed by @IQ-TRADER with contributions to the Alpha Section by @KivancOzbilgic, this script overlays the following components on your chart:
EMA1: A customizable Exponential Moving Average for short-term trend analysis.
SMA Cluster (50, 100, 200): Simple Moving Averages on daily timeframes to identify long-term trends and key support/resistance zones.
Anchored VWAP x2 (VWAPCVD & VWAPARZ): Two Volume Weighted Average Price lines anchored to user-defined dates, providing insights into price levels relative to volume from specific points in time.
AlphaTrend: A custom trend-following indicator based on ATR and MFI, helping to gauge market direction and volatility.
Usage InstructionsInstallation:
Copy and paste the script into the Pine Script editor on TradingView, then add it to your chart.
Customization:Adjust the periods for EMA, SMA50, SMA100, and SMA200 under the "Inputs" tab.
Set the anchor dates for VWAPCVD and VWAPARZ to analyze specific historical periods.
Enable or disable individual components (EMA1, SMA50, SMA100, SMA200, VWAPCVD, VWAPARZ, AlphaTrend) and toggle labels via the settings.
Customize colors and line thickness to suit your preferences.
Modify the AlphaTrend multiplier and period for tailored sensitivity.
Interpretation:
Use the EMA1 for short-term momentum and crossovers with SMAs.
Monitor SMA crossovers (e.g., SMA50 crossing SMA200) for trend changes.
The Anchored VWAPs act as dynamic support/resistance levels based on the selected anchor dates.
AlphaTrend provides a visual guide for trend direction; use it alongside other indicators for confirmation.
Labels on the last bar show the current value and percentage distance from the price for each enabled indicator.
Pine Screener Module Usage:
Add this indicator to the Pine Screener to filter stocks, forex pairs, or other instruments based on the calculated distances (in percentage) between the close price and SMA50, SMA100, SMA200, VWAPCVD, and VWAPARZ.
In the Screener, use the "SMA50 Distance (%)", "SMA100 Distance (%)", "SMA200 Distance (%)", "VWAPCVD Distance (%)", and "VWAPARZ Distance (%)" columns to identify overbought/oversold conditions or potential reversal points.
Example filters: Set conditions like "SMA50 Distance (%) > 5" to find stocks trading significantly above the 50-day SMA, or "VWAPCVD Distance (%) < -2" to spot assets below the anchored VWAP, indicating potential support levels.
Combine multiple conditions (e.g., SMA50 Distance (%) > 5 AND AlphaTrend > previous AlphaTrend) to refine your scan for bullish trends.
Note: Ensure the indicator is applied to the chart or screener with the desired timeframe for accurate results.
Notes
This is an overlay indicator, meaning it plots directly on the price chart.
The script uses daily SMA calculations for consistency across timeframes.
Labels appear only on the last bar and are customizable.
This tool is for educational and informational purposes only. Trading involves risks, and it is recommended to consult a financial advisor before making decisions.
The script is credited to @IQ-TRADER with acknowledgment to @KivancOzbilgic for the Alpha Section contribution, adhering to intellectual property guidelines.
No Financial Advice: The description explicitly states that the indicator is for educational use and not financial advice, complying with TradingView's policy against promoting trading signals as guarantees.
Clear Usage: Step-by-step instructions are provided to ensure users can apply the indicator effectively, including screener usage.
No External Links or Promotions: No external links or promotional content is included, aligning with platform rules.

Dual MACD + TSI [CryptoSmart] by IgnotusA sophisticated dual momentum indicator combining a custom MACD Histogram with Divergence Detection and a TSI (True Strength Index) oscillator, designed for advanced technical analysis in crypto and other fast-moving markets.
---
🔍 Key Features:
- Custom MACD Histogram (MACD 1):
- Configurable fast/slow lengths and signal smoothing method (EMA/SMA).
- Advanced divergence detection (Regular & Hidden Bullish/Bearish patterns).
- Visual alerts and labels directly on the chart.
- Built-in divergence alerts for easy integration with TradingView alerts.
- TSI Oscillator (MACD 2):
- True Strength Index with customizable fast/slow periods and signal line smoothing.
- Overbought/oversold levels and optional background shading for quick visual cues.
- Fully optional elements (TSI Line, Signal Line, OB/OS levels) – disabled by default for clean charting.
- User-Friendly Design:
- Optional components can be toggled on/off via the settings panel.
- Works great as a standalone momentum filter or as part of a multi-indicator dashboard.
---
📈 How to Use:
- Use the MACD Histogram divergences to spot potential reversals.
- Combine with the TSI oscillator to confirm trend strength or detect overextended moves.
- Enable/disable components to avoid clutter and focus on what matters most.
---
Crafted for traders who want precision, flexibility, and visual clarity in their charts. Whether you're scalping or swing trading, this indicator helps you stay ahead of the curve.
---
Feel free to tweak the values and customize it to your strategy. Happy trading!

Profit Sniper RSI Based Buy/Sell📌 Profit Sniper RSI – Intelligent Buy/Sell Signals Based on Adaptive RSI Zones
Profit Sniper RSI is a precision-engineered indicator that generates high-confidence Buy and Sell signals by dynamically interpreting the Relative Strength Index (RSI) across five market zones. It is designed to reduce signal noise and avoid false breakouts using a combination of crossover logic, zone validation, and trend sentiment detection.
🔍 Underlying Concept:
This script divides the RSI into five structured zones:
- **0–24**: Power Sell (Extreme bearish momentum)
- **24–40**: Sell (Weak price action with downward pressure)
- **40–60**: Neutral/Consolidation (No clear trend)
- **60–76**: Buy (Bullish initiation zone)
- **76–100**: Power Buy (Strong bullish momentum)
Signals are generated **only after the RSI crosses a zone boundary** (e.g., from below 60 to above 60), and only **after the candle closes**, which helps filter out noise from intra-bar RSI fluctuations.
📈 Signal Logic:
- **Buy signals** are triggered when RSI crosses key thresholds (24, 40, or 60) upward, indicating rising strength.
- **Sell signals** are triggered when RSI crosses downward below 76, 60, or 40, suggesting trend weakness or reversal.
- **Power Buy and Power Sell signals** are reserved for extreme crossovers beyond 76 and below 24, respectively.
- The script avoids repeated signals (e.g., Buy after Buy) by tracking the last confirmed signal state.
🔧 Customization:
- Users can toggle visibility of Buy, Sell, Power Buy, and Power Sell signals independently.
- Adjustable RSI length input to fit different market conditions or timeframes.
- Displays a real-time info panel showing the current RSI, last signal type, the RSI level at the time of the last signal, and the price when the signal was triggered.
🧠 How It Helps Traders:
- Reduces false entries by only generating signals **after candle closure**.
- Designed to work across **any timeframe** and **any market** (Crypto, Forex, Stocks).
- Ideal for traders who rely on **RSI-based confirmation** before entry and prefer minimal visual clutter.
- Acts as a sniper tool — waiting for clear RSI structure and crossover before acting.
⚠️ Note:
This script does **not repaint**. All signals are based on closed-bar RSI logic. While no indicator guarantees profitability, this tool is built for serious traders who value disciplined entries backed by momentum structure.
💡 Tip: Combine Profit Sniper RSI with key support/resistance or trendline zones for added confluence and trade precision.

Golden Ratio Trend Persistence [EWT]Golden Ratio Trend Persistence
~~~~~~~~~~~~~~~~~~~~~~~~~~~~~~~~~~~~~~~~~~~~
Overview
The Golden Ratio Trend Persistence is a dynamic tool designed to identify the strength and persistence of market trends. It operates on a simple yet powerful premise: a trend is likely to continue as long as it doesn't retrace beyond the key Fibonacci golden ratio of 61.8%.
This indicator automatically identifies the most significant swing high or low and plots a single, dynamic line representing the 61.8% retracement level of the current move. This line acts as a "line in the sand" for the prevailing trend. The background color also changes to provide an immediate visual cue of the current market direction.
~~~~~~~~~~~~~~~~~~~~~~~~~~~~~~~~~~~~~~~~~~~~
The Power of the Golden Ratio (61.8%)
The golden ratio (ϕ≈1.618) and its inverse (0.618, or 61.8%) are fundamental mathematical constants that appear throughout nature, art, and science, often representing harmony and structure. In financial markets, this ratio is a cornerstone of Fibonacci analysis and is considered one of the most critical levels for price retracements.
Market movements are not linear; they progress in waves of impulse and correction. The 61.8% level often acts as the ultimate point of support or resistance. A trend that can hold this level demonstrates underlying strength and is likely to persist. A breach of this level, however, suggests a fundamental shift in market sentiment and a potential reversal.
~~~~~~~~~~~~~~~~~~~~~~~~~~~~~~~~~~~~~~~~~~~~
How to Use This Indicator
This indicator is designed for clarity and ease of use.
Identifying the Trend : The visual cues make the current trend instantly recognizable.
A teal line with a teal background signifies a bullish trend. The line acts as dynamic support.
A maroon line with a maroon background signifies a bearish trend. The line acts as dynamic resistance.
Confirming Trend Persistence : As long as the price respects the plotted level, the trend is considered intact.
In an uptrend, prices should remain above the teal line. The indicator will automatically adjust its anchor to new, higher lows, causing the support line to trail the price.
In a downtrend, prices should remain below the maroon line.
Spotting Trend Reversals : The primary signal is a trend reversal, which occurs when the price closes decisively beyond the plotted level.
Potential Sell Signal : When the price closes below the teal support line, it indicates that buying pressure has failed, and the uptrend is likely over.
Potential Buy Signal : When the price closes above the maroon resistance line, it indicates that selling pressure has subsided, and a new uptrend may be starting.
Think of this tool as an intelligent, adaptive trailing stop that is based on market structure and the time-tested principles of Fibonacci analysis.
~~~~~~~~~~~~~~~~~~~~~~~~~~~~~~~~~~~~~~~~~~~~
Input Parameters
You can customize the indicator's sensitivity through the following inputs in the settings menu:
Pivot Lookback Left : This number defines how many bars to the left of a candle must be lower (for a pivot high) or higher (for a pivot low) to identify a potential swing point. A higher value will result in fewer, but more significant, pivots being detected.
Pivot Lookback Right : This defines the number of bars that must close to the right before a swing point is confirmed. This parameter prevents the indicator from repainting. A higher value increases confirmation strength but also adds a slight lag.
Fibonacci Ratio : While the default is the golden ratio (0.618), you can adjust this to other key Fibonacci levels, such as 0.5 (50%) or 0.382 (38.2%), to test for different levels of trend persistence.
Adjusting these parameters allows you to fine-tune the indicator for different assets, timeframes, and trading styles, from short-term scalping to long-term trend following.

Angled Gann Time-Price Squares with S/RThis is a Pine Script indicator that implements Angled Gann Time-Price Squares based on W.D. Gann's trading theory. Here's what it does:
Core Functionality
Detects pivot highs and lows using a configurable lookback period
Creates angled squares by connecting pivot points to current price action when specific geometric conditions are met
Validates square formation by checking if the price movement follows proper Gann angles (typically 45°, 135°, etc.) within a tolerance range
Key Features
Real-time square tracking: Shows both completed squares and forming squares in progress
Support/Resistance levels: Automatically generates S/R lines from:
Square edge extensions
Diagonal extensions (pivot centers)
Quarter/half levels within squares (25%, 50%, 75%)
Visual feedback: Color-coded squares (green for up, red for down, orange for forming)
Projection lines: Predicts where squares might complete based on Gann angle theory
Gann Theory Application
The indicator follows Gann's principle that time and price move in geometric harmony. It looks for price movements that form perfect squares when plotted on a chart, where the diagonal of the square represents the natural flow of price and time at specific angles.
The generated support/resistance levels are particularly valuable because they're based on completed geometric patterns rather than just horizontal price levels, making them potentially more significant according to Gann methodology.