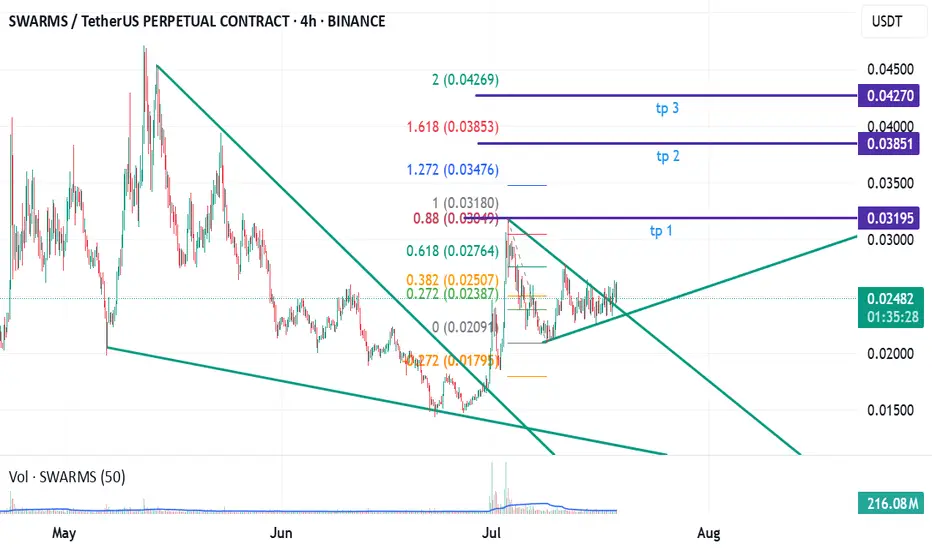
SWARMS/USDT Analysis: Continued DeclineThis asset continues its downward movement. A strong volume cluster has now formed, allowing for position building and participation in further movement.
We consider the $0.0287–$0.0302 zone as a short opportunity upon its retest, provided there is a seller reaction.
If no reaction occurs and price consolidates above this zone, we will view it as a mirror support level.
SWARMSUSDT trade ideas
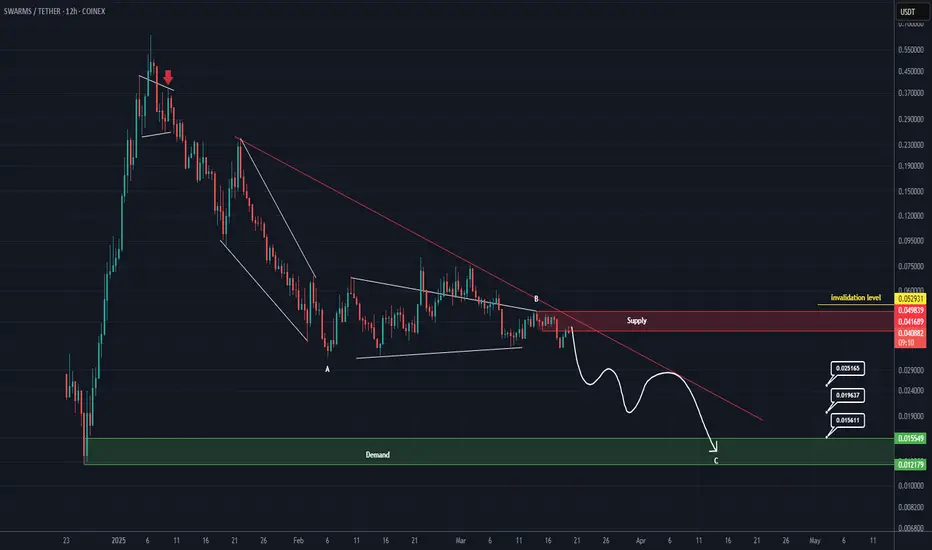
Short opportunity for SWARMS (8H)The correction of SWARM has started from the point where we placed the red arrow on the chart.
It appears that wave B has just completed, and the price is currently forming a pivot for another drop.
We expect to enter wave C soon, with the price moving towards the targets.
The closure of a daily candle above the invalidation level will invalidate this analysis.
For risk management, please don't forget stop loss and capital management
When we reach the first target, save some profit and then change the stop to entry
Comment if you have any questions
Thank You
SWARMS/USDT Analysis. Short Toward the Current LowFor this asset, we are considering a speculative short position. We have tested a key volume zone but observed no bullish reaction. Instead, selling pressure has increased.
If the $0.41-$0.43 zone is retested and a reaction occurs, we will enter a short position with a target at the $0.35 level.
break the red resistance zoneAnalysis 🚨
$SWARMS attempted to break the red resistance zone 🔴 but failed due to strong selling pressure at this level.
📌 What’s next?
We need a breakout above this resistance for bullish momentum.
If it successfully breaks, the first target will be the green line level 🟩.
Watch this red resistance carefully, as it’s a key level for the next move!
🎯 Target (If Breakout Happens):
✅ Green line level
SWARMS/USDTKey Level Zone: 0.0700 - 0.0710
HMT v6 detected. The setup looks promising, supported by a previous upward/downward trend with increasing volume and momentum, presenting an excellent reward-to-risk opportunity.
HMT (High Momentum Trending):
HMT is based on trend, momentum, volume, and market structure across multiple timeframes. It highlights setups with strong potential for upward movement and higher rewards.
Whenever I spot a signal for my own trading, I’ll share it. Please note that conducting a comprehensive analysis on a single timeframe chart can be quite challenging and sometimes confusing. I appreciate your understanding of the effort involved.
Important Note :
Role of Key Levels:
- These zones are critical for analyzing price trends. If the key level zone holds, the price may continue trending in the expected direction. However, momentum may increase or decrease based on subsequent patterns.
- Breakouts: If the key level zone breaks, it signals a stop-out. For reversal traders, this presents an opportunity to consider switching direction, as the price often retests these zones, which may act as strong support-turned-resistance (or vice versa).
My Trading Rules
Risk Management
- Maximum risk per trade: 2.5%.
- Leverage: 5x.
Exit Strategy
Profit-Taking:
- Sell at least 70% on the 3rd wave up (LTF Wave 5).
- Typically, sell 50% during a high-volume spike.
- Adjust stop-loss to breakeven once the trade achieves a 1.5:1 reward-to-risk ratio.
- If the market shows signs of losing momentum or divergence, ill will exit at breakeven.
The market is highly dynamic and constantly changing. HMT signals and target profit (TP) levels are based on the current price and movement, but market conditions can shift instantly, so it is crucial to remain adaptable and follow the market's movement.
If you find this signal/analysis meaningful, kindly like and share it.
Thank you for your support~
Sharing this with love!
HMT v2.0:
- Major update to the Momentum indicator
- Reduced false signals from inaccurate momentum detection
- New screener with improved accuracy and fewer signals
HMT v3.0:
- Added liquidity factor to enhance trend continuation
- Improved potential for momentum-based plays
- Increased winning probability by reducing entries during peaks
HMT v3.1:
- Enhanced entry confirmation for improved reward-to-risk ratios
HMT v4.0:
- Incorporated buying and selling pressure in lower timeframes to enhance the probability of trending moves while optimizing entry timing and scaling
HMT v4.1:
- Enhanced take-profit (TP) target by incorporating market structure analysis
HMT v5 :
Date: 23/01/2025
- Refined wave analysis for trending conditions
- Incorporated lower timeframe (LTF) momentum to strengthen trend reliability
- Re-aligned and re-balanced entry conditions for improved accuracy
HMT v6 :
Date : 15/02/2025
- Integrated strong accumulation activity into in-depth wave analysis
SWARM looks bearish (4H)It appears to be forming a diamond-shaped diametric pattern and is currently in wave E of this diametric.
The main supply zone has been marked on the chart.
Wave E is expected to drop to the lower areas.
A daily candle closing above the invalidation level will invalidate this analysis.
For risk management, please don't forget stop loss and capital management
Comment if you have any questions
Thank You
Is SWARMUSDT Ready for a Breakout?
SWARMUSDT has entered a fascinating phase, trading at $0.11341, far below its historical peak of $0.62689—a stunning 81.91% deviation from the highs recorded just 18 days ago. Yet, with the asset rebounding 25.1% above its recent low, the question arises: Is this the calm before the storm?
Current technicals suggest a potential setup worth watching. The RSI sits at 36.39, hinting at oversold conditions, while a series of VSA Buy Patterns on recent candles signal accumulation at these levels. With the MA50 trending downward to $0.13403, SWARMUSDT remains under pressure—but could this be the catalyst for a breakout as bulls test new resistance?
In a market swayed by macroeconomic shifts and investor sentiment, now is the time to stay vigilant. Is this your opportunity to ride the wave, or will the market pull back for one last consolidation? Keep an eye on this volatile mover—every second counts.
Roadmap of SWARMUSDT: From Signal to Momentum
Dive into the timeline of recent SWARMUSDT patterns to decode how the asset’s price movements align with key signals. Let’s analyze the most relevant patterns that hit the mark and proved their predictive power.
VSA Buy Pattern Extra 1st: January 25, 2025
Direction: Buy
The opening price of $0.11491 and closing at $0.1109 didn’t fully deliver immediate upside action. While the pattern aimed for a bullish push, the subsequent VSA Buy Pattern Extra 1st on January 24 also signaled Buy—validating a short-lived reversal that held potential. Prices stayed in a tight range but hinted at incoming accumulation.
Increased Sell Volumes: January 24, 2025
Direction: Sell
Here’s where things get spicy. The asset opened at $0.141 but sharply closed at $0.12597—a classic example of heavy sell-side pressure. This sell pattern succeeded in directing the market downward, confirming a clear alignment with the downward trajectory.
VSA Buy Pattern Extra 1st: January 23, 2025
Direction: Buy
This time, the Buy signal partially delivered. Opening at $0.15108, the price closed only marginally lower at $0.15101. However, it’s the interaction with the subsequent Buy Volumes pattern on January 22 that confirmed this pattern's intent, as the price rallied from $0.2026 to $0.22059—an undeniable proof of accumulation feeding the fire.
Increased Buy Volumes: January 22, 2025
Direction: Buy
This is the breakout you dream of. The market opened at $0.2026 and closed strongly at $0.22059, proving the upward bias was no fluke. What followed was a confirmation that this momentum marked a reversal point, supported by the next sequence.
VSA Manipulation Sell Pattern 2nd: January 21, 2025
Direction: Sell
The bears momentarily gained control here, with the price falling from $0.17216 to $0.1641. This retracement set the stage for the next accumulation phase, aligning perfectly with the Buy Volumes pattern that came to fruition soon after.
Buy Volumes Takeover: January 21, 2025
Direction: Buy
Boom. The market rebounded, closing at $0.17529 after an opening of $0.16161, signaling a firm buyer's grasp. This aligned perfectly with the trendline’s trajectory and set up a bullish consolidation period.
Key Takeaways for Traders
The Buy Volumes pattern consistently validated itself, signaling effective accumulation and trend reversals. Sell patterns like Increased Sell Volumes confirmed bearish phases, ensuring traders were aware of short-term downward movements. The roadmap suggests that combining VSA patterns with volume indicators amplifies accuracy. Future opportunities lie in identifying similar setups and leveraging momentum for entry/exit strategies.
This sequence is your guide to understanding how predictive signals can transform trading outcomes. Stay tuned and keep an eye on the next wave of SWARMUSDT patterns!
Technical & Price Action Analysis: Key Support and Resistance Levels
Let’s break it down with pinpoint accuracy. These levels are the battle lines where bulls and bears will clash, and price action will reveal its hand. If these levels don’t hold, they’ll flip into resistance zones, so keep a close watch.
Support Levels:
These levels are where buyers might step in to defend the trend:
0.09065 (recent absolute low)
If broken, expect this level to act as a brick wall of resistance for any bullish recovery attempts.
Resistance Levels:
These are the ceilings that price needs to smash for a breakout:
0.14784
0.24552
0.3642
If momentum fizzles out here, these levels will flip, becoming tough hurdles for the bulls.
Powerful Support Levels:
Currently, no standout zones are in play, suggesting the price is testing buyers’ resolve near dynamic supports like moving averages.
Powerful Resistance Levels:
Major areas to watch where the bears are likely to stack their sell orders:
0.24552 (also aligns with a key fib retracement zone).
Once the market closes above this with volume, a significant bullish run could ignite, but failure will likely spell trouble for any recovery momentum.
The game plan is simple: watch how the price reacts at these zones. A breakout or failure will guide the next move. Always trade with a plan—respect the levels, and let the market show its hand before diving in.
Trading Strategies Based on Rays: Fibonacci Meets Market Dynamics
The "Rays from the Beginning of Movement" concept integrates Fibonacci-based geometric principles with dynamic price action, creating a robust framework for trading SWARMUSDT. By leveraging these rays, traders can identify high-probability zones for interaction and subsequent movement, supported by dynamic factors such as Moving Averages and VSA (Volume Spread Analysis) rays.
Concept of Rays
Core Idea: Rays, based on Fibonacci angles, are drawn from the start of movement patterns to define channels and dynamic interaction zones. Unlike classical analysis relying on extremum points, this method adapts to market dynamics in real-time.
Dynamic Factors: Interaction with key Moving Averages (MA50, MA100) provides additional confirmation of trends and support/resistance zones.
Interaction Scenarios: When the price interacts with a ray, traders should wait for confirmation of reversal or continuation patterns. This ensures trades are placed at moments of high probability. Targeting Zones: Each ray transition creates a roadmap of price objectives, with the price typically moving from one ray to the next, offering clear entry and exit strategies.
Trading Scenarios
Optimistic Scenario:
Key Interaction Zone: Price bounces off the ascending Fibonacci ray near $0.11341 and interacts with MA50 at $0.13403.
Targets:
First target at $0.14784, aligned with dynamic resistance and the next Fibonacci ray.
Second target at $0.24552, achievable upon breaking MA100 at $0.1545.
Third target at $0.3642, signaling a significant trend breakout.
Strategy: Enter long after confirmation of the bounce from $0.11341, supported by volume and bullish VSA rays. Maintain trailing stops as the price moves toward each target.
Pessimistic Scenario:
Key Interaction Zone: Price fails to hold above the Fibonacci ray at $0.11341 and breaks below the critical level of $0.09065.
Targets:
First target at $0.09065, turning into resistance if broken.
Second target at $0.081, representing a potential oversold zone if significant bearish pressure emerges.
Strategy: Enter short after confirmation of a breakdown below $0.11341 and a bearish crossover of MA50 and MA100. Look for VSA sell signals to reinforce the decision.
Suggested Trades
Long from $0.11341 to $0.14784: Entry after interaction with the Fibonacci ray and confirmation of bullish momentum.
Short from $0.11341 to $0.09065: Entry upon bearish break below the ray, confirmed by sell-side volume dominance.
Continuation Long from $0.14784 to $0.24552: Add to positions after a breakout and interaction with MA100.
Trend Reversal Short from $0.14784 to $0.09065: Reevaluate bias if price fails to hold above the ray and reverses significantly.
These strategies offer traders flexibility to adapt to either direction, leveraging the synergy of Fibonacci rays, MAs, and VSA dynamics. Plan your entries wisely, and let the rays guide your trades from level to level!
Your Questions and Ideas Matter!
Hey traders! Let’s keep the conversation alive—drop your questions, thoughts, or requests right here in the comments. I always enjoy hearing your insights and discussing how we can navigate these markets together.
If you found value in this idea, don’t forget to hit Boost and save it to revisit later. Watching how the price respects the levels and rays over time is a game-changer—it’s all about nailing those key zones for entry and exit. Let’s see how this setup plays out together.
By the way, my indicator draws all these rays and levels automatically, making analysis smoother and more accurate. If you’re interested in accessing it, shoot me a private message—I’ll be happy to explain how it works. Whether you’re new or experienced, I can help tailor strategies to your needs.
Have an asset in mind that you’d like analyzed? Leave a comment with the ticker, and if it resonates, I’ll do my best to share a breakdown. For more detailed, private analysis, let’s chat directly—we can work out the perfect solution for your needs.
If you enjoy this content, hit Follow to stay updated with my latest ideas and strategies. It’s here on TradingView that I’ll continue sharing insights, so let’s grow together! 🚀
Trade smart and stay inspired!
SWARMS/USDTKey Level Zone: 0.1957 - 0.2025
HMT v4.1 detected. The setup looks promising, supported by a previous upward/downward trend with increasing volume and momentum, presenting an excellent reward-to-risk opportunity.
HMT (High Momentum Trending):
HMT is based on trend, momentum, volume, and market structure across multiple timeframes. It highlights setups with strong potential for upward movement and higher rewards.
Whenever I spot a signal for my own trading, I’ll share it. Please note that conducting a comprehensive analysis on a single timeframe chart can be quite challenging and sometimes confusing. I appreciate your understanding of the effort involved.
Important Note :
Role of Key Levels:
- These zones are critical for analyzing price trends. If the key level zone holds, the price may continue trending in the expected direction. However, momentum may increase or decrease based on subsequent patterns.
- Breakouts: If the key level zone breaks, it signals a stop-out. For reversal traders, this presents an opportunity to consider switching direction, as the price often retests these zones, which may act as strong support-turned-resistance (or vice versa).
My Trading Rules
Risk Management
- Maximum risk per trade: 2.5%.
- Leverage: 5x.
Exit Strategy
Profit-Taking:
- Sell at least 70% on the 3rd wave up (LTF Wave 5).
- Typically, sell 50% during a high-volume spike.
- Adjust stop-loss to breakeven once the trade achieves a 1.5:1 reward-to-risk ratio.
- If the market shows signs of losing momentum or divergence, ill will exit at breakeven.
The market is highly dynamic and constantly changing. HMT signals and target profit (TP) levels are based on the current price and movement, but market conditions can shift instantly, so it is crucial to remain adaptable and follow the market's movement.
If you find this signal/analysis meaningful, kindly like and share it.
Thank you for your support~
Sharing this with love!
HMT v2.0:
- Major update to the Momentum indicator
- Reduced false signals from inaccurate momentum detection
- New screener with improved accuracy and fewer signals
HMT v3.0:
- Added liquidity factor to enhance trend continuation
- Improved potential for momentum-based plays
- Increased winning probability by reducing entries during peaks
HMT v3.1:
- Enhanced entry confirmation for improved reward-to-risk ratios
HMT v4.0:
- Incorporated buying and selling pressure in lower timeframes to enhance the probability of trending moves while optimizing entry timing and scaling
HMT v4.1:
- Enhanced take-profit (TP) target by incorporating market structure analysis
SWARMS - Monster Move IncomingThe decline has been long and painful. But signs of reversal are in sight
MACD Cross over on the 8h chart along with bullish RSI Crossover.
I wouldn't be surprised if a break above 0.15 unleashed a massive run, similar to the run we saw it start with.
A break through that channel, could see a short term retest. Though if Trump signs Bitcoin friendly executive orders later today, it could be the fuel that sets an explosive move upwards on something that's just itching to move higher.
SWARMS/USDTKey Level Zone : 0.2640 - 0.2670
HMT v4.1 detected. The setup looks promising, supported by a previous upward/downward trend with increasing volume and momentum, presenting an excellent reward-to-risk opportunity.
HMT (High Momentum Trending):
HMT is based on trend, momentum, volume, and market structure across multiple timeframes. It highlights setups with strong potential for upward movement and higher rewards.
Whenever I spot a signal for my own trading, I’ll share it. Please note that conducting a comprehensive analysis on a single timeframe chart can be quite challenging and sometimes confusing. I appreciate your understanding of the effort involved.
Important Note :
Role of Key Levels:
- These zones are critical for analyzing price trends. If the key level zone holds, the price may continue trending in the expected direction. However, momentum may increase or decrease based on subsequent patterns.
- Breakouts: If the key level zone breaks, it signals a stop-out. For reversal traders, this presents an opportunity to consider switching direction, as the price often retests these zones, which may act as strong support-turned-resistance (or vice versa).
My Trading Rules
Risk Management
- Maximum risk per trade: 2.5%.
- Leverage: 5x.
Exit Strategy
Profit-Taking:
- Sell at least 70% on the 3rd wave up (LTF Wave 5).
- Typically, sell 50% during a high-volume spike.
- Adjust stop-loss to breakeven once the trade achieves a 1.5:1 reward-to-risk ratio.
- If the market shows signs of losing momentum or divergence, ill will exit at breakeven.
The market is highly dynamic and constantly changing. HMT signals and target profit (TP) levels are based on the current price and movement, but market conditions can shift instantly, so it is crucial to remain adaptable and follow the market's movement.
If you find this signal/analysis meaningful, kindly like and share it.
Thank you for your support~
Sharing this with love!
HMT v2.0:
- Major update to the Momentum indicator
- Reduced false signals from inaccurate momentum detection
- New screener with improved accuracy and fewer signals
HMT v3.0:
- Added liquidity factor to enhance trend continuation
- Improved potential for momentum-based plays
- Increased winning probability by reducing entries during peaks
HMT v3.1:
- Enhanced entry confirmation for improved reward-to-risk ratios
HMT v4.0:
- Incorporated buying and selling pressure in lower timeframes to enhance the probability of trending moves while optimizing entry timing and scaling
HMT v4.1:
- Enhanced take-profit (TP) target by incorporating market structure analysis