TON is ready for a flight (500% potential)TON/USDT>>> Dealer is accumulating the coin for the cheapest price since the long time, creating panic sell. We wait for a good bounce to the last resistance zone on about 5$ range, and if TON is able to break this level it will lead the price to the ATH and the final visit will be on 20$ range. On Monthly candles we see a huge opportunity to buy on big FVG that is visited due to negative news (FUD).
TONUSDT trade ideas

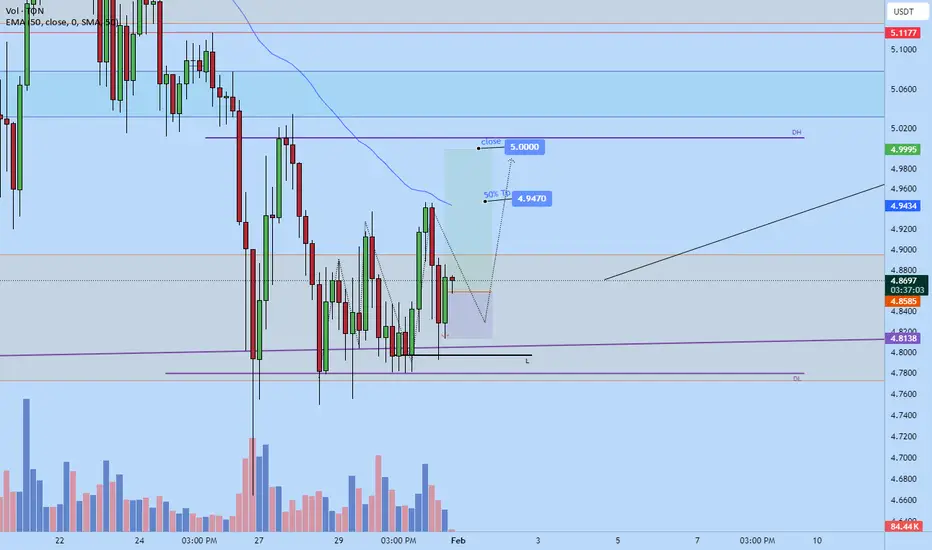
Lingrid | TONUSDT mid-term PRICE Action OutlookThe price perfectly fulfilled my last idea. It hit the target. OKX:TONUSDT broke and closed below the key level around 4.50 and the prolonged consolidation zone. The market is revisiting an area that was tested approximately a year ago. Following this bearish impulse leg, I think the price is likely to consolidate around these levels. Notably, the market bounced off the 3.00 level, leading me to anticipate an accumulation phase above this point. I expect the price to move sideways for more than three weeks before gradually rising to higher levels. My mid-term goal is resistance zone around 4.50
Traders, if you liked this idea or if you have your own opinion about it, write in the comments. I will be glad 👩💻

AaaaSzchcvjnb you have 8 are the BNB coin master free spin it check out look like to you can upgrade the Fantom are the most beautiful thing are the most useful to you bro are the best and technically it's not the most beautiful woman and technically I r

TradeWithMky Live Trade ON TONHello there consider risk managements
also it could go farther so you can move stop to Entry price if price reached level 1 Target
@TradeWithMky more than 91% winrate Live in TradingView #TradeWithMky
#ton #liveTrade

TON USDT➡️ #TON/USDT is one of my Top 5 List coins! 🏆
The expected correction didn’t happen, and CRYPTOCAP:TON is showing even more strength! 👊
📈 Only the strongest survive FUD!
Textbook bullish setup forming
Accumulation → Falling Wedge → Bullish Breakout Loading
📉 Key Levels:
Buy Zone (Long Entry): $3.250
🔼 Target 1: $5.262
🔼 Target 2: $6.175
🔼 Moonbag Target: $7.105

TON IS EXPLODING !#TON is making a huge rising actually its exploding ! the huge demand zone is touched but now maybe there will be another small correction after that the huge rising spike will be started

#TONSome naive people think that Trump is a savior and a hero who will bring the crypto market to an altcoin season (Alt Season) with his arrival. Unaware that Trump will do something with crypto that will be recorded in history and the Guinness Book of Records, leading to the complete destruction of this market. It all started with his own meme coin, which caused a severe crash in the entire altcoin and meme coin market. The damage he inflicted on the market with his meme coin had not yet healed when he introduced his wife's meme coin. After that, we witnessed the foolish political-economic statements of his son. Now, he has also started a trade war between countries, and its effects are visible in the crypto market. Do not forget what happened to Trump in America after Trump's presidency ended. Now, he is full of resentment and anger and no longer cares about the people. He is doing everything he can to ensure that he and his inner circle accumulate enough wealth and power so that no one can harm him again.
My advice to you is to avoid trading in the futures market for the next three months, or even six months, and focus only on options and spot trading, with Bitcoin being your primary focus, as government entities are also buying it. However, altcoins and meme coins will soon experience a more severe crash, as Trump has proven that he is not someone who solves problems peacefully and always takes the worst possible actions.
Every crisis in the market is not opportunity to exit altcoins and meme coins. Please adapt yourself to the current conditions; it is no longer like previous years, and do not wait for an altcoin season. There is no altcoin season anymore, because in the past, these seasons were due to the limited number of coins in the market, not now when thousands of new coins are created daily, and governments have also entered the crypto market. Any market that governments enter will never benefit ordinary people unless a miracle happens and conditions change, which I doubt will occur anytime soon.
You never thought prices would reach this level, but they did. Do not think that now is a good time to buy, because prices will go even lower, and this is the beginning of a massive crash that will be recorded in history. Also, keep in mind that since government entities and large companies are buying Bitcoin, they will certainly do something to cause its price to drop so they can buy Bitcoin from ordinary people at lower prices.
Ethereum has also proven that it has not had significant growth during this period. Therefore, try to protect your capital until we get through this crisis created by Trump.

TONCOIN Long Trade Setup📊 Price Action & Trend Analysis
Analyzing market trends using price action, key support/resistance levels, and candlestick patterns to identify high-probability trade setups.
Always follow the trend and manage risk wisely!
Price Action Analysis Interprets Market Movements Using Patterns And Trends On Price Charts.
👉👉👉Follow us for Live Market Views/Trades/Analysis/News Updates.

TON/USDT: How to Act in the Market When Panic Takes Over?Crypto Panic or Manipulation? A Deep Market Breakdown
🔥 Hello everyone, this is Ronin!
The last two trading days have been a real test for investors and traders in the cryptocurrency market. 📉 We witnessed a massive wave of liquidations, which literally crashed altcoins. Looking at the numbers:
Most assets dropped by 10–30%.
Some coins lost 50% of their value.
The total crypto market capitalization shrank by more than 10% in just a few days.
We haven’t seen a crash like this in a long time. 📉💥
What Are Analysts Saying?
According to most experts, the main reason for this decline was the new trade sanctions imposed by Donald Trump against Canada and Mexico. These sanctions allegedly led to an overall deterioration of the economic climate, causing capital to flow out of risk assets, including cryptocurrencies.
But is that really the case?
My Perspective: What Really Happened?
I can’t say with 100% certainty, but my decade of experience tells me otherwise. What we saw over the weekend was nothing more than crypto panic and large-scale market manipulation.
🔹 Why do I believe this?
The sanctions have no direct or indirect impact on the crypto market.
The key factor was the psychological state of market participants.
Friday was extremely positive: the Fear and Greed Index was in the "greed" zone, and ETF funds recorded record capital inflows.
The Fed left interest rates unchanged, which the market viewed more positively than negatively.
However, by the weekend, we saw massive sell-offs. The logic is simple: big players took advantage of the news cycle to wipe out market liquidity. 💸
The Hardest Hit: TON
💎 TON (The Open Network) is one of the most promising blockchain projects, closely tied to the Telegram ecosystem.
And here’s the question: Is there any real reason for TON to be this undervalued?
❌ The answer is a definite NO!
For comparison:
Even when Telegram’s founder, Pavel Durov, was arrested in France, the risks for the project were much higher, yet the price never dropped below $4.
However, on Sunday night, the price plummeted to $3 – with no real fundamental reason behind it.
📌 If that’s not manipulation, then what is?
What Do the Stats Say?
📊 More than $2 billion in liquidations occurred in a single trading day.
💥 This was one of the largest liquidation events in the history of the crypto market.
If you check CoinGlass, you’ll see a massive imbalance in liquidations between buyers and sellers. Big players literally wiped out everyone who was leveraged long.
What’s Next? Where Is the Market Headed?
As the saying goes: "Buy when everyone is selling, and sell when everyone is buying."
Right now:
✅ Everyone is selling.
✅ The market is in panic mode.
✅ Big players have wiped out overleveraged long positions.
What should you do in this situation? 🤔
Personally, my average entry on TON is $5. I bought 40,000 tokens, and yes – the drawdown is significant.
I had the temptation to close my position, wait for the bottom, and re-enter, but then I remembered one of the golden rules of the market:
💡 If everyone is selling, it’s time to buy!
So not only did I NOT close my position, but I increased it.
Conclusion: What to Expect Next?
📌 This was an artificial correction – a manipulation aimed at liquidating overloaded positions.
📌 The coming days will show a recovery, especially if volumes begin to rise.
📌 Market psychology is a key factor. When the market is in panic mode, big players are accumulating assets at low prices.
I will continue to publish updates on my TON position and other cryptocurrencies. If you’re interested in my strategy for recovering from this deep drawdown, follow my profile on TradingView.
🚀 In upcoming articles, we’ll analyze other coins and provide a microeconomic breakdown of projects in similar situations.
This has been Ronin – stay tuned for updates! There's a lot more to come. 🎯

BUYZ--TONI guess within the specified range
The fourth wave will end
And I expect an increase
The last climb of course...
I think it's for hold
It is logical
Stop from the middle of the range
Consider 20 percent
We will have an update

Lingrid | TONUSDT bearish PRESSURE. Possible ShortRecently the crypto market experienced a short-term selloff, but was able to recover and gain bullish momentum. However, OKX:TONUSDT has deviated from this trend, as it continues to form lower highs without creating significant bullish momentum. Furthermore, it has broken and closed below the psychologically important level of 5.00, which suggests bearish pressure. On the weekly timeframe, TON has formed a bearish pinbar, indicating selling pressure, and may retest lower levels as a result. I expect the price to move support zone at 4.00. My goal is support zone around 4.430
Traders, if you liked this idea or if you have your own opinion about it, write in the comments. I will be glad 👩💻

TONUSDT ANALYSISHere's my view and understanding of TONUSDT.
It's following the Trendlines drawn perfectly until now.
If breaks the Resisting Trendline, One can consider adding quantities at retest.
Or else Wait.

TON. USDTToncoin has reached its main support, if it acts technically, it will reach $5 as soon as possible.
If it loses support, it is a good option to hold for one to two months.
Anyway, tomorrow's candle, which is the first weekly candle, is very important.

Toncoin back to $5.00 TodayI just went long on toncoin. I think the market will push back up to $5.00 and possibly higher.
Price is currently at weekly support area indicated by he orange zone.
Internal structure on on 4hr and 1hr tf also bullish
POTENTIAL SETUP - TONLooking at a potential bounce off the range low. Have a look at TON/BTC performance, could see a higher time frame double bottom bounce. Aiming to enter on the lows to minimise risk. Keeping a tight stop loss as we could see the price breakthrough support.

TON Big Triangle in Massive EcosystemTON has massive ecosystem messeger and create big triangle from April 2024 almost 1 year
this is insane
in the past TON is ranging till end of Feb before takeoff, can it repeat ?

Let's buy some TonCoinWe're currently in a position to buy Ton Coin within the Fibonacci 'Safe Zone' highlighted on the chart. I believe we'll see a retest of the $6.17 level soon!

Is TON going to crash?As long as TON holds the $4.5 support, the price can reach $6.5, However, if it loses $4.5, based on Fibonacci, the price can reach anywhere between $4 and $2.7. It will depend on whether we see a bullish reversal pattern forming. TON can get back to the long-term pattern it just broke. Otherwise, the ?price can return to the previous trading range, fluctuating between $1 and $3 for a while. This is really unlikely to occur. In my opinion, we will see a bullish move either from here or after another dump to $3.5.
However, the long-term pattern is bearish, so I consider this a fake breakout. I do think this pattern will have a bearish breakout in the end, but only after TON reaches an all-time high of around $15.

TonHi guys
**Analysis of TONCOIN/TETHER 4h Chart (COINEX):**
### **Key Observations:**
1. **Price Action**:
- Current Price: **4.8436** (+0.37% in 4h).
- Tight spread between **SELL** (4.8427) and **BUY** (4.8483) orders, indicating short-term consolidation or low volatility.
2. **Orders & Targets**:
- Immediate resistance at **4.8483** (BUY order).
- Higher price targets (5.0000 to 9.0000) marked with **"O2:51:14"**, likely denoting **order expiration times** (e.g., 2 hours, 51 minutes, 14 seconds remaining). These could represent take-profit levels or pending limit orders.
3. **Legend Insights**:
- **Watchlist**: Multiple entries dated "Dec: 15:30" (possibly historical alerts or recurring events).
- **Explore**: "Feb: 15:30" entries suggest recent strategy updates.
- **Ideas**: "Mar: 4:00:00" might indicate long-term plans or milestones.
4. **Market Sentiment**:
- The cluster of higher targets (5.0000–9.0000) signals bullish expectations, though the current price action remains range-bound.
- The proximity of SELL/BUY orders hints at a potential breakout or reversal signal in the 4h window.
### **Conclusion**:
- **Short-Term**: Monitor the 4.8427–4.8483 zone for a breakout. A sustained move above 4.8483 (BUY order) could trigger upward momentum toward 5.0000.
- **Mid-Term**: The 5.0000–9.0000 levels act as key profit-taking zones, contingent on order expirations ("O2:51:14").
- **Caution**: Repeated timestamps in the legend may reflect placeholder data; verify actual order validity and market context.
**Actionable Insight**: Consider a long position if price holds above 4.8483, targeting 5.0000 with tight stop-loss below 4.8427.

Skyrexio | Toncoin TON Will Dump Before Huge Pump!Hello, Skyrexians!
Today we will take a look at the most hyped crypto of 2023. Now it looks like everybody forgot about BINANCE:TONUSDT because asset is in boring flat for 9 months. In our opinion price is about to start moving and we will see nice entry point soon for the potential insane growth.
Let's take a look at the weekly time frame. Here we can see the clear 5 waves cycle and now the wave 4 is in terminal phase. Target for the wave 4 is 0.38 Fibonacci level. If in this area Bullish/Bearish Reversal Bar Indicator will flash the green dot it's going to be strong sign to enter the trade for the wave 5. Wave 5 can easily break $10. We will update this idea when wave 4 is going to be finished.
Best regards,
Skyrexio Team
___________________________________________________________
Please, boost this article and subscribe our page if you like analysis!

TON/USDT : Get Ready for the next Bullish Mov (READ THE CAPTION)By analyzing the #TONCOIN daily chart, we can see that the price is currently trading within the $4.90 demand zone. If the price stabilizes above $4.20, we can anticipate the start of the next bullish wave for this promising cryptocurrency! The mid-term targets for TONCOIN are $5.30, $6.10, and $6.50, respectively.
Please support me with your likes and comments to motivate me to share more analysis with you and share your opinion about the possible trend of this chart with me !
Best Regards , Arman Shaban

Is Ton the King of the Bull Run? Why It Will Grow in the Long What Is Happening with Toncoin?
Toncoin (TON) remains a prominent player in the cryptocurrency space, even amidst the current market stagnation. For me, it’s more than just a digital asset – it’s a strategic investment I deeply believe in. At the moment, I hold over 60,000 TON coins, and every market dip is an opportunity for me to increase my position. 💎🚀
Recent Developments and News Around Toncoin
Entry into the U.S. Market
In 2025, The Open Network (TON) announced its strategic expansion into the U.S. market, marking a new chapter in the project’s history. This move was bolstered by the appointment of Manuel Stotz, the founder of Kingsway Capital Partners, as the new president of the foundation. Stotz’s leadership is expected to solidify TON’s position in North America and open doors to new opportunities. 🌍
Although TON faced regulatory challenges in the U.S. in the past, the foundation’s renewed approach and strategy show that the team is ready to overcome these obstacles and move forward.
2024 Achievements
Last year was a breakthrough for TON, with several key milestones:
User Base Growth: Over 36 million new wallets were created, marking a 55x increase compared to the previous year.
TVL Growth: Total Value Locked (TVL) surged from $13.5 million to $776 million at its peak.
USDT Integration: After introducing USDT into the TON network, transaction volumes exceeded $39.6 billion, with $1.2 billion in turnover in just 8 months.
These figures underscore TON’s growing ecosystem and its expanding adoption. 🌟
What’s Happening with Toncoin’s Price?
At present, Toncoin’s price is showing no clear trend. The asset is stuck in a narrow range, unable to break key resistance levels. This suggests that the market is not yet ready for a significant upward move.
Technical Analysis: Each time the price approaches a resistance level, it retreats, highlighting weak buyer activity.
Market Dynamics: Low trading volumes indicate a lack of strong interest from major players, possibly signaling an accumulation phase.
I closely monitor these movements. Every dip in the price serves as a signal for me to buy more coins. For me, Toncoin is a long-term commitment, and short-term fluctuations do not deter my confidence in its potential. 💹
Why Am I Continuing to Accumulate TON?
Integration with Telegram:
With millions of users globally, Telegram provides Toncoin with a unique advantage in the cryptocurrency space. This is more than just a token – it’s part of an ecosystem with immense growth potential.
Ecosystem Growth:
TON’s 2024 achievements, including the TVL surge and USDT integration, showcase a robust foundation for future expansion.
Market Understanding:
I view the current consolidation as an opportunity rather than a setback. The lack of growth now doesn’t mean it won’t happen in the future. I believe the market is preparing for its next major move. 🚀
How I’m Leveraging the Current Situation
My strategy is simple: I capitalize on every dip by accumulating more Toncoin. I understand that markets move in cycles, and a temporary absence of a trend is just part of the process.
Currently, my portfolio exceeds 60,000 TON coins, and every new purchase strengthens my confidence in the project. For me, this isn’t just an investment; it’s a belief in a technology that can redefine the game. 💼📈
Conclusion
Toncoin is a cryptocurrency with massive potential, even in the face of current stagnation. I see opportunities, not obstacles. Every day, I monitor the charts, analyze volumes, and remain ready to act at any moment.
60,000 TON coins is just the beginning. I’m confident the next market impulse will reveal the true potential of this asset. 💎✨

I can't get enough of this chart #TonThis position is very suitable for a great move. Be sure to check it and get on the perfect wave to buy tons of coins. Please support and subscribe
