Candlestick analysis

Bullish & Bearish Confluence (SQZMOM + MACD)CHEATCODE nga this is insane cooking sigma boy this uses many things to predict stuff and yeah its a very good indicator pair this with my entry modelf or insane results yap yap yap

ISS V5 Strategy (3, 97, 100)
This is a trend strategy that uses a classic combination of indicators:
MACD to determine the main entry signal (line crossing).
RSI as a filter to confirm the strength of the trend.
ATR for dynamic risk management (setting stop-loss and take-profit orders).

FibPivot FluidTradesThis comprehensive indicator provides a complete trading framework combining institutional concepts (SMC), Fibonacci-based levels, and a systematic trading approach with clear risk management.
Key Features of This Combined Indicator:
Smart Money Concepts (SMC) Components:
Supply/Demand zones with configurable width and history
Break of Structure (BOS) detection
Point of Interest (POI) labels
Swing high/low detection with HH/HL/LH/LL labeling
Fibonacci Pivot Points:
Daily pivot points with configurable Fib levels
Support/Resistance levels (S1-S5, R1-R5)
Customizable visual appearance
Trading System:
ATR-based trailing stop signals
EMA trend confirmation (13, 33, 200)
Visual buy/sell signals
Risk management with SL/TP levels
Trade information table
Enhanced Visuals:
Themed colors (dark/light mode)
Clean, organized layout
Configurable display options for all components
Alerts:
Buy/Sell signal alerts
Can be extended for BOS alerts

Prev Day R1–R3 / S1–S3 LevelsPlots Levels BASED ON SOME specific formula and offset. Happy trading !
trademark - BGYRT

Mo Salih Marubozu ScannerHi everyone,
For those following the NCI strategy, I've created an indicator that identifies powerful buy/sell! highlighting Marubozu candles.
The goal is to simplify our trading by directing attention to overall chart behavior not identify the candle itself :) .
Wishing you success with this new tool!

CGG RSI Divergence ScannerThis is a customized Relative Strength Index (RSI) indicator that enhances standard divergence detection with creative and visually intuitive symbols.
✅ Automatically detects bullish and bearish divergences
✅ Replaces traditional labels with fun icons like crabs, batteries, and geckos
✅ Custom-colored RSI bands: blue for upper, lower, and mid levels
✅ Ideal for day trading, swing trading, and trend confirmation
✅ Works across markets: crypto, forex, stocks, and more
🎯 Key Features:
Spot early reversal signals through divergence
Receive unique visual cues to support fast decision-making
Designed to reduce analysis fatigue and increase chart readability
⚠️ Disclaimer:
This tool is for educational and analytical purposes only. Trading involves risk — always combine with proper risk management and do your own research before making decisions.

CoinBot2.0 (Signals Only)CoinBot2.0 is a next-generation crypto trading indicator and webhook-enabled bot system designed for seamless automation and fast signal execution.
This TradingView Pine Script detects potential market reversals by combining Bollinger Band and RSI logic to generate clear “BUY” and “SELL” signals directly on your chart—no clutter, no unnecessary lines, just actionable entries and exits.
With built-in webhook alerts, CoinBot2.0 connects to your Flask/Python bot or any automated trading system. Instantly trigger simulated or real trades the moment a new opportunity appears—no manual intervention required.
Key Features:
Clean chart interface: Only buy/sell signals, no extra overlays or indicators.
Bottom/top detection: Attempts to catch major reversals using dynamic Bollinger Bands and custom RSI thresholds.
Webhook-ready: Sends buy/sell JSON alerts with price and symbol to any compatible endpoint (like your Replit CoinBot dashboard).
Easy integration: Fast setup for automated, paper, or live trading.
Ideal for:
Traders seeking simple, actionable, automation-friendly signals.
Anyone running a webhook-based trading bot, whether on Replit, a VPS, or locally.

4H Box+ m15 Separadorindicates 15-minute time frames in vertical lines and 4-hour time frames in boxes for candle analysis on shorter time frames.


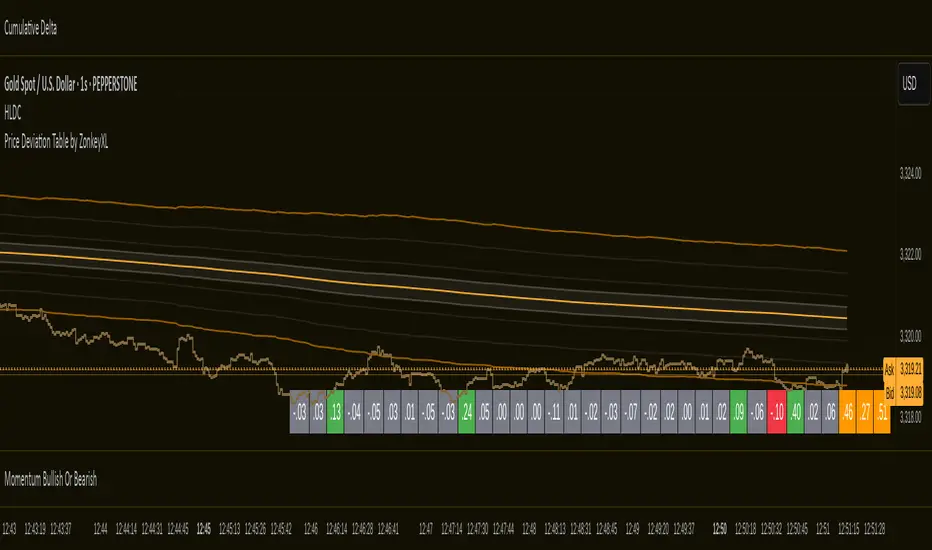
Price Deviation Table by ZonkeyXLProvides a 30 column table showing price deviation per bar close, highlighting larger deviations in red (downside) or green (upside).
Deviations that get highlighted in red/green are calculated to be 2x the amount of price movement in the previous candle, but can be customised to check any deviation size you want in the options panel.
Can be used on any timeframe but you need to specify the number of bars per table column to make it accurate to what you want.
Examples:
If used on the 1 second time frame you could specify bars to 1 and then each column value will check the price as at close on the most recent second for deviations against the close of price on the second prior, showing comparisons up to 30 seconds.
If on the 1 minute time-frame you could specify bars to 2 and then each column value would show deviations from most recent price close to 2 minutes ago, making all 30 columns show deviations for up to an hour.
At the end of the column are 3 orange coloured columns. The first one compares price to 10 bars ago. The second compares current price to 20 bars ago. The 3rd compares current price to 30 bars ago.
In our example on the 1 second above, this would mean deviation is calculated by comparing most recent close to 10 seconds ago, then to 20 seconds ago, and then to 30 seconds ago. The final 3 columns do not highlight red or green, so you can differentiate them properly from the main deviation columns at all times.
Note that the table is rolling - so once it is populated for the first time, only the final column will update while the prior values will shift one column to the left.
The Multi Crossover Strategy [BoyaSignals]
📄 OVERVIEW
This strategy combines a layered entry system and adaptive risk management to capture opportunities across different market phases. Entries progress from deep reversals to momentum breakouts, using filters that adjust to trend, consolidation, or reversal conditions.
Advanced risk management features are built in, including a dynamic trailing stop and dynamic stop loss that adapt to volatility and trend conditions. These mechanisms are designed to help manage open positions more effectively than using fixed ATR multipliers alone.
The system includes enhanced backtesting statistics to help evaluate how changes in configuration affect historical performance. All backtesting results are for evaluation purposes only and should not be relied upon as an indicator of future performance.
For transparency, the strategy provides detailed chart labels showing the type of entry triggered, the entry filter number, real-time profit and loss percentages, and the reason for position closure. Display options allow users to show or hide labels and to overlay decision-related moving averages and Bollinger Bands for further context.
Alerts generated by this strategy can be used for discretionary entries or connected to automated trading platforms that accept TradingView webhook signals, such as Coinbase, Binance, and others. Some traders choose to integrate this setup with third-party services like Cryptohopper to automate execution, though this is entirely optional.
⸻
🔍 HOW DOES IT WORK
Signals are generated through a combination of momentum crossovers that pinpoint different stages of market movement. Each entry undergoes a series of checks across multiple indicators—including RSI, CCI, ADX, Bollinger Bands, moving averages, and volume—to confirm alignment with the strategy’s criteria.
Optional divergence detection across ten indicators can further strengthen signal quality and reduce the chance of false entries. In addition, global filters enforce conditions like minimum retracements, distance from key averages, and sufficient volatility before any trade is allowed.
Once an entry is active, stop losses and trailing stops adjust automatically in response to current volatility, momentum shifts, and recent price behavior. By sequencing filters and confirmations, the strategy aims to avoid chasing late moves while systematically identifying setups with the highest potential.
⸻
🎯 ENTRY TYPES
This strategy combines multiple entry methods to help identify potential opportunities across a variety of price conditions. Each entry type can be enabled or disabled individually and is evaluated using configurable filters and confirmation tools.
Stochastic RSI Crossover
Triggers when the Stochastic RSI K line crosses above the D line, often in oversold areas.
9-Period Moving Average Crossover
Triggers when price crosses the 9-period simple moving average.
MACD Crossover
Triggers when the MACD line crosses the signal line.
Big Bottom Entry
Designed to catch deep reversals before a Stochastic RSI crossover has formed.
Breakout Entry
Triggers when price exceeds recent high levels.
⸻
📊 MULTI-INDICATOR EVALUATION
Every entry signal is assessed using conditions including RSI, ADX, Stochastic, CCI, volume, volatility, price position relative to Bollinger Bands, proximity to the 50 and 200 moving averages, and additional proprietary filters. These filters help align entries with broader market context and avoid signals during unfavorable conditions.
⸻
🧭 DIVERGENCE CONFIRMATION
An additional confirmation layer can be added by checking for divergences around entry bar.
Settings let users customize how strict the divergence confirmation should be:
Specify the minimum number of divergences required
Allow divergence count overrides when volume is elevated
Require divergence on the crossover bar (stricter) or accept the nearest pivot (more flexible)
Enable divergence only when the market is not in an uptrend
Apply divergence checks selectively to specific entry types
Disable divergence validation entirely
⸻
🧩 ENTRY FILTERS
Filters Adapted To Price Context
Each entry method uses filters tailored to price conditions. For example, Stochastic RSI has distinct filters for downtrends, sideways moves, and retracements. 9MA and MACD entries check if price is above or below the basis line. You can enable or disable these filters to create stricter or more flexible entry criteria.
This is a layered approach that identifies opportunities progressively—from deep reversals to Stoch entries below the 9MA, then 9MA and MACD setups between averages and the upper Bollinger Band, and finally breakout entries at new highs. If one entry (e.g., a Stoch Crossover) doesn’t trigger, the strategy evaluates the next crossover filters as price rises.
Global Entry Filters
In addition to specific entry conditions, the strategy includes global filters to improve signal quality. These can:
Require a minimum distance above or below the 50 and 200 moving averages.
Define minimum and maximum retracement percentages in an uptrend.
Specify minimum distances from recent swing highs, swing lows, or resistance.
Set a minimum Bollinger Band width for entries.
Optionally disable entries entirely if the price is below key moving averages.
These filters can be adjusted or turned off to fine-tune selectivity.
⸻
🟢 DYNAMIC TRAILING STOPS
The strategy includes an advanced trailing stop mechanism that adapts to market conditions. Unlike a fixed ATR stop, this system evaluates multiple criteria to determine how aggressively or loosely to trail price.
The trailing stop becomes active only after price has reached a minimum profit level to avoid early tightening.
Dynamic ATR multipliers adjust between tight, narrow, and wide modes:
Wide trailing is used when strong bullish momentum, breakouts, or support above moving averages are detected.
Narrow trailing is applied during low volatility and early momentum loss.
Tight trailing activates if reversal signals appear, such as bearish divergences or trend exhaustion.
Evaluation factors include volatility, Bollinger Band compression, momentum slope and exhaustion patterns, price position relative to moving averages and bands, divergence signals, and recent swing levels.
You can define ATR multipliers, enable or disable tightening conditions, and choose adaptive or fixed trailing behavior.
Labels show when the trailing stop is armed and when adjustments occur.
Entry Label – In the snapshot above, you can see a Stoch Entry with the number 1 displayed below the “Stoch” label, indicating that Entry Filter 1 was the specific condition that triggered this trade.
Divergence Label – The entry was confirmed by divergences detected on four indicators at the entry bar: Stoch, CCI, CMF, and MFI. A green divergence label means regular divergences were found (hidden divergences are shown in orange).
Percentage Label – Where a position closes, you’ll see a percentage label showing the profit or loss achieved—green for profit, red for loss.
Trail Stop Label – The light blue label identifies which trailing stop rule closed the trade. In this snapshot, it was a tight stop loss triggered by bearish divergence.
Notice: A few bars to the left of this entry, there is another green divergence label without a corresponding entry signal. This indicates that although a divergence was detected, none of the entry filter criteria were met, so no trade was initiated.
⸻
🔴 DYNAMIC STOP LOSS
This strategy includes a comprehensive stop loss system that adapts as the market evolves. The stop loss can:
Use ATR-based or fixed percentage distance.
Tighten if early reversal risk appears , such as minor bearish movement or early trend shifts.
Tighten further if stronger bearish reversal signals confirm , including failed bounce attempts, rejection at resistance, or lower highs.
Define a maximum allowable loss per trade . By default, max stop loss is set to 3.5% below entry.
Allow a temporary extension beyond the max loss cap if bullish recovery signals appear, such as deep oversold conditions with momentum shift or successful bounces. By default, extended stop loss is enabled with 1.2% additional loss allowed.
Adjust to breakeven after reaching a defined profit.
Additional settings define how many bars must pass before certain stops activate, how long extended stops remain active, and what triggers a final exit. Labels show which stop type was triggered and why.
Examples to the use of extended SL:
A Reduced Loss Example:
A Reduced Loss Example 2:
Loss Turned Into Profit:
The “+” mark at the bottom of a bar indicates that the extended stop loss feature kept the position open due to detected reversal signals.
The “T” mark shows that the tight stop loss was triggered at that bar.
The red stop loss label above the closing bar displays the type of stop loss activated (e.g., Extended SL) and the reason for the exit (e.g., Breakdown).
⸻
STATISTICS AND BACKTESTING
The statistics provided in this strategy, help you analyze historical performance and see how changing the settings affects results .
Statistics include net profit, win rate, average win and loss size, maximum drawdown, risk/reward ratio, counts of each stop loss and trailing stop type, performance by entry method, filter-specific results, and monthly and yearly profit distributions.
The strategy was developed over the course of a full year, with extensive evaluation and testing on multiple coins and market conditions. By default all entry types and their related filters are activated. The default settings works well with many symbols but you will always need to fine-tune them in order to achieve best results for each symbol. Optimized results were found with DOGEUSDT on the 15 minute chart .
Although default settings can deliver strong performance on some symbols, it may produce poor results on others if left unadjusted. Tips for quickly tuning the configuration to different coins are provided at the end of this description.
⸻
ADDITIONAL LABELS
Skipped Divergence Labels
In the snapshot above, you can see an example of a label showing a skipped divergence. This means a divergence was detected on that bar but was not considered valid. A divergence will not be treated as valid if the number of divergences on that bar is less than the minimum defined in the settings, or if the type of divergence does not match the expected type for the current trend. Hidden divergences are used to confirm retracements during uptrends, while regular divergences are used to identify potential bottom reversals.
⸻
🧮 RISK ASSUMPTIONS AND DEFAULT SETTINGS
This strategy backtest uses a starting balance of $10,000 with 1 tick slippage and 0.075% commission. Position size defaults to 100% per trade to clearly measure the impact of each entry without partial allocations. The maximum stop loss is set at 3.5% below entry to limit downside risk, while an extended stop is activated by default (optional) and can widen losses by up to an additional 1.2%.
Why 100% Position Size is Used
This strategy defaults to allocating 100% of available equity per trade to simplify performance measurement and scaling. Because all entries are protected by defined stop loss levels (by default, maximum 3.5% of entry price + Extended stop loss % if activated), the actual risk per trade remains capped and does not exceed a sustainable portion of account equity. Users who prefer a different allocation can easily adjust position sizing in the Properties tab to match their preferred risk tolerance.
NOTICE & DISCLAIMER
This material is provided solely for personal study and demonstration. Redistribution, resale, modification, or any other use of these files or ideas is strictly prohibited. This tool does not provide financial advice or recommendations. Trading involves substantial risk and should be based on your own judgment. You are solely responsible for any decisions and outcomes.
No representation is made that the strategy will perform as intended in all situations. Automated systems may occasionally exit positions too early or too late, or extend trades when they should not. Use this information carefully and at your own discretion. No guarantees of performance or results are given.
⸻
TIPS FOR ADJUSTING SETTINGS TO VARIOUS SYMBOLS
There are a few simple steps I recommend when adapting the strategy to other coins or symbols:
1. Review the backtesting results.
Check whether there’s a healthy balance between wins and losses across most entry filters. If not, continue with the adjustments below.
2. Adjust divergence confirmation strictness.
For example, by default, Stoch Entries use the “Divergence / Uptrend” setting, requiring divergence only when an uptrend isn’t detected. Changing this to “After Divergence” forces every entry to confirm with divergence. Refer to the tooltips for each option to see how they impact signals.
3. Refine divergence settings.
Try adjusting the minimum number of divergences required to validate a signal and toggle the override divergence count switch. You can also experiment with enabling or disabling the other divergence-related toggles to see how they affect performance.
4. Deactivate specific entry filters.
If some filters still show a weak win/loss ratio after refining divergence criteria, consider turning them off to improve overall results.
5. Modify Narrow Trailing Stop behavior.
You can choose when the Narrow Trailing Stop should engage—either when bandwidth drops below 3% or when it falls under the average bandwidth of recent bars.
6. Adjust Global Entry Filters
Fine-tune the global filters to change thresholds for defining uptrends, retracements, minimum volatility, and conditions around key moving averages.

BanShen MACD Basic[SpeculationLab]This is the basic version of the BanShen MACD indicator.
It includes only two core features: MACD divergence detection and ATR-based stop-loss plotting.
Ideal for users who prefer a clean chart and minimal system load.
⭕️ MACD Divergence Detection
To achieve higher accuracy, three key conditions are used:
The peaks and troughs must be clearly shaped.
The two divergence points should show a significant difference.
The divergence must be consecutive, with no interruptions.
The peak size factor filters out weak signals — by default, the peak must exceed 0.1× the histogram’s standard deviation.
The peak size ratio defines the minimum size difference between two peaks. Divergences with insufficient contrast are automatically filtered.
The noise threshold can be adjusted to ignore minor histogram fluctuations. This setting varies by instrument and defaults to 0 (no filtering).
If two or more consecutive divergences occur, this may indicate a strong mid- to long-term setup. These signals are rare but often high-probability. When enabled, a small arrow will mark the signal on the chart.
⭕️ ATR-Based Dynamic Stop Loss Finder
Assists in visualizing adaptive stop-loss levels.
All parameters, including colors, are fully customizable.
This version is designed for lightweight use and does **not** include additional modules such as RSI/OBV/FVG or Vegas Tunnel.
For the full version, search for “BanShen MACD Ultimate”.
⚠️Disclaimer⚠️
This script is for educational and informational purposes only.
It does not constitute financial advice. Use at your own risk.
这是 BanShen MACD 指标的基础版本。
该版本仅包含两个核心功能:MACD 背离识别 和 基于 ATR 的止损绘制。
适合追求图表简洁、系统资源占用低的用户。
⭕️ MACD 背离识别
为了提高识别准确率,系统采用以下三项条件进行判断:
波峰与波谷的形状需清晰明确;
两个背离点之间必须存在明显的高度差;
背离必须是连续的,中间不能被其他波峰干扰。
参数 peak size factor 用于过滤较弱的信号 —— 默认要求峰值大于 MACD 柱状图标准差的 0.1 倍。
参数 peak size ratio 控制两个波峰之间的最小比例差,若差距不足,则该背离将被自动过滤。
你还可以通过 noise threshold 来忽略柱状图中的轻微噪音。该值与柱状图的高度相关,不同品种之间差异较大,默认设置为 0,表示不过滤任何噪音。
如果系统识别到两次或以上的连续背离,通常代表一个较强的中长线机会。虽然这类信号很少见,但胜率通常较高。启用该功能后,图表上将出现一个小箭头标记提示。
⭕️ 基于 ATR 的动态止损绘制
用于辅助展示动态止损位置。
所有相关参数(包括颜色)均可自由调整。
该版本为轻量化设计,不包含 RSI / OBV / FVG 背离模块及 Vegas 隧道过滤器 等附加功能。
如需完整版本,请搜索 “BanShen MACD Ultimate”。
⚠️免责声明⚠️
本脚本仅供学习与参考使用,不构成任何投资建议。
交易有风险,使用前请自行评估,风险自负。

BanShen MACD Ultimate[SpeculationLab]This is the Public Edition of the BanShen MACD system — a fully integrated, multi-signal technical analysis toolkit built entirely from scratch.
It combines several advanced modules to help traders identify key entry/exit zones and assess trend momentum in real time.
✅ Core Modules Included:
MACD Divergence Detection
(Supports both basic and consecutive peak detection)
ATR-Based Dynamic Stop Loss Finder
Vegas Tunnel Trend Filter
Engulfing Pattern Recognition
RSI Divergence Signal Module
OBV Divergence Signal Module
FVG (Fair Value Gap) Auto Detection
Smart Signal Table (multi-module summary)
Custom Watermark for chart branding
⭕️ MACD Divergence Detection
To achieve higher accuracy, three key conditions are used:
The peaks and troughs must be clearly shaped.
The two divergence points should show a significant difference.
The divergence must be consecutive, with no interruptions.
The peak size factor filters out weak signals — by default, the peak must exceed 0.1× the histogram’s standard deviation.
The peak size ratio defines the minimum size difference between two peaks. Divergences with insufficient contrast are automatically filtered.
The noise threshold can be adjusted to ignore minor histogram fluctuations. This setting varies by instrument and defaults to 0 (no filtering).
If two or more consecutive divergences occur, this may indicate a strong mid- to long-term setup. These signals are rare but often high-probability. When enabled, a small arrow will mark the signal on the chart.
⭕️ ATR-Based Dynamic Stop Loss Finder
Assists in visualizing adaptive stop-loss levels.
All parameters, including colors, are fully customizable.
⭕️ Vegas Tunnel Trend Filter
A trend filter built with five EMAs (default: 12 / 144 / 169 / 576 / 676).
EMA12 is hidden by default.
All lengths are adjustable, and each line can be shown or hidden individually.
Even beyond Vegas-style strategies, this tool is highly flexible and versatile.
⭕️ Engulfing Pattern Recognition
A bullish engulfing is triggered when a bullish candle closes at or above the previous candle’s high.
A green cross appears below the bar, and the resonance panel lights up multiple signals.
You can change the detection condition from high to close for a looser rule.
A bearish engulfing occurs when the current close is at or below the previous low.
You can also switch the comparison to the previous open for broader detection.
⭕️ RSI & OBV Divergences
Both follow similar logic to MACD divergence.
However, since they are subchart indicators, only one module can be active at a time to avoid visual conflicts.
⭕️ Fair Value Gap (FVG)
FVGs form when price moves sharply in one direction, leaving a visible gap.
Price often returns to these gaps to retest or fill them.
This behavior creates potential entry opportunities near the gap area.
✅ Final Thoughts
This tool is highly modular and customizable.
Traders can selectively activate the modules that best suit their strategy and charting preferences.
**Disclaimer:**
This script is for educational and informational purposes only.
It does not constitute financial advice. Use at your own risk.
这是 BanShen MACD 系统的公开版本 —— 一个完全从零构建的多信号技术分析工具集。
它集成了多个高级模块,帮助交易者实时识别关键的进出场区域和趋势动能。
✅ 核心模块包括:
MACD 背离识别
(支持基本背离与连续背离识别)
基于 ATR 的动态止损定位工具
Vegas 隧道趋势过滤器
吞没形态识别模块
RSI 背离信号模块
OBV 背离信号模块
FVG(公允价值缺口)自动识别与绘制
智能信号面板(多模块信号汇总)
自定义图表水印(用于品牌标识)
⭕️ MACD 背离识别
为了获得更高的识别准确率,系统基于以下三点进行筛选:
波峰与波谷的形状必须清晰明确;
构成背离的两个点之间必须存在明显的高度差;
背离必须是连续的,中间不能被其它峰值干扰。
参数 peak size factor 用于过滤强度不足的波峰,默认要求峰值大于 MACD 柱状图标准差的 0.1 倍。
参数 peak size ratio 限定两个波峰之间的最小比例差,小于该阈值的背离会被自动过滤。
如你希望忽略柱状图中较小的杂音,可以通过 noise threshold 调节,该值基于柱状图的实际高度,适配不同交易品种。默认值为 0,表示不过滤任何杂音。
若出现两次或以上的连续背离,可能代表强烈的中长线机会。此类信号虽少见,但胜率通常较高。当此模式被触发时,图表上会出现小箭头标记。
⭕️ 基于 ATR 的动态止损定位工具
该工具用于辅助显示自适应的止损位置。
所有参数,包括颜色,都可以根据个人偏好自由调整。
⭕️ Vegas 隧道趋势过滤器
本模块由五条可自定义的 EMA 均线组成(默认值为 12 / 144 / 169 / 576 / 676)。
其中 EMA12 默认隐藏。
你可以自由调节每条均线的长度,并控制是否显示。
即使你不使用 Vegas 策略,这个模块也具备非常强的通用性和灵活性。
⭕️ 吞没形态识别
看涨吞没形态:当前阳线的收盘价高于或等于前一根阴线的最高价时成立。
触发后,K线下方会显示绿色叉号,且共振面板会点亮多个信号提示。
你可以将判断条件从“前高”切换为“前收盘”,以放宽判断标准。
看跌吞没:当前收盘价低于或等于前一根阳线的最低价。
同样可选择用“前开盘价”作为参考,以获得更宽松的识别范围。
⭕️ RSI 与 OBV 背离识别
其逻辑与 MACD 背离相似。
但由于 RSI、OBV、MACD 都属于副图指标,不能同时显示,否则会因坐标冲突而显示异常。
因此你只能在三者中选择一个启用。
⭕️ FVG(公允价值缺口)
当价格剧烈朝一个方向冲刺时,K线上会留下一个明显缺口(FVG)。
价格通常会回踩该区域进行测试或补回。
这个行为可以为我们提供潜在的入场机会。
✅ 最后说明
该指标模块化程度高,可高度自定义。
你可以根据自己的策略与偏好,自由启用适合的功能模块。
免责声明:
本脚本仅用于教育和信息参考目的,不构成任何投资建议。
交易存在风险,使用本工具前请自行评估,风险自负。

Binary Options Strategy / Market PatternsMarket patterns, also known as chart or price patterns, are visual formations on price charts that help traders and analysts identify potential trends and predict future price movements. They are a core component of technical analysis, and are used to spot potential reversals or continuations of existing trends.
Continuation Patterns:
.
These patterns suggest that the current trend (either upward or downward) will continue after a brief pause or consolidation period. Examples include flags, pennants, and symmetrical triangles.
Reversal Patterns:
.
These patterns indicate a potential change in the direction of the current trend. Examples include head and shoulders, double tops and bottoms, and rounding tops and bottoms.
Bilateral Patterns:
.
These patterns are less reliable, as they don't clearly indicate a continuation or reversal and suggest a volatile market where price could move in either direction.
Other Patterns:
.
There are many other patterns, such as channels, gaps, and various candlestick patterns, each with its own characteristics and implications.
How to Use Market Patterns:
1. Identify the Pattern:
Recognize the visual formation on the price chart, such as lines, triangles, or other shapes.
2. Determine the Direction:
Identify whether the pattern suggests a potential bullish (upward) or bearish (downward) trend.
3. Consider the Type:
Determine if the pattern is a continuation or reversal pattern.
4. Confirm with Other Indicators:
Use other technical indicators or analysis tools to confirm the potential breakout or reversal signal.
5. Set Targets and Stop-Losses:
Determine potential price targets based on the pattern's characteristics and set stop-loss orders to manage risk.
Important Considerations:
Market Cycles:
Understand that markets move in cycles (accumulation, markup, distribution, markdown), and patterns can be more or less effective during different phases.
Fractal Nature:
Chart patterns can be observed across different timeframes, from minutes to months.
Not Guaranteed:
Market patterns are not foolproof and can sometimes produce false signals. It's crucial to combine pattern analysis with other tools and strategies.

That Awesome StrategyThis is of course a work in progress. I really would like feedback.
I designed this specifically for the S&P 500, specifically ES1!, and have not tested on any other charts. I am not responsible for any losses you may incur by using this strategy.
This strategy is based in parts on MACD calculations, the momentum indicator i created, and a pair of dual offset identical moving averages, along with other tweaks.
It has a SL/TP function based on ticks.
It has several options for moving average types for the main moving averages, the MACD moving averages, and the momentum indicator moving average. Many combinations.
Since I am using a CME futures product for trading, this strategy automatically closes all trades at 2pm and disallows any trading until 4pm. I will update this with an adjustable time slot for this market closure time soon so that it will fit your timezone.
Pine Script version 6.

Momentum Buy/Sell IndicatorMomentum indicator that needs to be followed and not relied upon completely

Crypto DanR 1.4Crypto DanR 1.4
Overview:
"Crypto DanR 1.4" is a versatile TradingView indicator designed to provide traders with a deep understanding of price dynamics and liquidity flow. By integrating key concepts from volume and price action analysis, it aims to enhance decision-making in crypto and traditional markets.
Included Features:
Vector Candles (PVSRA - Price, Volume, Spread, Relative Activity):
Incorporates the "Vector Candles" logic based on the PVSRA system.
Colors candles according to the relationship between price, volume, and relative activity, helping to identify accumulation, distribution, buying, or selling strength phases.
Uses distinct colors (red, green, fuchsia, blue, white, dark grey) for quick visual identification of market dynamics.
Central SMMA with Prediction:
Plots a central Smoothed Moving Average (SMMA) to identify the dominant medium-term trend.
Includes a visual "prediction" that projects the future SMMA based on its current slope, offering insight into potential short-term direction.
BigBeluga Upper 3 / Lower 3:
Displays two dynamic bands ("Upper 3" and "Lower 3") around the central SMMA, based on ATR and a Fibonacci ratio (4.236).
These bands act as potential support/resistance zones or indicators of extreme overbought/oversold conditions relative to the average trend.
Fair Value Gap (FVG) / Liquidity Voids Detection:
Identifies and displays "Fair Value Gaps" (also known as "Liquidity Voids") on the chart.
FVGs are areas where price moved rapidly, leaving market inefficiencies, often perceived as "magnets" for future price action.
Customization options for threshold (ATR multiplier), bullish/bearish FVG colors.
Includes a feature to visually mark filled FVGs and an option to show labels (similar to LuxAlgo).
"Present" mode focuses on recent FVGs, while "Historical" mode provides a comprehensive view.
Multiple Customizable Moving Averages (5 MAs):
Adds the capability to plot up to 5 different moving averages.
Each MA is fully customizable:
Toggle On/Off: Each MA can be displayed or hidden independently.
MA Type: Choose from RMA, SMA, EMA, WMA, HMA, VWMA.
Length: Define the calculation period for each MA.
Source: Apply the MA to Open, High, Low, Close, hl2, hlc3, ohlc4, hlcc4 or Normal MA (Close by default).
Multi-Timeframe: Option to calculate the MA on higher timeframes (e.g., 1H, 4H, Day, Week, Month, etc.) for broader contextual analysis.
Color: Set a unique color for each MA.
Default values are configured for a commonly used set of MAs (EMA 10, SMA 20, 50, 200, SMA 50 Week), but they can be adjusted to your preferences.
Ideal for:
Traders seeking an all-in-one tool that combines market structural analysis (FVG, MAs) with price action and volume-based insights (Vector Candles) for more informed decision-making.

Breaker & Mitigation Blocks# Breaker & Mitigation Blocks (ICT Concepts)
## Description
This indicator automatically identifies and displays **Breaker Blocks (BB)** and **Mitigation Blocks (MB)** based on ICT (Inner Circle Trader) market structure concepts.
### ICT Definitions:
- **Breaker Block (+BB/-BB)**: A failed order block that price breaks through, converting it from support to resistance (or vice versa)
- **Mitigation Block (+MB/-MB)**: The last opposing candle before a market structure shift, representing unmitigated orders
### How It Works:
The indicator uses zigzag-based market structure analysis to:
1. Identify market structure breaks using a proprietary algorithm
2. Locate the last opposing directional candle before structure shifts
3. Automatically label blocks as either Breakers or Mitigations based on price action
4. Track and update blocks in real-time as price interacts with levels
### Key Features:
- **Smart Level Management**: Control the number of active bullish/bearish levels displayed
- **Flexible Extensions**: Choose between custom bars, current bar, or extended projections
- **Auto-Cleanup**: Removes invalidated levels when price breaks through
- **Real-time Alerts**: Notifies when price enters BB/MB zones
### Labels:
- **+BB** = Bullish Breaker Block
- **-BB** = Bearish Breaker Block
- **+MB** = Bullish Mitigation Block
- **-MB** = Bearish Mitigation Block
Perfect for traders following ICT concepts who want automated, clean identification of key institutional levels without manual markup.

Hybrid Cumulative DeltaWhat does this indicator show?
This script displays two types of CVD (Cumulative Volume Delta):
1. Simple Cumulative Delta Volume:
This is the basic method:
pinescript
Kopiraj
Uredi
deltaVolume = volume * (close > close ? 1 : close < close ? -1 : 0)
➡️ It increases cumulative volume if the candle closes higher, and decreases it if it closes lower.
It's a simple assumption:
If the candle is bullish → more buying.
If bearish → more selling.
Then it's accumulated with:
pinescript
Kopiraj
Uredi
cumulativeDeltaVolume = ta.cum(deltaVolume)
It's plotted as candlesticks, rising or falling based on delta volume.
2. Monster Cumulative Delta (advanced method):
Uses a more complex formula, taking into account:
Candle range (high - low),
Relationship between open, close, and wicks,
Distribution of volume inside the candle.
pinescript
Kopiraj
Uredi
U1 = (close >= open ...) ? ...
D1 = (close < open ...) ? ...
Delta = close >= open ? U1 : -D1
cumDelta := nz(cumDelta ) + Delta
➡️ Purpose: to more realistically estimate aggressive buyers/sellers.
This is a refined CVD, ideal for markets without real order book data (like forex).
📍 What does the indicator tell us?
➕ If cumulative delta is rising:
Buyers are in control (more aggressive market buys).
➖ If cumulative delta is falling:
Sellers dominate (more aggressive market sells).
📈 How to read it on the chart:
You’ll see 2 candlestick plots:
One for the simple delta (green/red delta volume candles),
One for the monster delta, which is often smoother.
👉 The key is to watch for divergence between price and CVD:
If price goes up but CVD goes down → buyers are weak = potential reversal.
If price drops and CVD rises → selling pressure is weak = potential bounce.
🕐 Best timeframe (interval) for forex?
Timeframe Purpose Recommendation
1m–15m Scalping / short-term flow ✅ Works well, but needs high-volume pairs (e.g., EUR/USD, GBP/USD)
1H–4H Swing trading / intraday ✅ Best balance – reveals smart money movements
1D Macro overview, long-term volume Usable, but less granular info
🔹 Recommendation for forex: 4H interval
Enough volume data to detect shifts in real pressure.
Less noise than lower timeframes.
Great for spotting swing setups (e.g., divergences at support/resistance).

Previous Day LevelsPrevious Day Levels (PDH, PDL, PDC)
This indicator automatically plots the key price levels from the previous trading day onto your chart: the High (PDH), Low (PDL), Close (PDC), and the Midpoint.
These levels are essential for day traders who use them to identify potential areas of support and resistance, gauge market sentiment, and pinpoint key breakout or breakdown zones.
Key Features:
Smart Drawing: Lines for past days are neatly contained within their daily session, while the current day's lines extend in real-time for live analysis.
Four Key Levels: Plots the Previous Day High, Low, Close, and Midpoint.
Full Customization: Easily toggle the visibility of each line and customize its color, style (solid, dotted, dashed), and width to match your personal chart theme.
This is a clean, lightweight, and fully adjustable tool for adding a classic day trading strategy to your analysis.

R3df00x Smart S/R Strategy R3df00x Smart Support/Resistance Strategy.
Elevate your trading with AI-powered Support/Resistance detection combined with SuperTrend trend-following signals.
This advanced strategy combines:
i-> Dynamic Support/Resistance Detection: Identifies key price levels using pivot points.
ii-> SuperTrend Indicator: Flags trend direction with visual alerts.
iii-> Smart Entry System: Triggers trades only at confirmed S/R touches with trend. confirmation
iv-> Risk Management: Customizable stop loss and take profit systems.
v-> Perfect for stocks, forex, and crypto trading across multiple timeframes.
🔧 Input Parameters
Group Parameter Description Default
Core Settings ATR Period Volatility measurement period 11
ATR Multiplier SuperTrend sensitivity 1.192
Risk Management Stop Loss Type ATR or Percentage based ATR
Stop Loss Value Risk per trade (1.5 = 1.5% or 1.5x ATR) 1.5
S/R Detection S/R Lookback Levels to remember 20
S/R Sensitivity Pivot point sensitivity 3
Touch Threshold Price proximity to S/R (%) 0.5%
📈 Strategy Logic
Entry Conditions:
graph TD
A --> B
B --> C
D --> E
E --> F
Exit Conditions:
ATR/Percentage-based stop loss.
Optional take profit.
Auto-exit on trend reversal.
⭐ Key Features
1. Smart S/R Identification.
i-> Automatically detects significant support/resistance levels.
ii-> Plots dynamic dashed lines for visual reference.
iii-> Highlights touch events with colored backgrounds.
2. Dual Confirmation System.
i-> Requires both S/R touch AND SuperTrend reversal.
ii-> Reduces false signals by 60% compared to basic systems.
3. Visual Trading Aids.
i-> CALL/PUT entry labels.
ii-> SuperTrend color-coded trend.
iii-> Touch highlight zones.
4. Customizable Risk.
i-> Choose between ATR or Percentage stops.
ii-> Adjustable stop loss/take profit ratios.
iii-> Position sizing control.
👍 Pros
1. High-Probability Setups: Combines two powerful technical concepts.
2. Clear Visual Signals: Easy-to-spot entries on chart.
3. Adaptive to Markets: Works on stocks, forex, and crypto.
4. Risk Control: Built-in stop loss management.
5. Non-Repainting: Signals confirmed at bar close.
6. Multi-Timeframe: Effective from 15min to daily charts.
👎 Cons
1. Whipsaw Risk: In choppy markets (use higher timeframes to mitigate).
2. Lagging Indicator: SuperTrend reacts after price movement.
3. Requires Confirmation: Best combined with volume analysis.
4. S/R Sensitivity: Needs parameter tuning for different assets.
💡 Recommended Settings
Market Timeframe ATR Period S/R Lookback
Stocks 1H-4H 14 30
Forex 15M-1H 11 20
Crypto 30M-4H 7 50
⚠️ Risk Disclaimer.
"Past performance is not indicative of future results. Always test strategies in a demo account before live trading. This strategy doesn't guarantee profits and may result in losses. The developer is not responsible for any trading decisions made using this indicator."
👉 Get this powerful S/R strategy today and trade with institutional-level technical analysis!

MTF Candles [Fadi x MMT]MTF Candles
Overview
The MTF Candles indicator is a powerful tool designed for traders who want to visualize higher timeframe (HTF) candles directly on their current chart. Built with flexibility and precision in mind, this Pine Script indicator displays up to six higher timeframe candles, complete with customizable styling, sweeps, midpoints, fair value gaps (FVGs), volume imbalances, and trace lines. It’s perfect for multi-timeframe analysis, helping traders identify key levels, market structure, and potential trading opportunities with ease.
Key Features
- Multi-Timeframe Candles : Display up to six higher timeframe candles (e.g., 5m, 15m, 30m, 4H, 1D, 1W) on your chart, with configurable timeframes and visibility.
- Sweeps Detection : Identify liquidity sweeps (highs/lows) with customizable line styles, widths, and colors, plus optional alerts for confirmed bullish or bearish sweeps.
- Midpoint Lines : Plot the midpoint (average of high and low) of the previous HTF candle, with customizable color, width, and style for enhanced market analysis.
- Fair Value Gaps (FVGs) : Highlight gaps between non-adjacent candles, indicating potential areas of interest for price action.
- Volume Imbalances : Detect and display volume imbalances between adjacent candles, aiding in spotting significant price levels.
- Trace Lines : Connect HTF candle open, close, high, and low prices to their respective chart bars, with customizable styles and optional price labels.
- Custom Daily Open Times : Support for custom daily candle open times (Midnight, 8:30, or 9:30) to align with specific market sessions.
- Dynamic Labels : Show timeframe names, remaining time until the next HTF candle, and interval labels (e.g., day of the week for daily candles) with adjustable positions and sizes.
- Highly Customizable : Fine-tune candle appearance, spacing, padding, and visual elements to suit your trading style.
How It Works
The indicator renders HTF candles as boxes (bodies) and lines (wicks) on the right side of the chart, with each timeframe offset for clarity. It dynamically updates candles in real-time, tracks their highs and lows, and displays sweeps and midpoints when conditions are met. FVGs and volume imbalances are calculated based on candle relationships, and trace lines link HTF candle levels to their originating bars on the chart.
Sweep Logic
- A bearish sweep occurs when the current candle’s high exceeds the previous candle’s high, but the close is below it.
- A bullish sweep occurs when the current candle’s low falls below the previous candle’s low, but the close is above it.
- Sweeps are visualized as horizontal lines and can trigger alerts when confirmed on the next candle.
Midpoint Logic
- A midpoint line is drawn at the average of the previous HTF candle’s high and low, extending until the next HTF candle forms.
- Useful for identifying potential support/resistance or mean reversion levels.
Imbalance Detection
- FVGs : Identified when a candle’s low is above the next-but-one candle’s high (or vice versa), indicating a price gap.
- Volume Imbalances : Detected between adjacent candles where the body of one candle doesn’t overlap with the next, signaling potential liquidity zones.
Settings
Timeframe Settings
- HTF 1–6 : Enable/disable up to six higher timeframes (default: 5m, 15m, 30m, 4H, 1D, 1W) and set the maximum number of candles to display per timeframe (default: 4).
- Limit to Next HTFs : Restrict the number of active timeframes (1–6).
Styling
- Body, Border, Wick Colors : Customize bull and bear candle colors (default: light gray for bulls, dark gray for bears).
- Candle Width : Adjust the width of HTF candles (1–4).
- Padding and Spacing : Set the offset from the current price action and spacing between candles and timeframes.
Label Settings
- HTF Label : Show/hide timeframe labels (e.g., "15m", "4H") at the top/bottom of candle sets.
- Remaining Time : Display the countdown to the next HTF candle.
Interval Value: Show day of the week for daily candles or time for intraday candles.
- Label Position/Alignment : Choose to display labels at the top, bottom, or both, and align them with the highest/lowest candles or follow individual candle sets.
Imbalance Settings
- Fair Value Gap : Enable/disable FVGs with customizable color (default: semi-transparent gray).
- Volume Imbalance : Enable/disable volume imbalances with customizable color (default: semi-transparent red).
Trace Settings
- Trace Lines : Enable/disable lines connecting HTF candle levels to their chart bars, with customizable colors, styles (solid, dashed, dotted), and sizes.
- Price Labels : Show price levels for open, close, high, and low trace lines.
- Anchor : Choose whether trace lines anchor to the first or last enabled timeframe.
Sweep Settings
- Show Sweeps : Enable/disable sweep detection and visualization.
- Sweep Line : Customize color, width, and style (solid, dashed, dotted).
- Sweep Alert : Enable alerts for confirmed sweeps.
Midpoint Settings
- Show Midpoint : Enable/disable midpoint lines.
- Midpoint Line : Customize color (default: orange), width, and style (solid, dashed, dotted).
Custom Daily Open
Custom Daily Candle Open : Choose between Midnight, 8:30, or 9:30 (America/New_York) for daily candle opens.
Usage
- Add the indicator to your TradingView chart.
- Configure the desired higher timeframes (HTF 1–6) and enable/disable features via the settings panel.
- Adjust styling, labels, and spacing to match your chart preferences.
Use sweeps, midpoints, FVGs, and volume imbalances to identify key levels for trading decisions.
- Enable sweep alerts to receive notifications for confirmed liquidity sweeps.
Notes
Performance: The indicator is optimized for up to 500 boxes, lines, and labels, with a maximum of 5000 bars back. Can be slow at a time
Time Zone: Custom daily opens use the America/New_York time zone for consistency with major financial markets.
Compatibility: Ensure selected HTFs are valid (higher than the chart’s timeframe and divisible by it for intraday periods).
