TTT Sentiment IndicatorThis indicator plots the NYSE uptick vs. downtick volume ratios and can be used as a short-term sentiment indicator of buying pressure (FOMO) when UVOL/DVOL is high and selling pressure (panic selling) when DVOL/UVOL is high. These ratios are used informally by Chris Vermeulen of The Technical Traders as a contrarian indicator on a 30 minute chart.
This script isn't created, approved, or supported by The Technical Traders, but was created by a TTT subscriber to support the request of other subscribers. I'm not planning to upgrade or support this indicator or answer questions on how to use it. It's open source, so users can make their own copy and edit as they see fit.
Indicators and strategies

Gold Power Hours Strategy📈 Gold Power Hours Trading Strategy
Trade XAUUSD (Gold) or XAUEUR during the most volatile hours of the New York session, using momentum and trend confirmation, with session-specific risk/reward profiles.
✅ Strategy Rules
🕒 Valid Trading Times ("Power Hours"):
Trades are only taken during high-probability time windows on Tuesdays, Wednesdays, and Thursdays , corresponding to key New York session activity:
Morning Session:
08:00 – 11:00 (NY time)
Afternoon Session:
12:30 – 16:00
19:00 – 22:00
These times align with institutional activity and economic news releases.
📊 Technical Indicators Used:
50-period Simple Moving Average (SMA50):
Identifies the dominant market trend.
14-period Relative Strength Index (RSI):
Measures market momentum with session-adjusted thresholds.
🟩 Buy Signal Criteria:
Price is above the 50-period SMA (bullish trend)
RSI is greater than:
60 during Morning Session
55 during Afternoon Session
Must be during a valid day (Tue–Thu) and Power Hour session
🟥 Sell Signal Criteria:
Price is below the 50-period SMA (bearish trend)
RSI is less than:
40 during Morning Session
45 during Afternoon Session
Must be during a valid day and Power Hour session
🎯 Trade Management Rules:
Morning Session (08:00–11:00)
Stop Loss (SL): 50 pips
Take Profit (TP): 150 pips
Risk–Reward Ratio: 1:3
Afternoon Session (12:30–16:00 & 19:00–22:00)
Stop Loss (SL): 50 pips
Take Profit (TP): up to 100 pips
Risk–Reward Ratio: up to 1:2
⚠️ TP is slightly reduced in the afternoon due to typically lower volatility compared to the morning session.
📺 Visuals & Alerts:
Buy signals: Green triangle plotted below the bar
Sell signals: Red triangle plotted above the bar
SMA50 line: Orange
Valid session background: Light pink
Alerts: Automatic alerts for buy/sell signals

Fempires (9 SMA + 21 EMA)Fempires (9 SMA + 21 EMA) Trading Indikator
This indicator is a simple yet effective trend-following tool based on the relationship between the 9-period Simple Moving Average (SMA) and the 21-period Exponential Moving Average (EMA). It visually highlights bullish and bearish conditions using dynamic color changes and a shaded zone between the two lines.
🔍 How It Works:
Green color indicates that the price is trading above the 21 EMA → Bullish bias
Red color shows that the price is trading below the 21 EMA → Bearish bias
The shaded area between the 9 SMA and 21 EMA helps you quickly identify momentum and potential trend reversals
📈 Ideal For:
Trend-following strategies
Entry/exit confirmation
Visual clarity in fast-moving markets
⚙️ Settings:
9-period SMA (fast trend)
21-period EMA (slow trend)
No complicated signals – just clear, visual guidance for intraday, swing, or scalping trades.

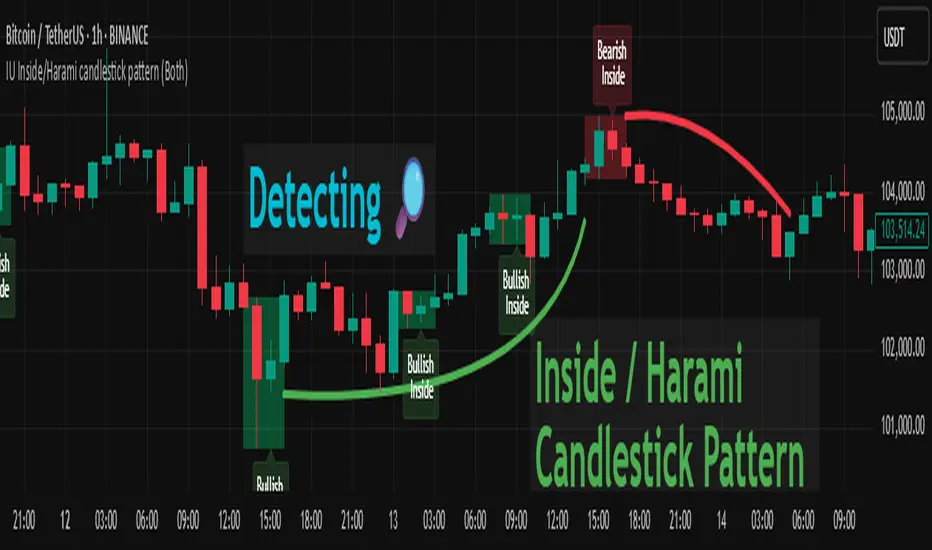
IU Inside/Harami candlestick patternDESCRIPTION
The IU Inside/Harami Candlestick Pattern indicator is designed to detect bullish and bearish inside bar formations, also known as Harami patterns. This tool gives users flexibility by allowing pattern detection based on candle wicks, bodies, or a combination of both. It highlights detected patterns using colored boxes and optional text labels on the chart, helping traders quickly identify areas of consolidation and potential reversals.
USER INPUTS :
Pattern Recognition Based on =
Choose between "Wicks", "Body", or "Both" to determine how the inside candle pattern is identified.
Show Box =
Toggle the appearance of colored boxes that highlight the pattern zone.
Show Text =
Toggle on-screen labels for "Bullish Inside" or "Bearish Inside" when patterns are detected.
INDICATOR LOGIC :
Bullish Inside Bar (Harami) is detected when:
* The current candle's high is lower and low is higher than the previous candle (wick-based),
* or the current candle’s open and close are inside the previous candle’s body (body-based),
* and the current candle is bullish while the previous is bearish.
Bearish Inside Bar (Harami) is detected when:
* The current candle's high is lower and low is higher than the previous candle (wick-based),
* or the current candle’s open and close are inside the previous candle’s body (body-based),
* and the current candle is bearish while the previous is bullish.
The user can choose wick-based, body-based, or both logics for pattern confirmation.
Boxes are drawn between the highs and lows of the pattern, and alert messages are generated upon confirmation.
Optional labels show the pattern name for quick visual identification.
WHY IT IS UNIQUE :
Offers three different logic modes: wick-based, body-based, or combined.
Highlights patterns visually with customizable boxes and labels.
Includes built-in alerts for immediate notifications.
Uses clean and transparent plotting without repainting.
HOW USER CAN BENEFIT FROM IT :
Receive real-time alerts when Inside/Harami patterns are formed.
Use the boxes and text labels to spot price compression zones and breakout potential.
Combine it with other tools like trendlines or support/resistance for enhanced accuracy.
Suitable for scalpers, swing traders, and price action traders looking to trade inside bar breakouts or reversals.
DISCLAIMER :
This indicator is not financial advice, it's for educational purposes only highlighting the power of coding( pine script) in TradingView, I am not a SEBI-registered advisor. Trading and investing involve risk, and you should consult with a qualified financial advisor before making any trading decisions. I do not guarantee profits or take responsibility for any losses you may incur.
Clean 20/40/60 High/Low LabelsIPDA Data Ranges
Works on all timeframes
20 period high and low, 40 period high and low, and 60 period high and low
This helps to identify large cycles on the daily and 4H chart
Can also be useful at liquidity injections and opening and closing prices of the market.


MTF Trend + SMC Structure (EMA/SMA Mix - HH/HL)Objective
To provide a quick, visual, and reliable reading of market trends and structure.
Combines dynamic moving averages and SMC (market structure) logic.
Effectively integrates into the chart via a clear table displayed in the top right corner.
📊 What the indicator displays (by timeframe: M5, M15, M30, H1, H4, D1, W1)
🟢 1. MA Trend
Based on two moving averages (short and long).
Average Type:
EMA for M5 to M30 (reactive)
SMA for H1 to Weekly (smoother)
Display:
🟢 Up if short MA > long MA
🔴 Down if short MA < long MA
Customizable lengths per timeframe
🧱 2. Structure (SMC logic)
Detects Higher High / Higher Low and Lower High / Lower Low
Based on significant pivots (pivothigh, pivotlow)
Logic inspired by SMC swing trading
Display:
🟢 Up = bullish structure (HH + HL)
🔴 Down = bearish structure (LH + LL)
⚪ Neutral = no clear structure
✅ Advantages
🔍 Instant view of the overall multi-timeframe context
📉 Combines trend by MA and SMC structure
🎯 Helps filter out bad entries Countertrend
⚡️ Very useful for intraday, swing, or SMC traders

FutureObitz Official Bank Levels// © 2025 FutureObitz - Custom version for private use
This Bank Levels indicator automatically calculates daily high, low, mid, and premium/discount zones using dynamic ranges.
Ideal for intraday traders using supply/demand, liquidity concepts, and institutional levels. Labels are cleanly aligned and update once per day for minimal chart clutter.
This version was customized for my personal trading style and refined for visual clarity.

Smart Money Premium | Made by EF (Improved)📊 Smart Money Premium | Made by EF (Improved)
A powerful all-in-one toolkit built for Smart Money / ICT traders.
It helps you clearly identify market structure, liquidity, order blocks, fair value gaps, and high-probability entry signals — all visualized directly on your chart.
✨ Key features:
✅ Automatic detection of Swing High / Swing Low points
✅ Real-time BOS / CHOCH (Break of Structure / Change of Character) labeling
✅ Dynamic Order Blocks with adjustable duration and color
✅ Detection of Fair Value Gaps (FVG) and visualization with customizable zones
✅ Liquidity zones (EQH/EQL) with tolerance settings
✅ Smart Swing Failure Patterns (SFP) with instant labels
✅ Built-in Kill Zones for London & New York sessions
✅ Automatic adaptation of key parameters to your timeframe
✅ Volume filter for additional signal confirmation
✅ Clear SL/TP levels with customizable Risk:Reward
✅ Interactive status panel showing trend, structure, session, and live signal readiness
⚙️ How to use:
1️⃣ Add the indicator to your chart
2️⃣ Choose your preferred settings (or let it auto-tune by timeframe)
3️⃣ Follow the on-chart signals: BOS, CHOCH, SFP, OB & FVG zones
4️⃣ Use the SL/TP levels and Risk:Reward built into each signal to plan your trades
✅ Designed for:
• Traders who follow Smart Money Concepts / ICT methodology
• Those who want a clean, visual and data-driven approach
• Both beginners and advanced traders looking to save time and keep discipline
🛠 All logic is transparent and customizable — colors, lookback periods, OB/FVG duration, liquidity sensitivity and more.
🔔 Alerts included for Long and Short setups.

Highlight Candles with Open-Close Difference ≥ 24momentum candle. price starts big move or continue momentum on either side.

Adj Momentum (3M / 6M / 12M)Mirza Salman Volatility Adjusted Momentum.
The Volatility Adjusted Momentum Indicator distills a security’s recent performance into a single, decision-ready metric that captures both the velocity and the reliability of its trend. By simultaneously rewarding sustained price appreciation and discounting erratic fluctuations, the indicator highlights those stocks that are not only advancing but doing so with a consistent, low-volatility profile—attributes typically favoured by quantitative momentum and trend-following frameworks. A high positive reading points to instruments exhibiting strong, orderly upward trajectories, making them prime candidates for capital allocation in momentum-oriented portfolios. Conversely, muted or negative readings reveal markets whose returns have been lacklustre, unstable, or downward-sloping, signalling that they warrant caution or exclusion. In practice, this indicator enables portfolio managers and traders to rank broad watch-lists swiftly, focus due-diligence on the most robust price leaders, and enforce systematic discipline in scaling back exposure to choppier, less reliable names—all without resorting to subjective chart interpretation or ad-hoc volatility filters.

GalihRidha ZoneX — Adaptive MTF S&R + Smart Money AreasWelcome to ZoneX: The new frontier of Support & Resistance for modern traders!
ZoneX is more than just S&R — it’s a hybrid price map that fuses classic pivots with institutional logic, visualizing the zones that really matter.
What Makes ZoneX Different?
Multi-Timeframe S&R:
Instantly spot the true key levels from higher timeframes, not just what everyone else sees on the current chart.
Smart Money Order Blocks:
Automatically highlights supply and demand zones where institutions accumulate or distribute — find the real “trap” areas and avoid getting faked out.
VWAP Bands:
See where the liquidity is thickest — these bands act as magnets for price, great for both reversals and breakouts.
Midline Channel:
Identify the market’s equilibrium — know when you’re in value and when you’re at the edge.
Previous High/Low:
Mark institutional magnets and classic stop-hunt zones, updated in real-time.
Ultra Customizable:
One-click to enable/disable any feature. Clean for minimalists, packed for pros.
How to Use ZoneX
Breakout?
Wait for price to clear a ZoneX band or order block with momentum — enter on the retest.
Reversal?
Fade wicks and exhaustion right in the highlighted zone — confirm with price action or volume.
Range/Balance?
Trade the ping-pong between ZoneX midline and outer bands — great for scalping and mean reversion.
Who’s It For?
Active traders who want an edge beyond standard S&R.
Institutional-mindset scalpers and swing traders.
Anyone who loves a clean chart but craves real market context.
Level up your chart, see what the big players see —
and never trade blind again. This is ZoneX.

OTC supply & demand Candleshi traders and OTC colleagues,
this simple indicator used to spot easly the (indecisive , decisive , explosive) candles
i suggest to keep the candle boarders from the chart setting (blue or green for bullish ) and (red for bearish) . this indicator simplify spotting the supply and demand zones and the most powerful explosive candles in eye plink based on Bernd Skorupinski
theory.
from indicator setting
colour 0 (indecisive)
colour 1 (decisive) bullish
colour 2 (decisive) bearish
colour 3 (explosive) bullish
colour 4 (explosive) bearish
you can change the colour as u wish.
have a good trading day

OTC supply & demand Candleshi traders and OTC colleagues,
this simple indicator used to spot easly the (indecisive , decisive , explosive) candles
i suggest to keep the candle boarders from the chart setting (blue or green for bullish ) and (red for bearish) . this indicator simplify spotting the supply and demand zones and the most powerful explosive candles in eye plink based on Bernd Skorupinski
theory.
from indicator setting
colour 0 (indecisive)
colour 1 (decisive) bullish
colour 2 (decisive) bearish
colour 3 (explosive) bullish
colour 4 (explosive) bearish
you can change the colours as u wish.
have a good trading day

Average Volume (Millions) On ChartThe indicator shows the average number Volume in the period of time of your decision

ADX and DI – Clean Trend IndicatorADX and DI – Clean Trend Indicator helps traders identify trending conditions and the strength of a trend using the classic Average Directional Index (ADX) along with the +DI and -DI directional movement lines.
ADX (orange line) shows overall trend strength.
+DI (green line) and -DI (red line) reveal bullish or bearish pressure.
When ADX is above the threshold (default 25), the background turns green to highlight strong trending conditions — a great time to apply trend-following strategies.
This script offers:
A visually clean layout
Configurable ADX length and strength threshold
Automatic background highlighting when strong trends are detected
Use this tool to confirm market momentum, avoid sideways chop, and enhance your entry timing for breakout or pullback setups.

Volume Breakout SignalsScript by Hanssome
The Volume Breakout Signals indicator is a trading tool designed to identify potential entry points by pinpointing high-momentum price breakouts on your main chart. It operates on a simple but powerful principle: a true breakout should be supported by a significant increase in trading volume.
The indicator plots two primary visual elements on your price chart:
Pivot Highs and Lows: These are marked with green and red circles and represent the most recent significant swing points in the price. They act as dynamic support and resistance levels, and the script watches for the price to break past them.
BUY and SELL Labels: These signals appear directly on the chart to indicate a potential trading opportunity.
A signal is only generated when two specific conditions are met simultaneously:
Price Breakout: A BUY signal requires the price to cross decisively above the most recent pivot high. A SELL signal requires the price to cross below the most recent pivot low.
Volume Confirmation: This price breakout must be accompanied by a recent spike in trading volume. This confirmation suggests strong momentum and conviction behind the move, increasing the probability of a successful breakout.
All the parameters, such as the sensitivity of the pivot points and the definition of a volume spike, can be adjusted in the indicator's settings to fit your specific trading style and the asset you are viewing.

Volume VisualizerVolume by Hannsome
The Volume Visualizer is a simple yet effective tool designed to display trading volume in a dedicated panel below the main price chart. Its primary goal is to help you easily identify when trading activity is significantly higher than usual.
The indicator plots two key elements:
Volume Bars: These are standard volume bars showing the amount of trading activity for each period. To draw your attention to important moments, bars with unusually high volume are highlighted in a distinct color (yellow by default).
Average Volume Line: A moving average line (orange by default) is plotted over the volume bars. This line represents the recent average trading volume, giving you a clear baseline to compare the current volume against.
A "significant" volume spike is defined as any period where the volume exceeds the moving average by a certain multiplier. You can adjust both the moving average length and this multiplier in the indicator's settings to fine-tune its sensitivity to what you consider a significant spike in activity.

OBV MACD IndicatorI have added alert function providing the ability to add an alert when either a long or short signal is detected.
The original script is OBV MACD Indicator by RafaelZioni

Hurst Exponent DFAThis script computes the Hurst exponent using Detrended Fluctuation Analysis (DFA) in TradingView. It works as follows:
- It takes a user-defined lookback window of closing prices and centers them by subtracting their mean.
- It builds a cumulative profile of these centered values.
- For each sample size input by the user, it divides the profile into non-overlapping segments, fits a local linear trend in each segment, and measures the root-mean-square fluctuation around that trend.
- It then performs a log–log regression of the average fluctuation versus segment size to estimate the Hurst exponent H.
- An optional exponential moving average smooths the Hurst series to reduce noise.
- A horizontal line at H = 0.5 helps distinguish trending regimes (H > 0.5) from mean-reverting regimes (H < 0.5).

The Great Anchors: Dual AVWAP Powered by RSI
The Great Anchors
*Dual Anchored Volume Weighted Average Price Powered by RSI*
---
📌 Overview
The Great Anchors is a dual AVWAP-based indicator that resets dynamically using RSI extremes — either from the current asset or a master symbol (e.g., BTCUSDT). It identifies meaningful shifts in price structure and momentum using these "anchored" levels.
It’s designed to help traders spot trend continuations, momentum inflection points, and entry signals aligned with overbought/oversold conditions — but only when the market confirms through volume-weighted price direction.
---
🛠 Core Logic
• AVWAP 1 (favwap): Anchored when RSI reaches overbought levels (top anchor)
• AVWAP 2 (savwap): Anchored when RSI reaches oversold levels (bottom anchor)
• AVWAPs are recalculated each time a new OB/OS condition is triggered — acting like "fresh anchors" at key market turning points.
---
⚙️ Key Features
🔁 Auto or Manual RSI Thresholds
→ Automatically determines dynamic RSI OB/OS levels based on past peaks and troughs, or lets you set fixed levels.
🧠 Master Symbol Control
→ Use the RSI of a separate asset (like BTCUSDT, ETHUSDT, SOLUSDT, BNBUSDT, SUPRAUSDT) or indices (like TOTAL, TOTAL2, BFR) to control resets — ideal for tracking how BTC/major coins impacts altcoins/others.
🔍 Trend-Filtering Signal Logic
→ Signals are filtered for less noise and are triggered when:
- Both AVWAPs are rising (bullish) or falling (bearish)
- Price action confirms the structure
🎯 Visual Markers & Alerts
→ "💥" for bullish signals and "🔥" for bearish ones. Alerts included for automation or push notifications.
---
🎯 How to Use It
1. Add the indicator to your chart.
2. Choose whether to use RSI from the current symbol or a master symbol (e.g., BTC).
3. Select auto-adjusted or manual OB/OS levels.
4. Watch for:
- AVWAP(s) making a significant change (at this point it's one of the AVWAPs resetting)
- Check if price flip it upwards or downwards
- If price goes above both AVWAPs thats a likely bullish trend
- If price can't go above both AVWAPs up and fall bellow both that's a likely bearish trend
- Price retesting upper AVWAP and bounce
- likely bullish continuation
- Price retesting lower AVWAP and dip
- likely bearish continuation
- Signal icons on chart ("💥 - Bullish" or "🔥- Bearish")
Best suited for:
• Swing traders
• Momentum traders
• Traders timing altcoin entries using BTC/Major asset's RSI
---
🔔 Signal Explanation
💥 Bullish Signal =
• Both AVWAPs rising
• Higher lows in price structure
• Bullish candle close
• Triggered from overbought RSI reset
🔥 Bearish Signal =
• Both AVWAPs falling
• Lower highs in price structure
• Bearish candle close
• Triggered from oversold RSI reset
Signals reset by opposite signals to prevent noise or overfitting.
---
⚠️ Tips & Notes
• Use AVWAPs as dynamic support/resistance, even without signal triggers
• Pair with volume or divergence tools for stronger confirmation
---
🧩 Credits & Philosophy
This tool is built with a simple philosophy:
"Anchor your trades to meaningful moments in price — not arbitrary time."
The dual AVWAP concept helps you see how price reacts after momentum peaks, giving you a cleaner bias and more precise trade setups.
---

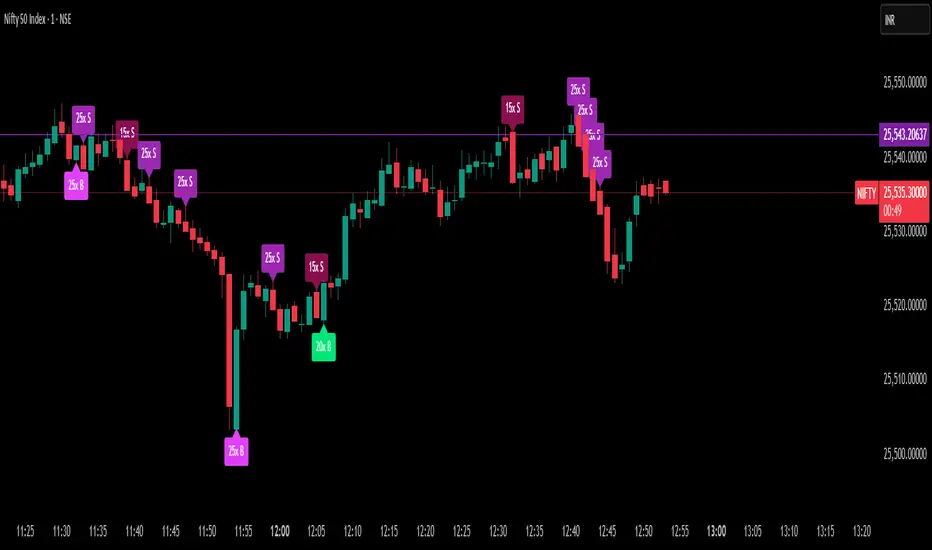
Delta Spike Detector [GSK-VIZAG-AP-INDIA]📌 Delta Spike Detector – Volume Imbalance Ratio
By GSK-VIZAG-AP-INDIA
📘 Overview
This indicator highlights aggressive buying or selling activity by analyzing the imbalance between estimated Buy and Sell volume per candle. It flags moments when one side dominates the other significantly — defined by user-selectable volume ratio thresholds (10x, 15x, 20x, 25x).
📊 How It Works
Buy/Sell Volume Estimation
Approximates buyer and seller participation using candle structure:
Buy Volume = Proximity of close to low
Sell Volume = Proximity of close to high
Delta & Delta Ratio
Delta = Buy Volume − Sell Volume
Delta Ratio = Ratio of dominant volume side to the weaker side
When this ratio exceeds a threshold, it’s classified as a spike.
Spike Labels
Labels are plotted on the chart:
10x B, 15x B, 20x B, 25x B → Buy Spike Labels (below candles)
10x S, 15x S, 20x S, 25x S → Sell Spike Labels (above candles)
The color of each label reflects the spike strength.
⚙️ User Inputs
Enable/Disable Buy or Sell Spikes
Set custom delta ratio thresholds (default: 10x, 15x, 20x, 25x)
🎯 Use Cases
Spotting sudden aggressive activity (e.g. smart money moves, traps, breakouts)
Identifying short-term market exhaustion or momentum bursts
Complementing other trend or volume-based tools
⚠️ Important Notes
The script uses approximated Buy/Sell Volume based on price position, not actual order flow.
This is not a buy/sell signal generator. It should be used in context with other confirmation indicators or market structure.
✍️ Credits
Developed by GSK-VIZAG-AP-INDIA
For educational and research use only.
High Volume Buyers/SellersThis indicator will help you indicate wether breakout happened with high volume or not
